
The Télé’Son U43 kit is an electronic board for fitting out your own Socotel U43 telephone, the Bakelite model made from 1943 onwards. It is a standalone audio player that plays the sounds stored on a microSD card (sold separately), in MP3 and WAV formats. Find it here, in the shop.
Do you have a Socotel S63? It has its own manual: Télé'Son S63 kit.
Quick overview
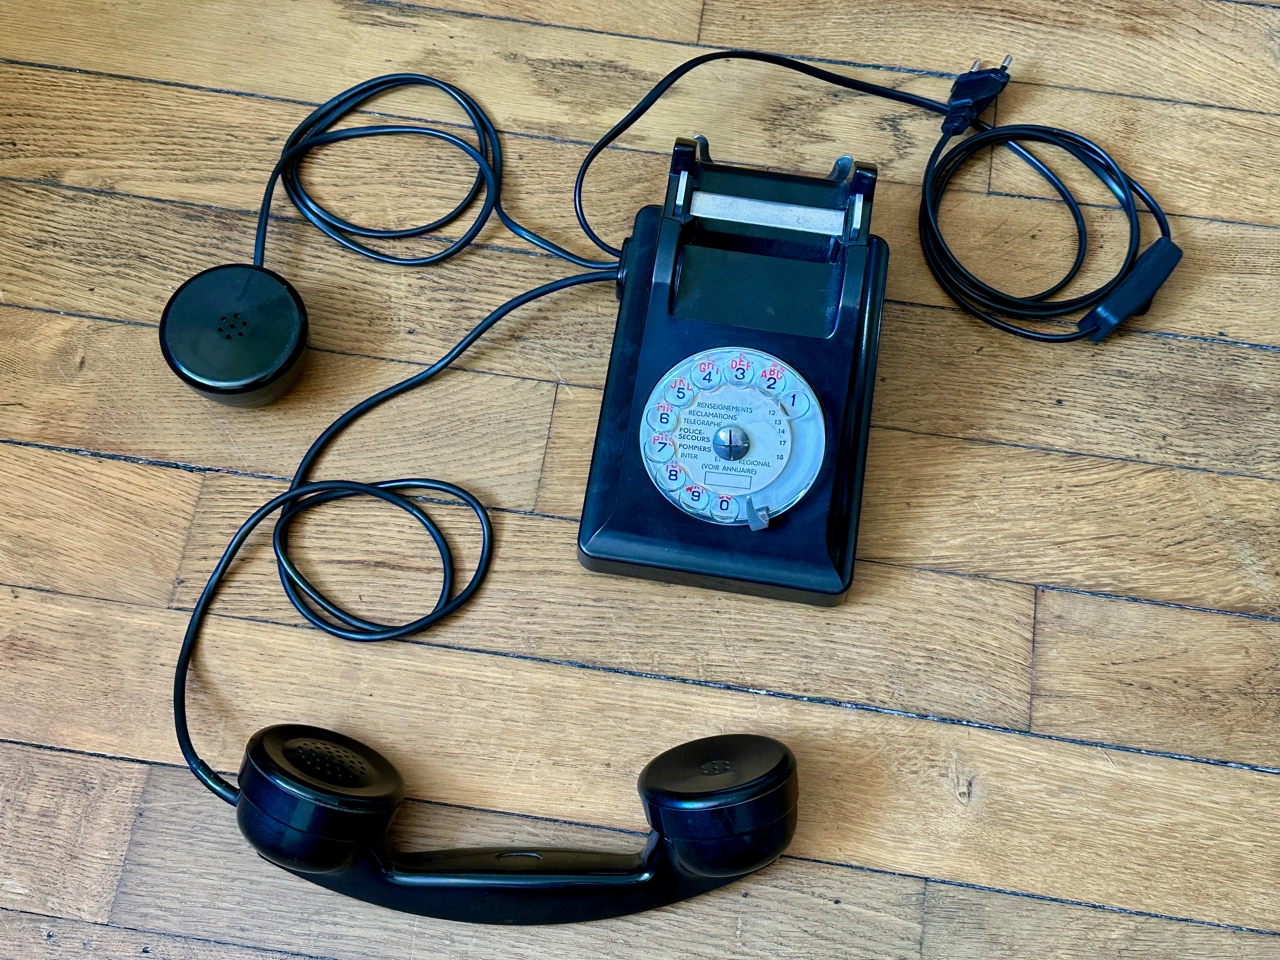
This board lets you fit out a Socotel U43. It carries an audio file player that plays the sounds on a microSD card, in MP3 (recommended) and WAV (up to 48 kHz / 16 bits) formats, as soon as the handset is picked up or the dial is turned (depending on your settings). The U43 only ever existed with a rotary dial.
The components are already soldered and the Nano is already programmed. The kit also includes the small plastic spacers used to fix the board inside the telephone. The telephone and the installation work are not included.
Fully equipped models are regularly for sale in the BigSoundBank shop. If none is available, contact me: I have some in stock, and I can even fit out your own telephones to order.
I made this board myself. Research and development, circuit board design, right down to soldering the components: it is all done by my own hands.
Fitted with an Arduino "Nano" type microcontroller, it can be reprogrammed by the more hands-on among you, to make it do whatever you like. Here are a few examples of what it can do:
- A "Quiz'O'Phone" with a single question or several questions, Christmas special.
- An escape game prop.
- An old, poetic hotel telephone.
- Etc.
If you are really hands-on and want to build your own installation from A to Z, follow this tutorial.
Warning
Caution: the board is sold without a case, and the bottom of a U43 is made of metal. Slip a thin piece of cardboard between that bottom and the board, and install the board in the telephone before powering it: nothing conductive must touch it, or there is a risk of a short circuit. It is powered only through its 7 to 12 V socket: 230 V mains electricity is dangerous, never connect it to the board.
In detail
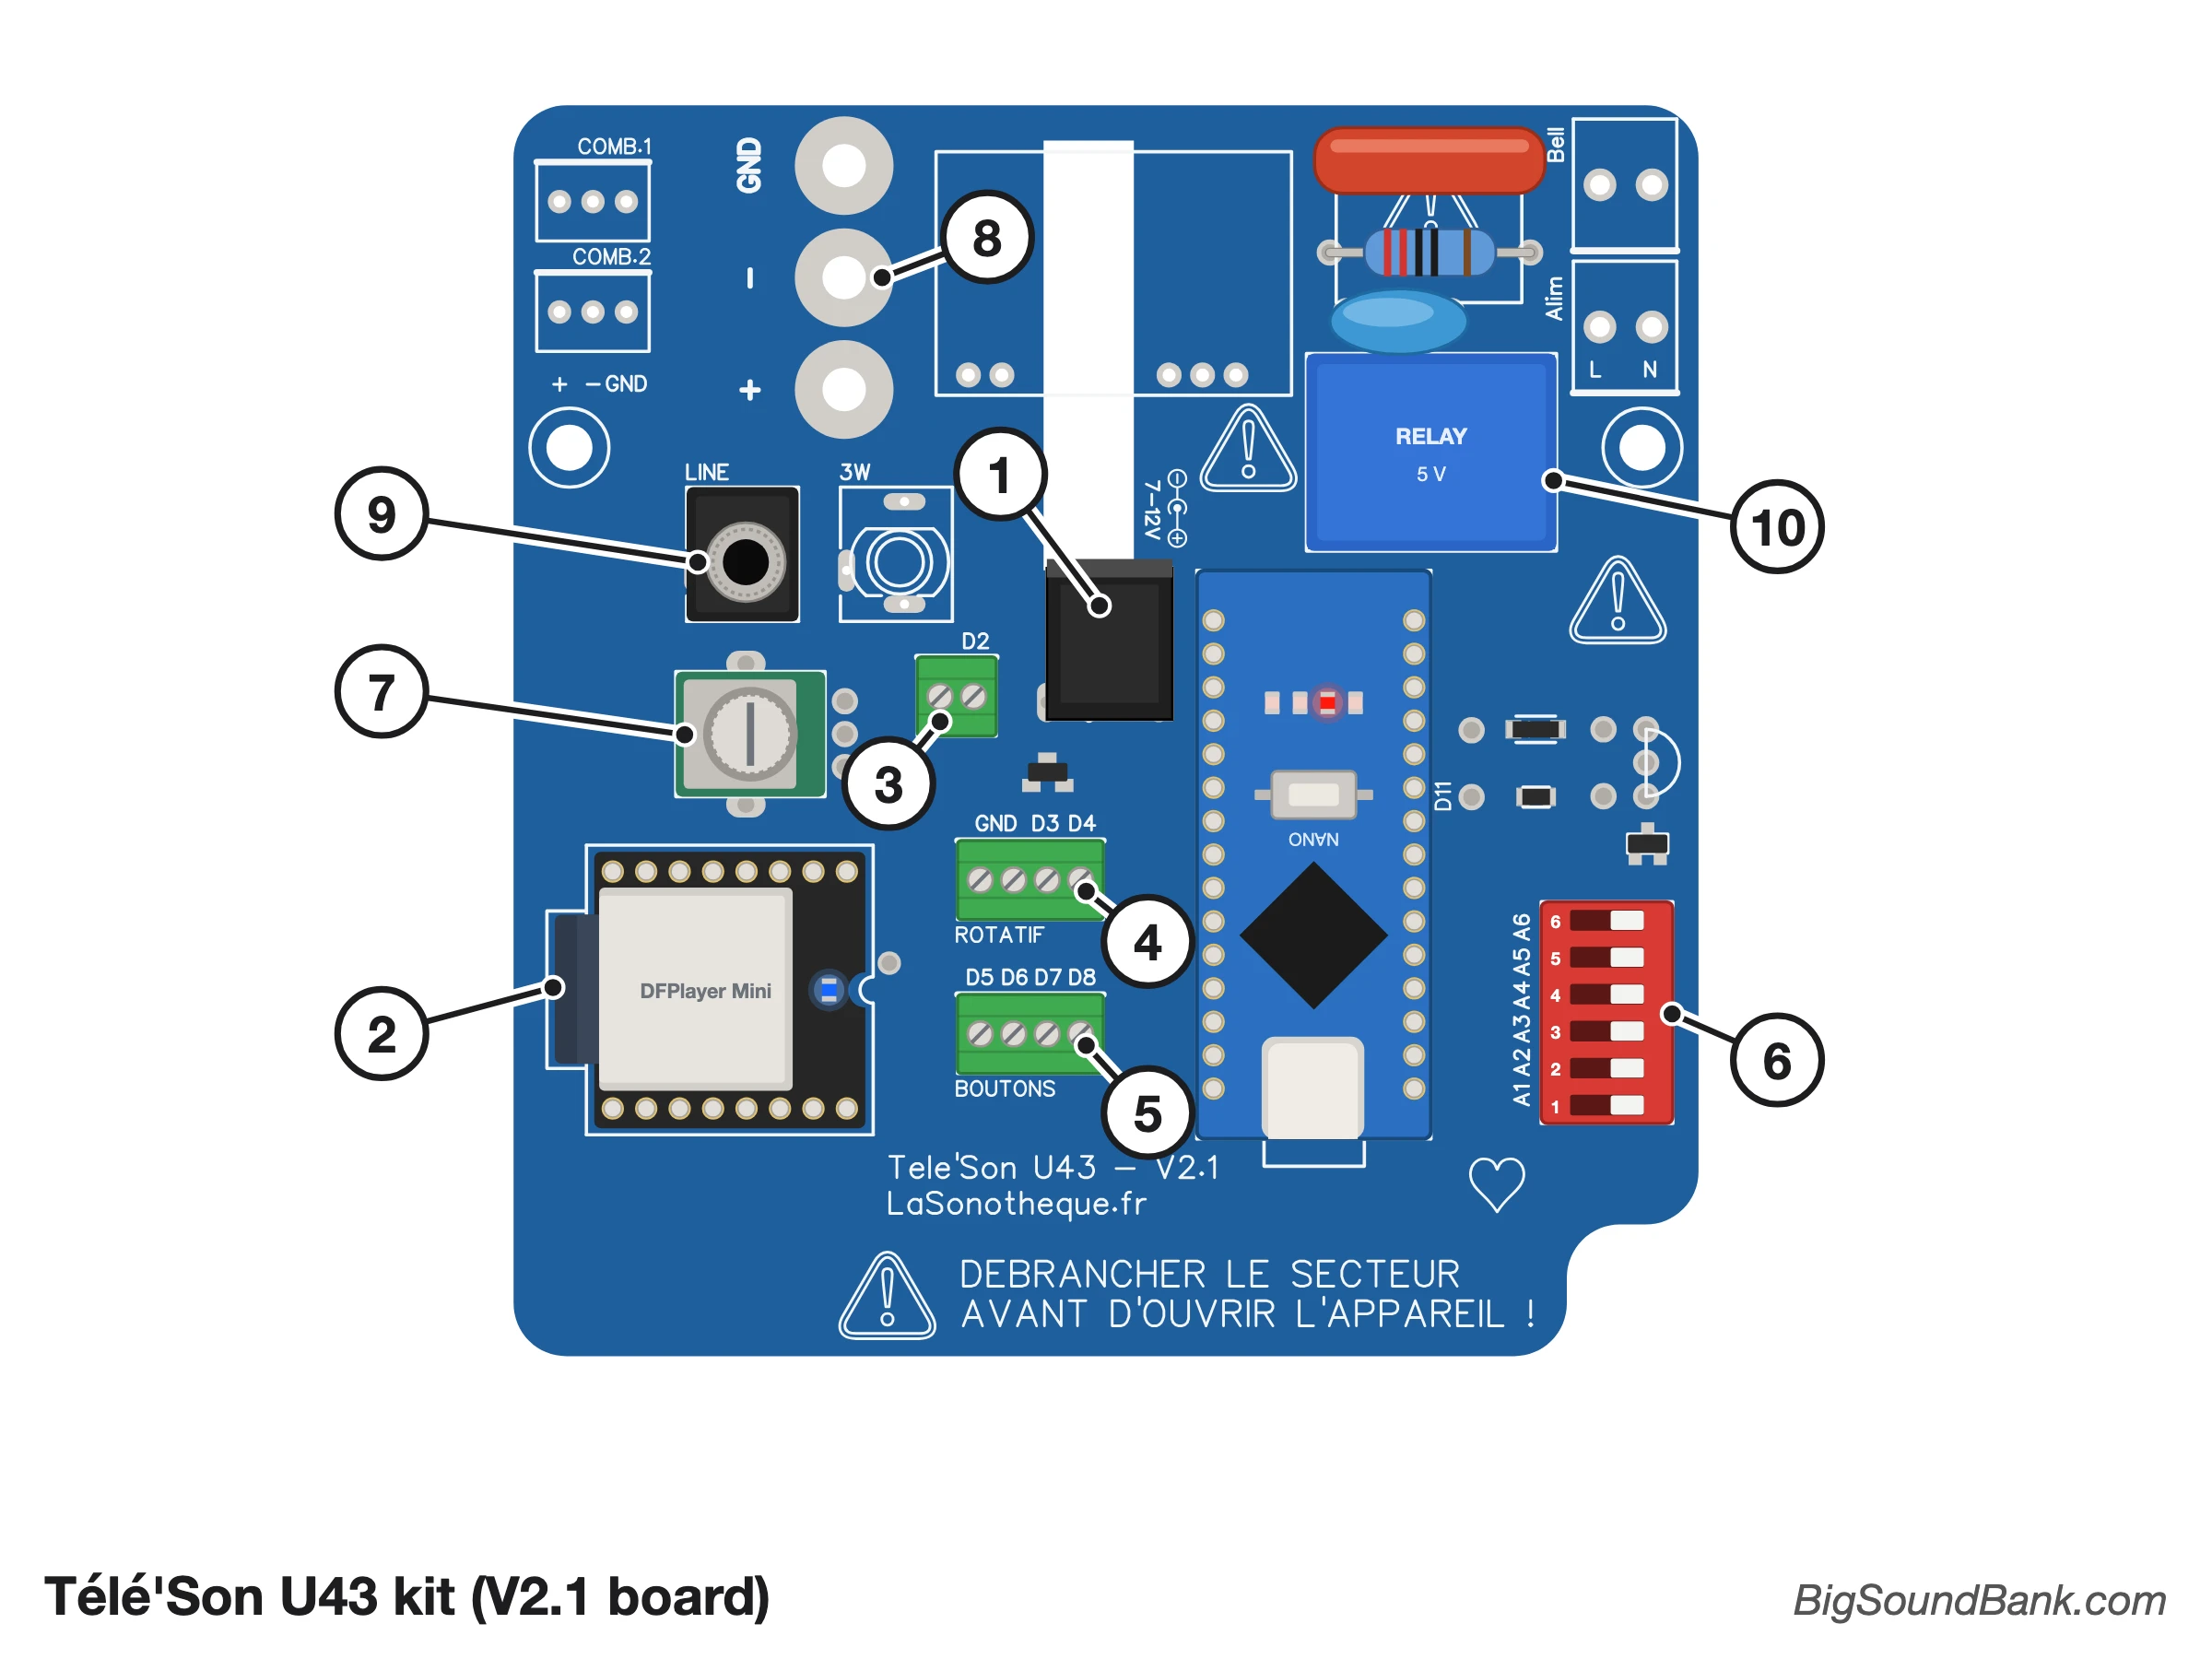
Legend
The diagram shows the V2.1 board, as it is delivered in the kit. Some footprints are left empty: they are used on the fully equipped Télé'Son (mains module, "Alim" and "Bell" terminals, "COMB.1" and "COMB.2" connectors), or for an old "3W" socket.
- 1: power socket, 7 to 12 V (5.5 × 2.1 mm DC plug).
- 2: microSD card reader.
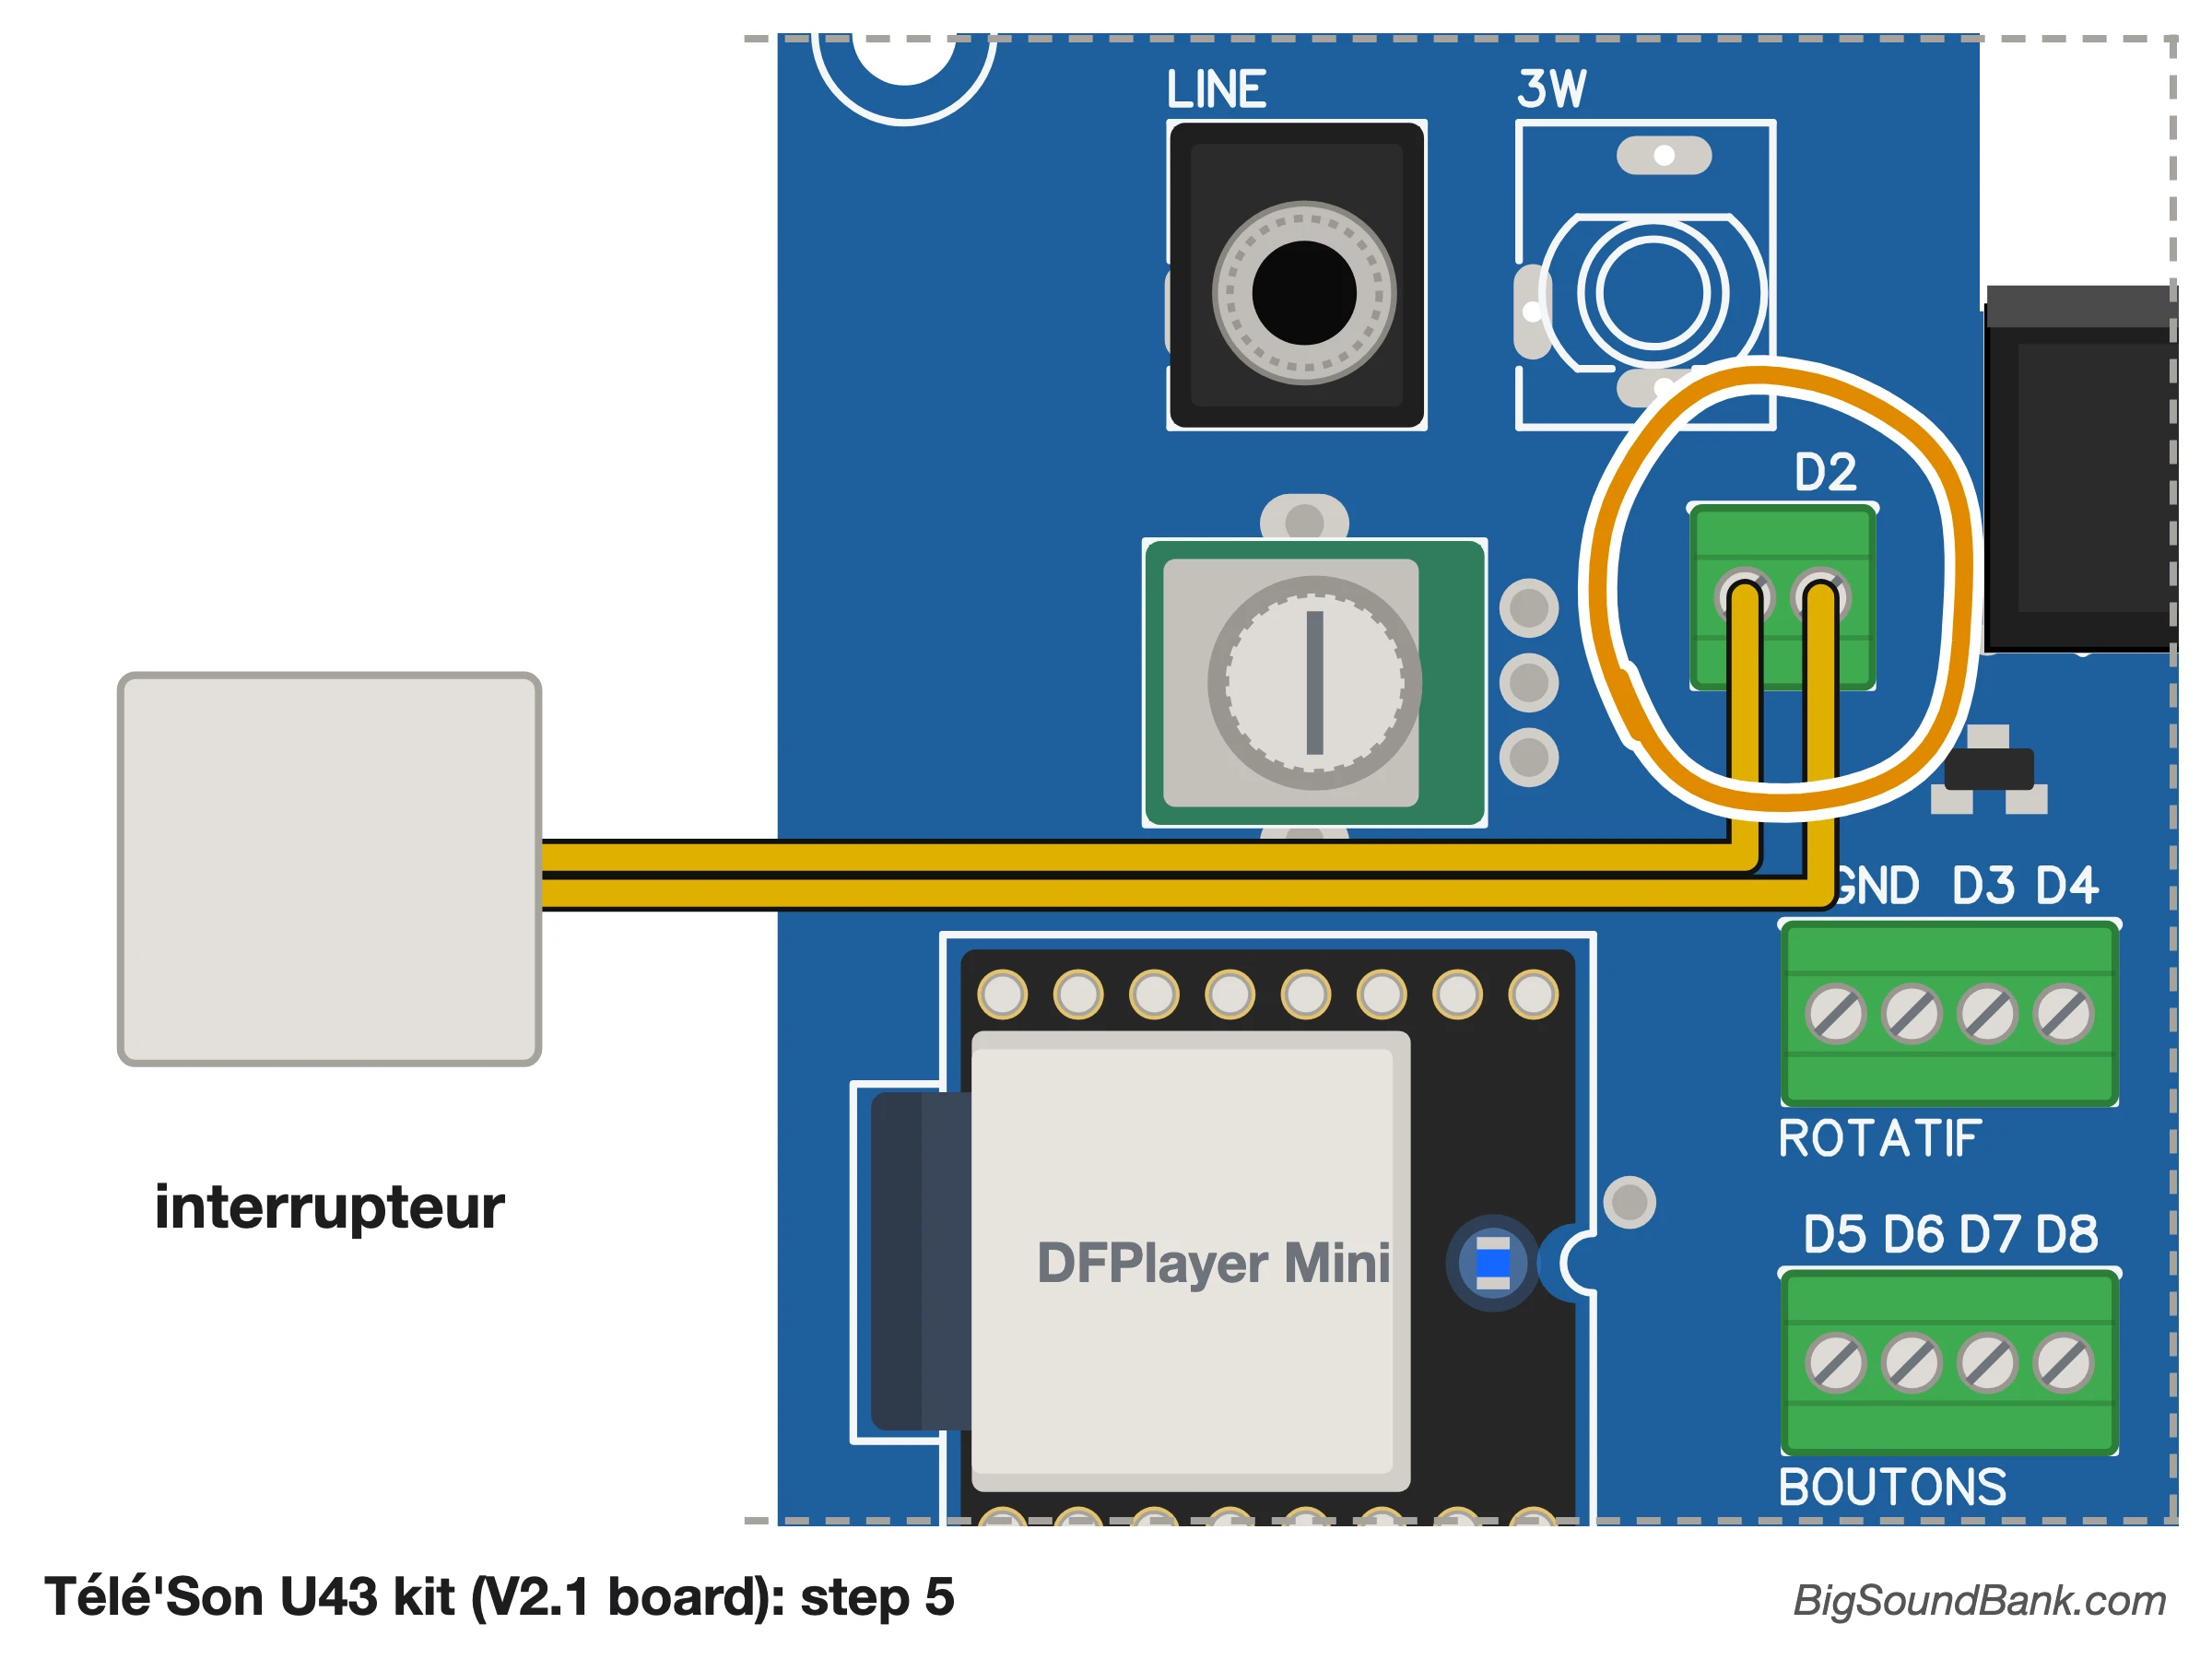
- 3: "D2" screw terminal, for the hook switch.
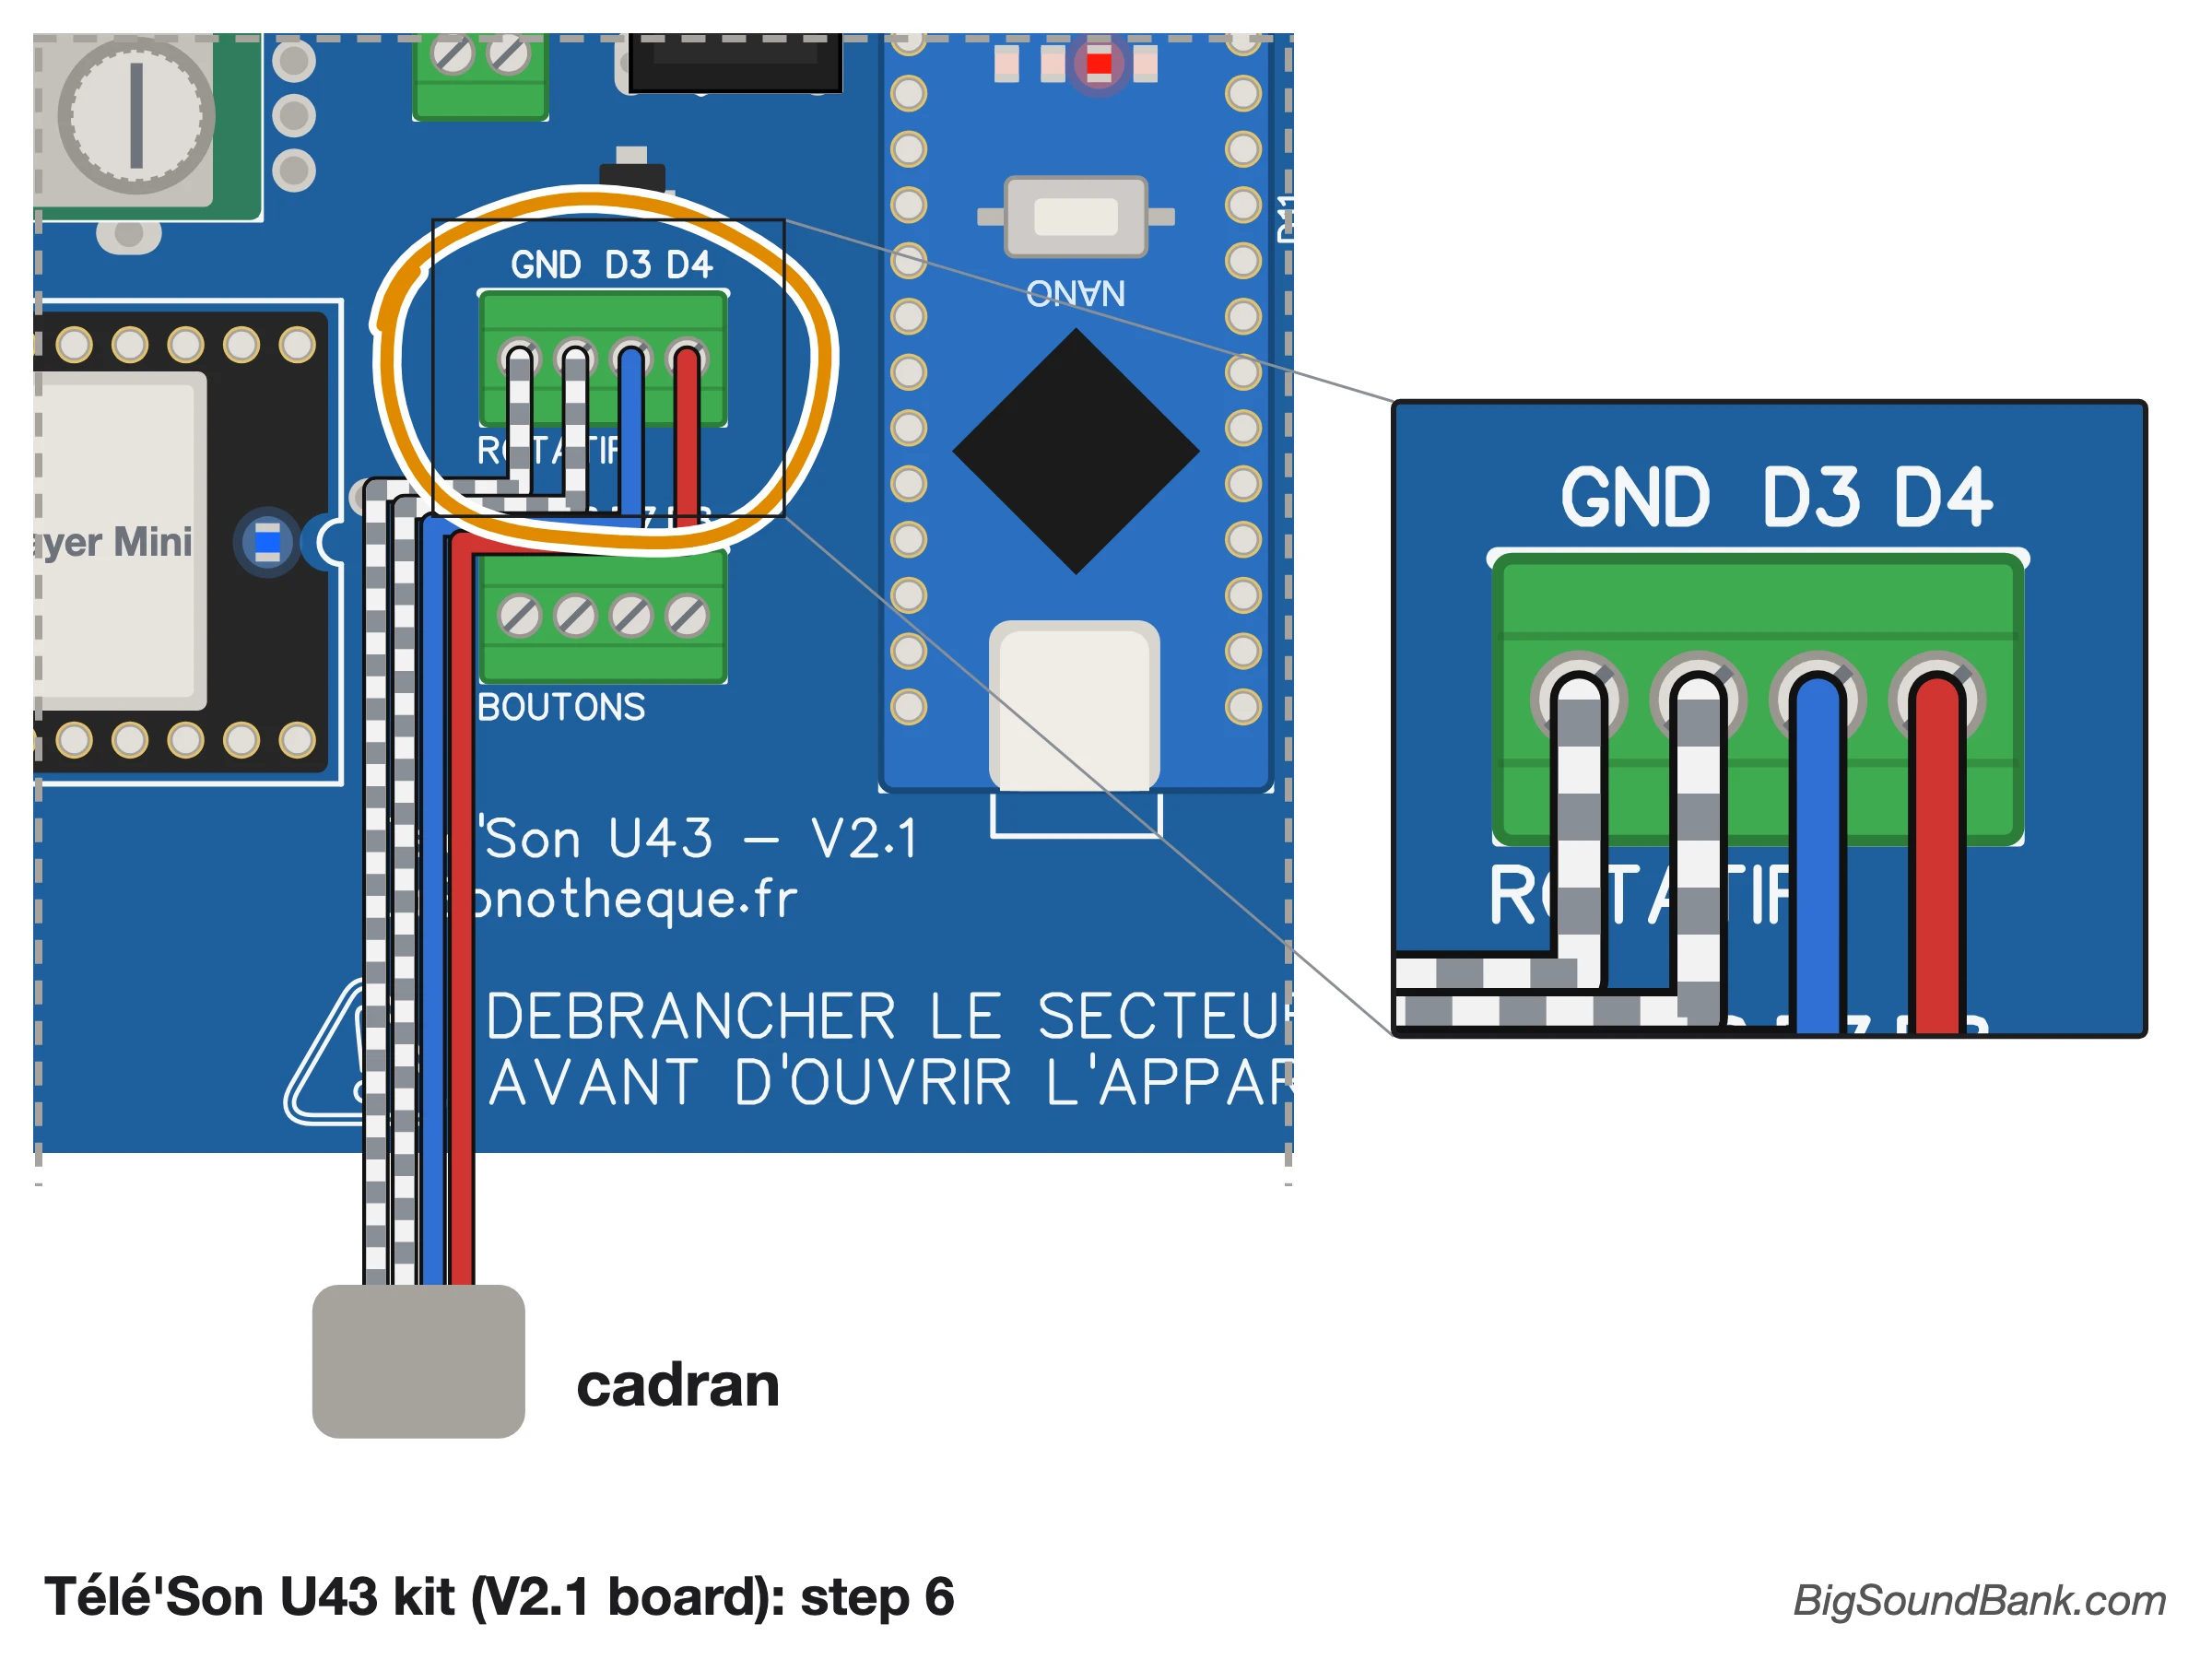
- 4: "ROTATIF" screw terminal, for the rotary dial.
- 5: "BOUTONS" screw terminal, for extra buttons (optional).
- 6: the six setting switches.
- 7: volume.
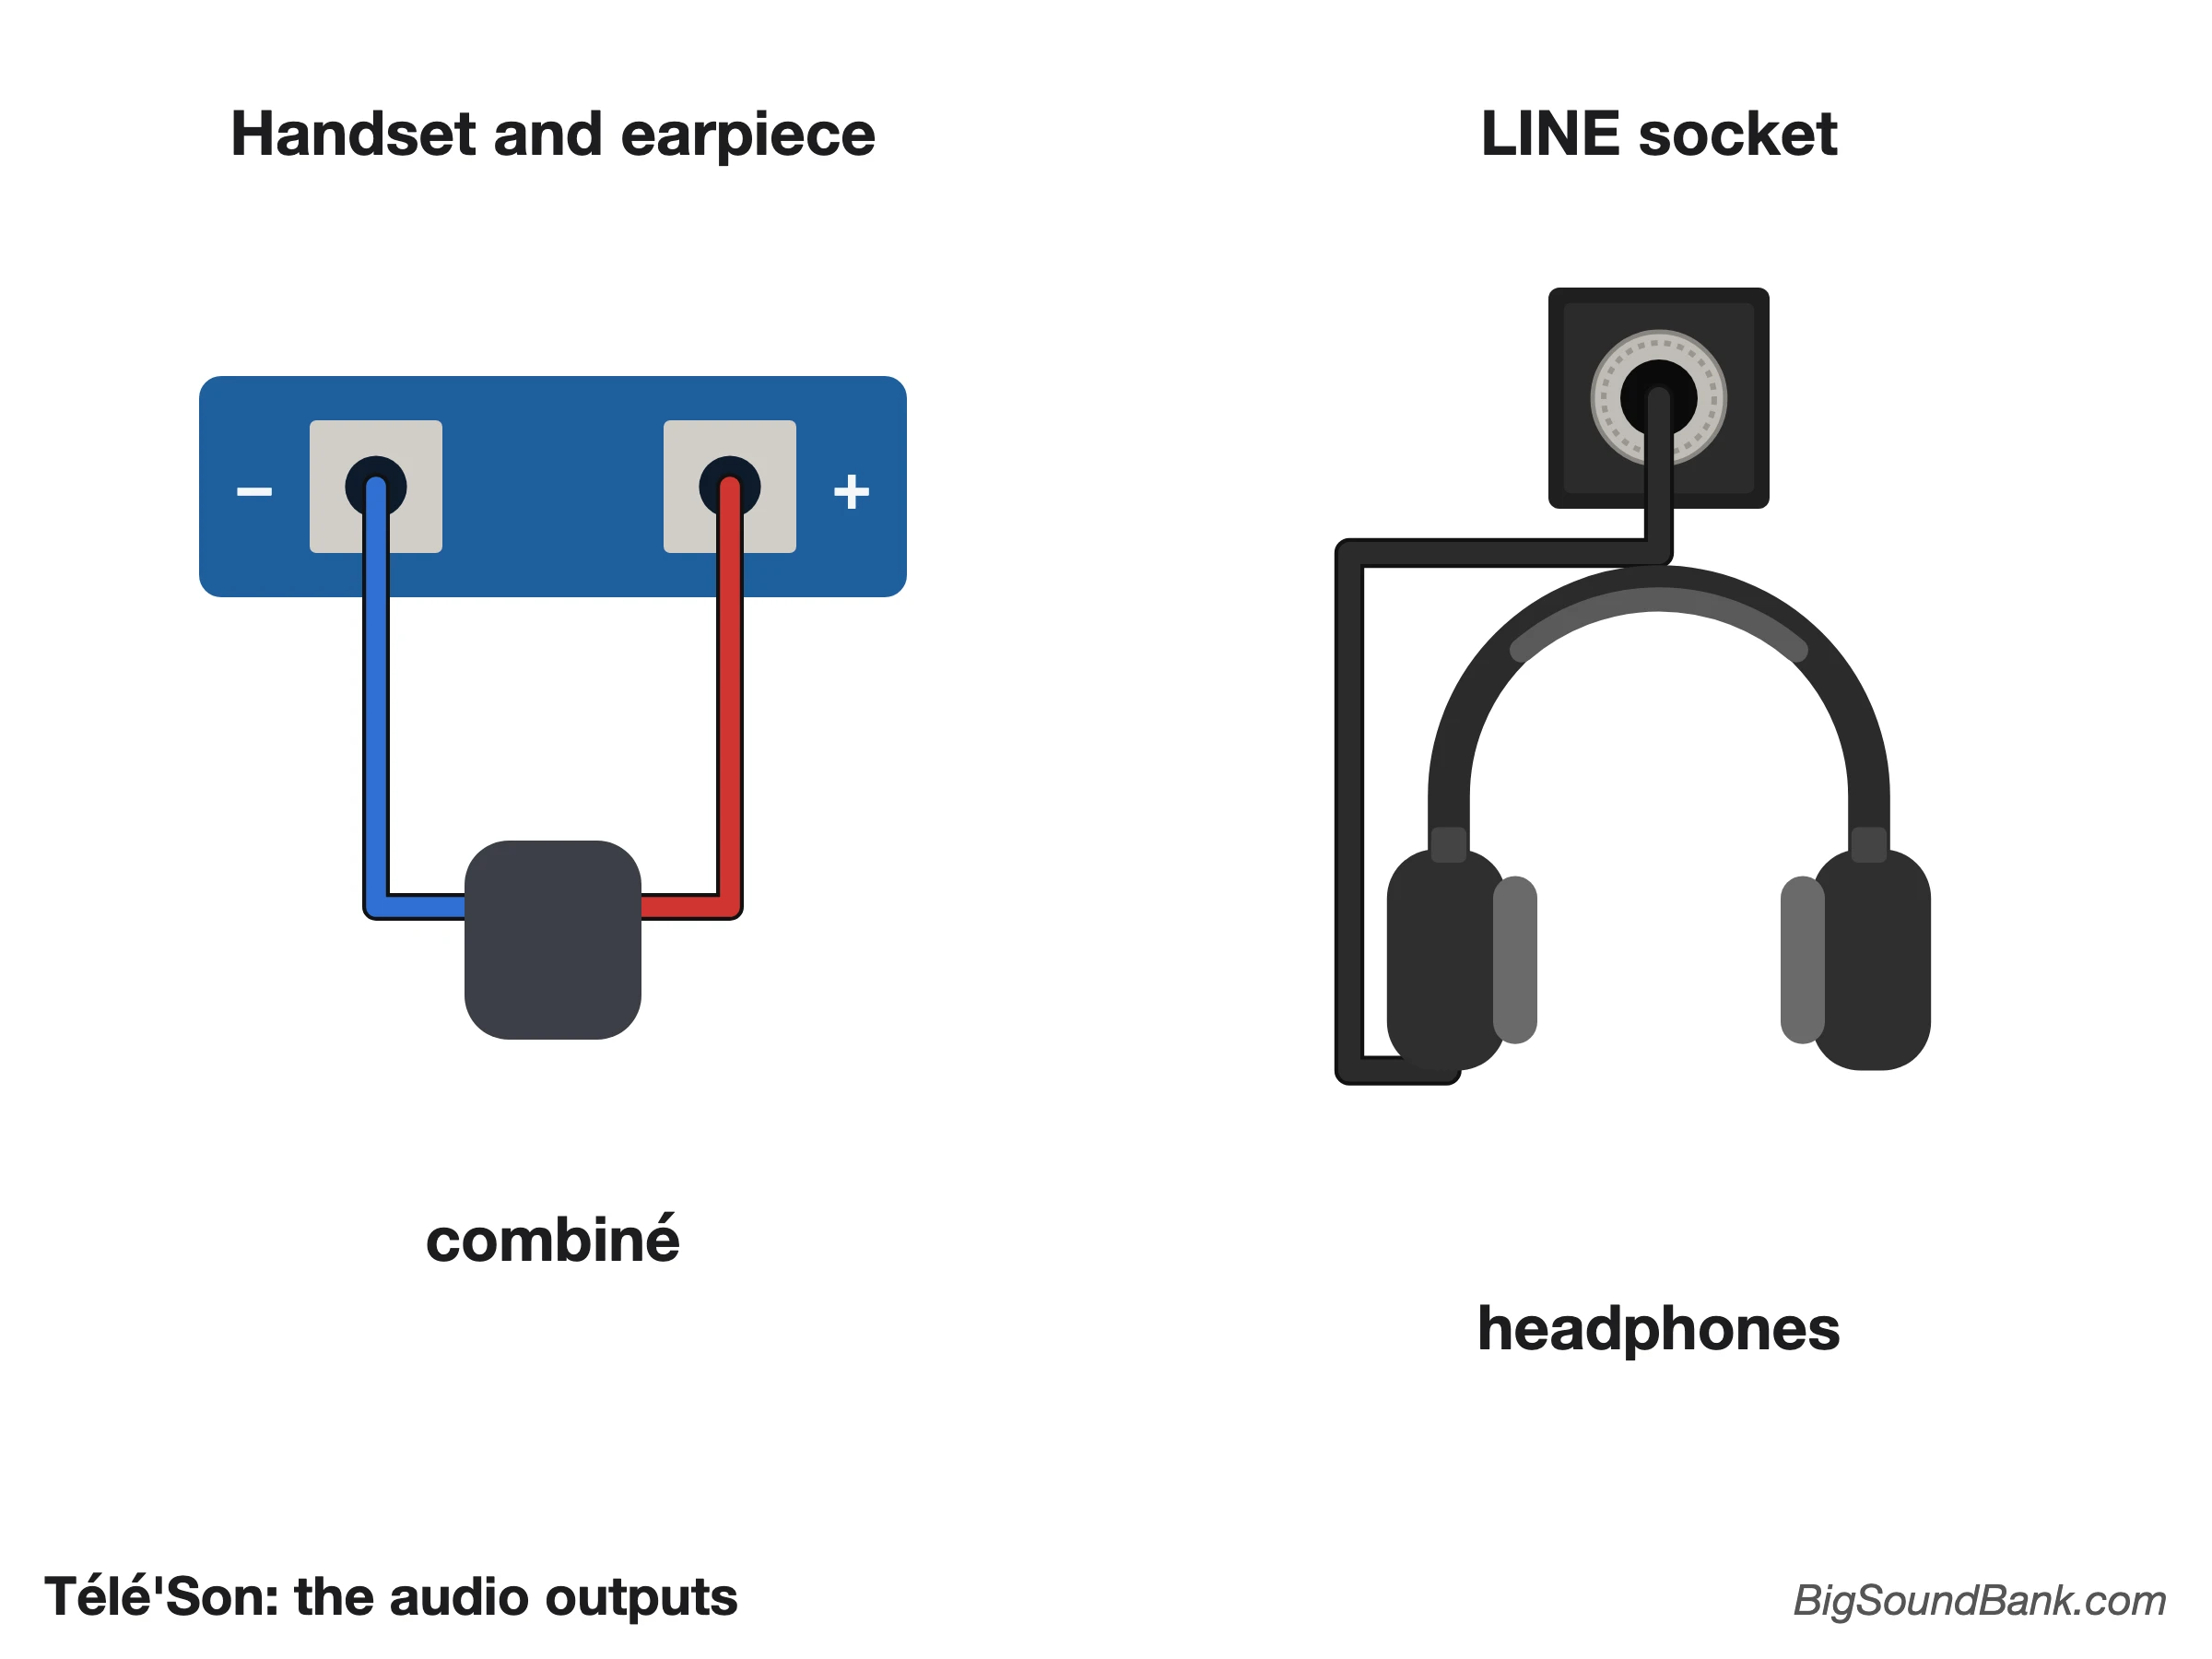
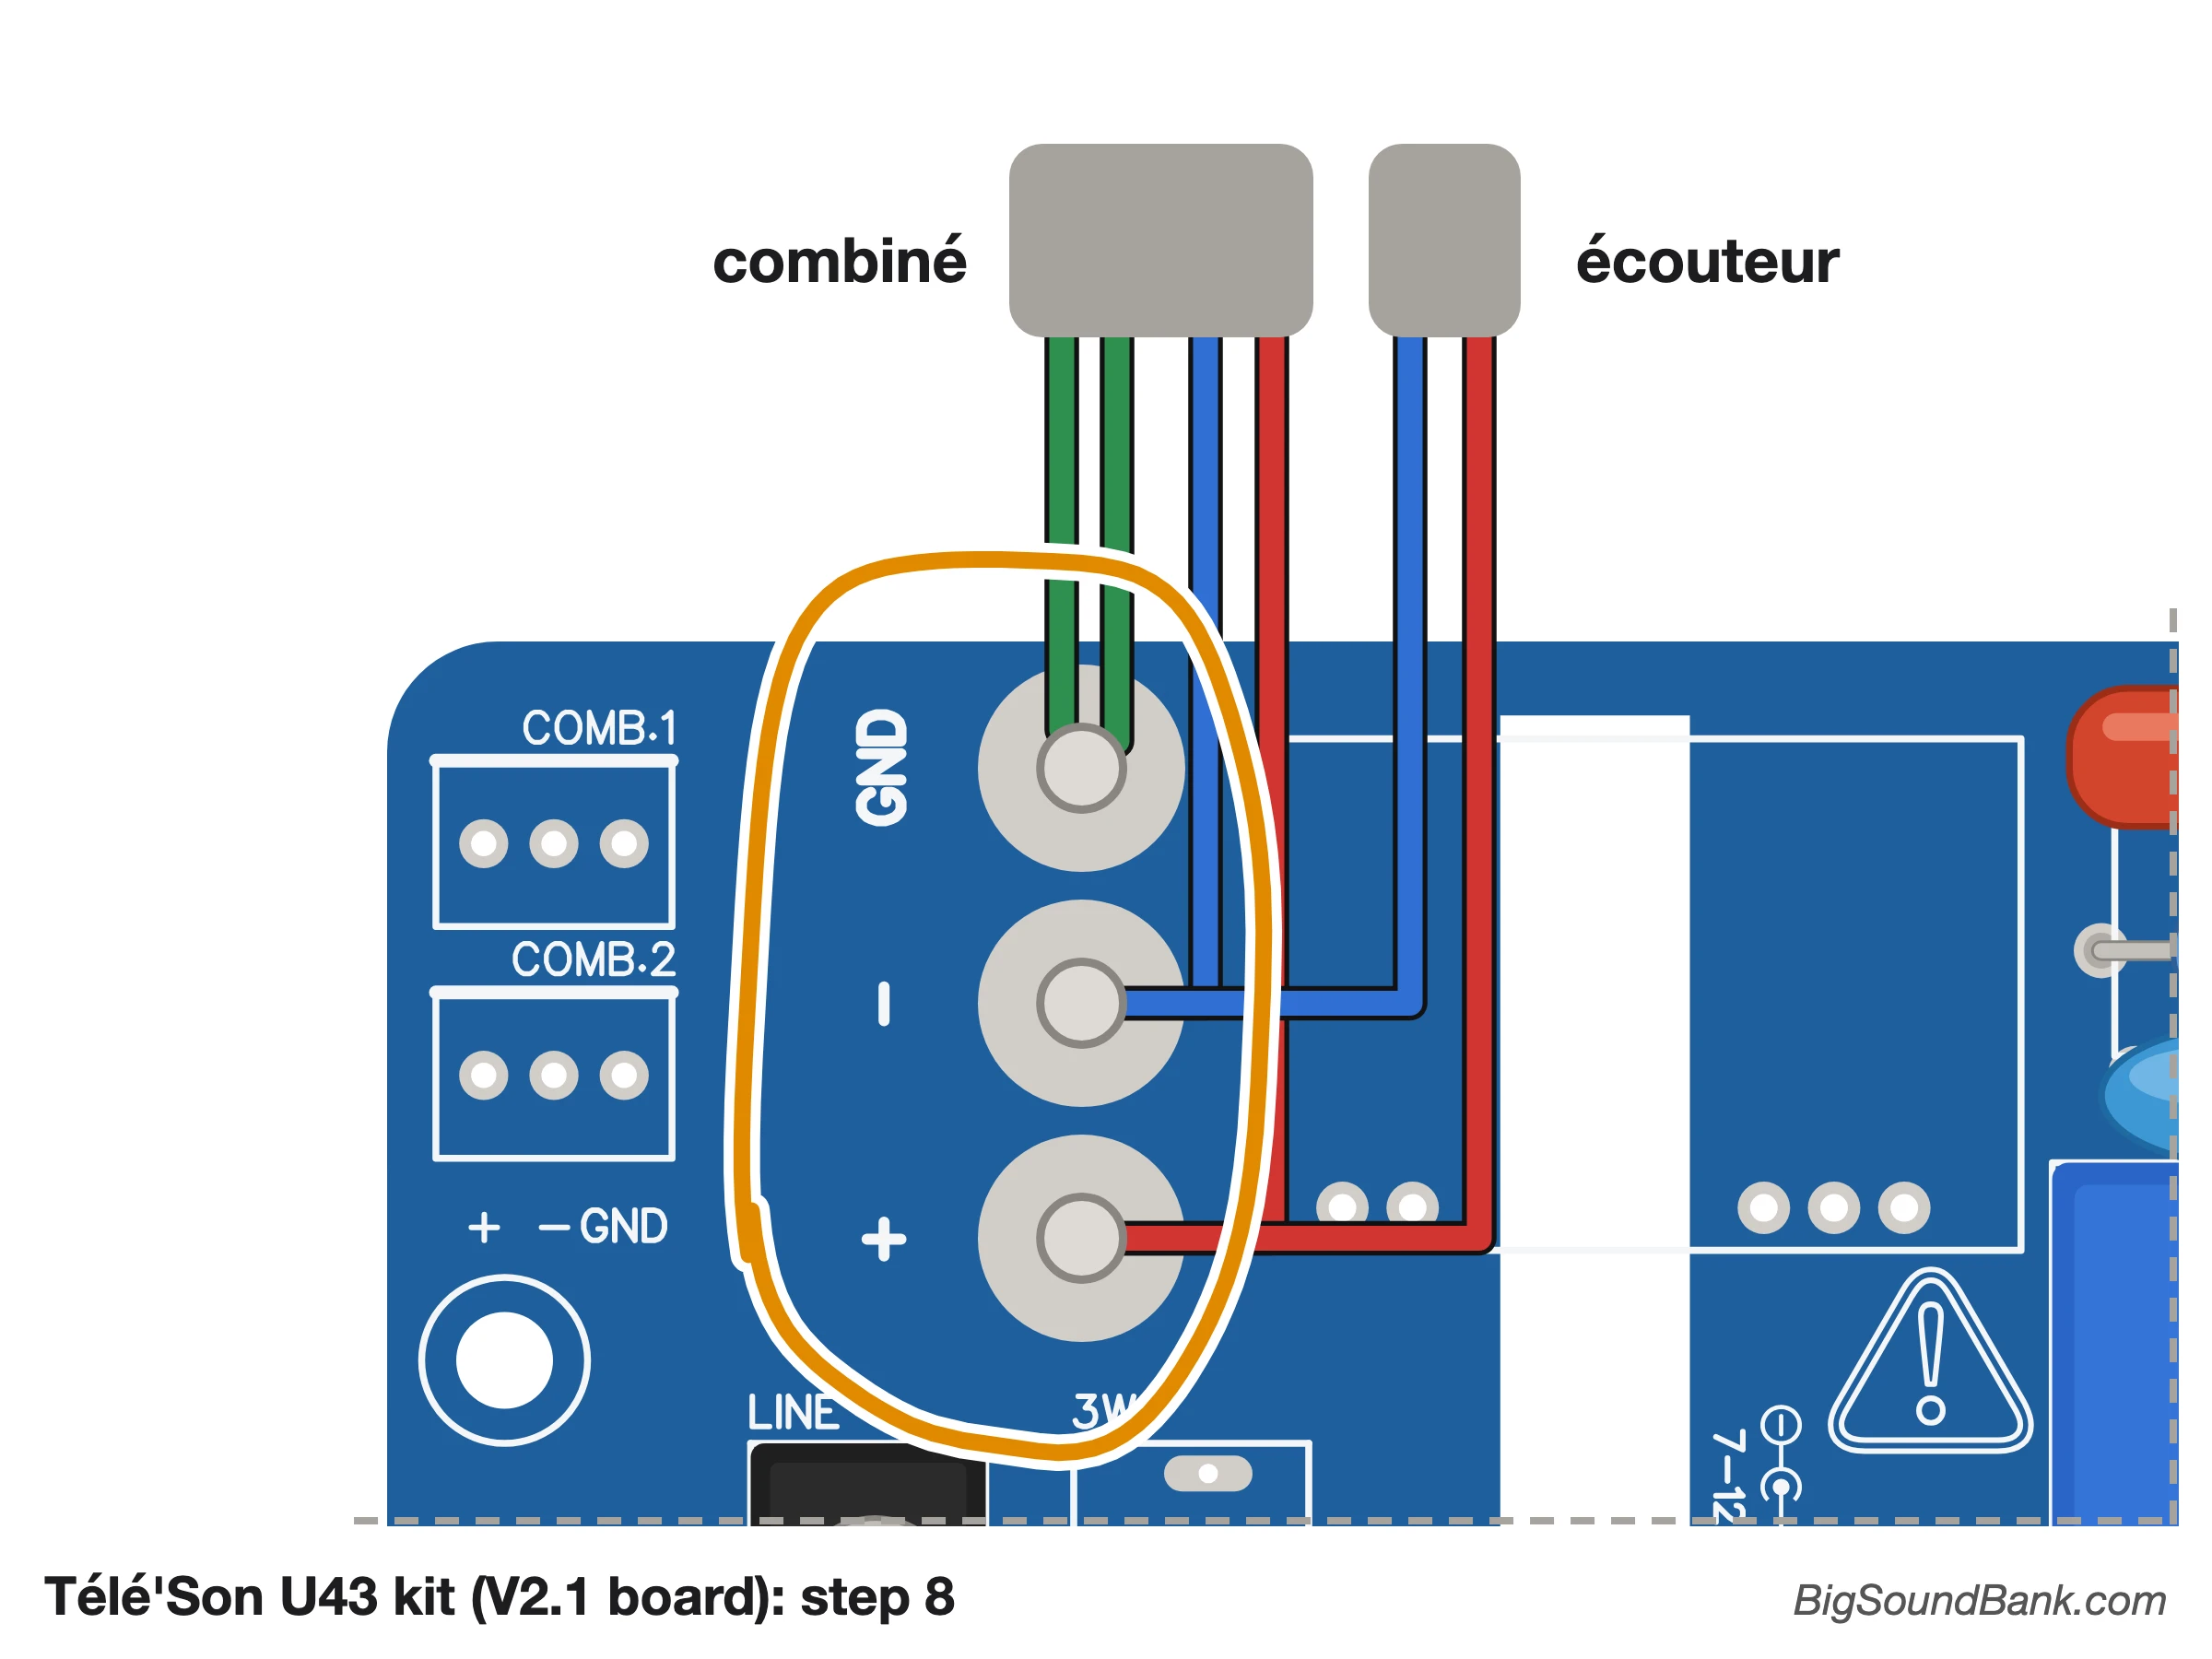
- 8: handset and earpiece lugs ("GND", "−" and "+").
- 9: "LINE" jack socket, for headphones or an amplifier.
- 10: ringer relay.
Explanations
Power supply
The board is powered through its socket 1, between 7 and 12 V, with a standard DC plug (5.5 × 2.1 mm, known as "DC5521"), + in the centre. I recommend 9 V, which produces less heat: from the mains with a DC power supply, or with a battery box (for the U43, the version for 6 AA batteries only). Never go above 12 V: no box of three 18650 batteries (12.6 V when charged), and no car cigarette lighter with the engine running. The socket is protected against reversed wires.
To power several Télé'Son from a single power supply, use a DC splitter. An extension cable lets you move the power supply further away.
Files
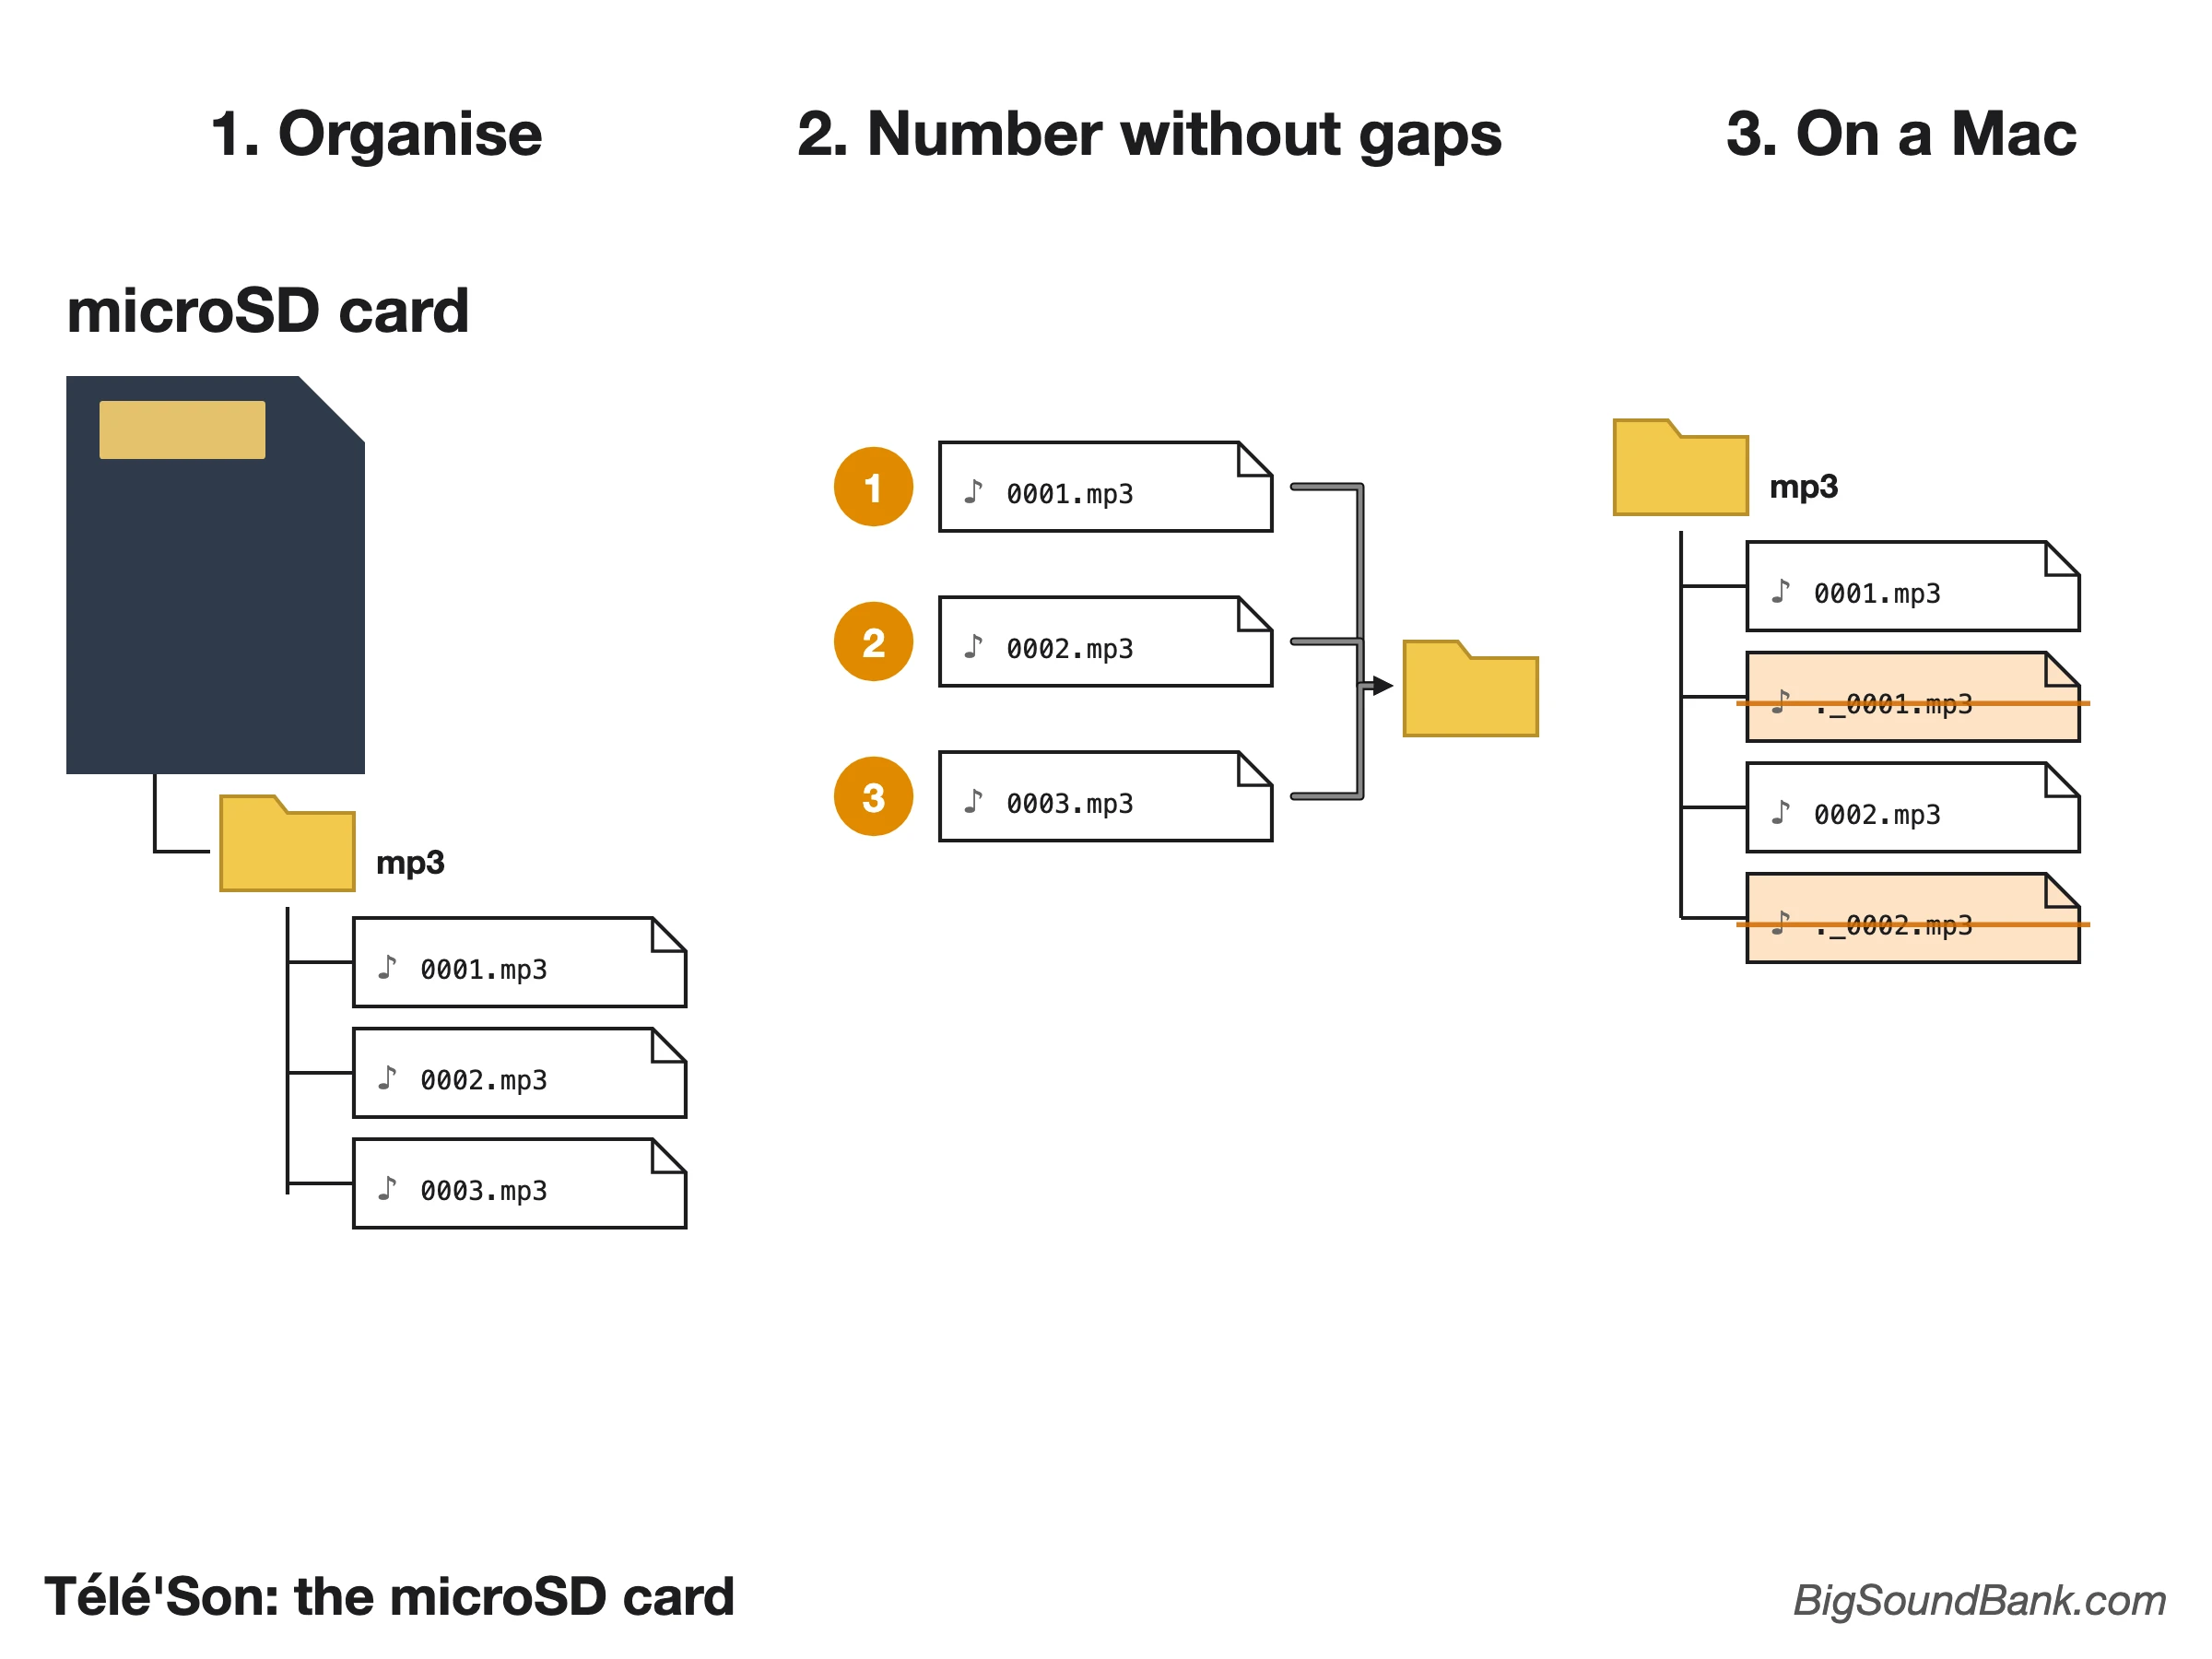
The reader 2 accepts a microSD card of up to 32 GB, formatted in FAT16 or FAT32. Put your sounds in a folder named mp3, at the root of the card, and name them 0001, 0002, 0003… without skipping a number: dialling "23" plays file 0023. The order in which you copy them does not matter, it is the name that counts. The file with the highest number is used as the intro (switch 3). Do not put anything else on the card.
On a Mac, hidden "._" files are added, which the player counts as sounds: type dot_clean /Volumes/CARD_NAME in the Terminal to delete them.
Handset, dial and buttons
The Nano knows when the handset is picked up thanks to the hook switch, the one from your own telephone, whose two wires are screwed into the "D2" terminal 3. The dial is screwed into the "ROTATIF" terminal 4.
Some U43 also have buttons, in addition to the dial. The "BOUTONS" terminal 5 (D5 to D8) is there for them, but my program does not read them: it is for people who write their own program (see "Advanced use").
The six switches
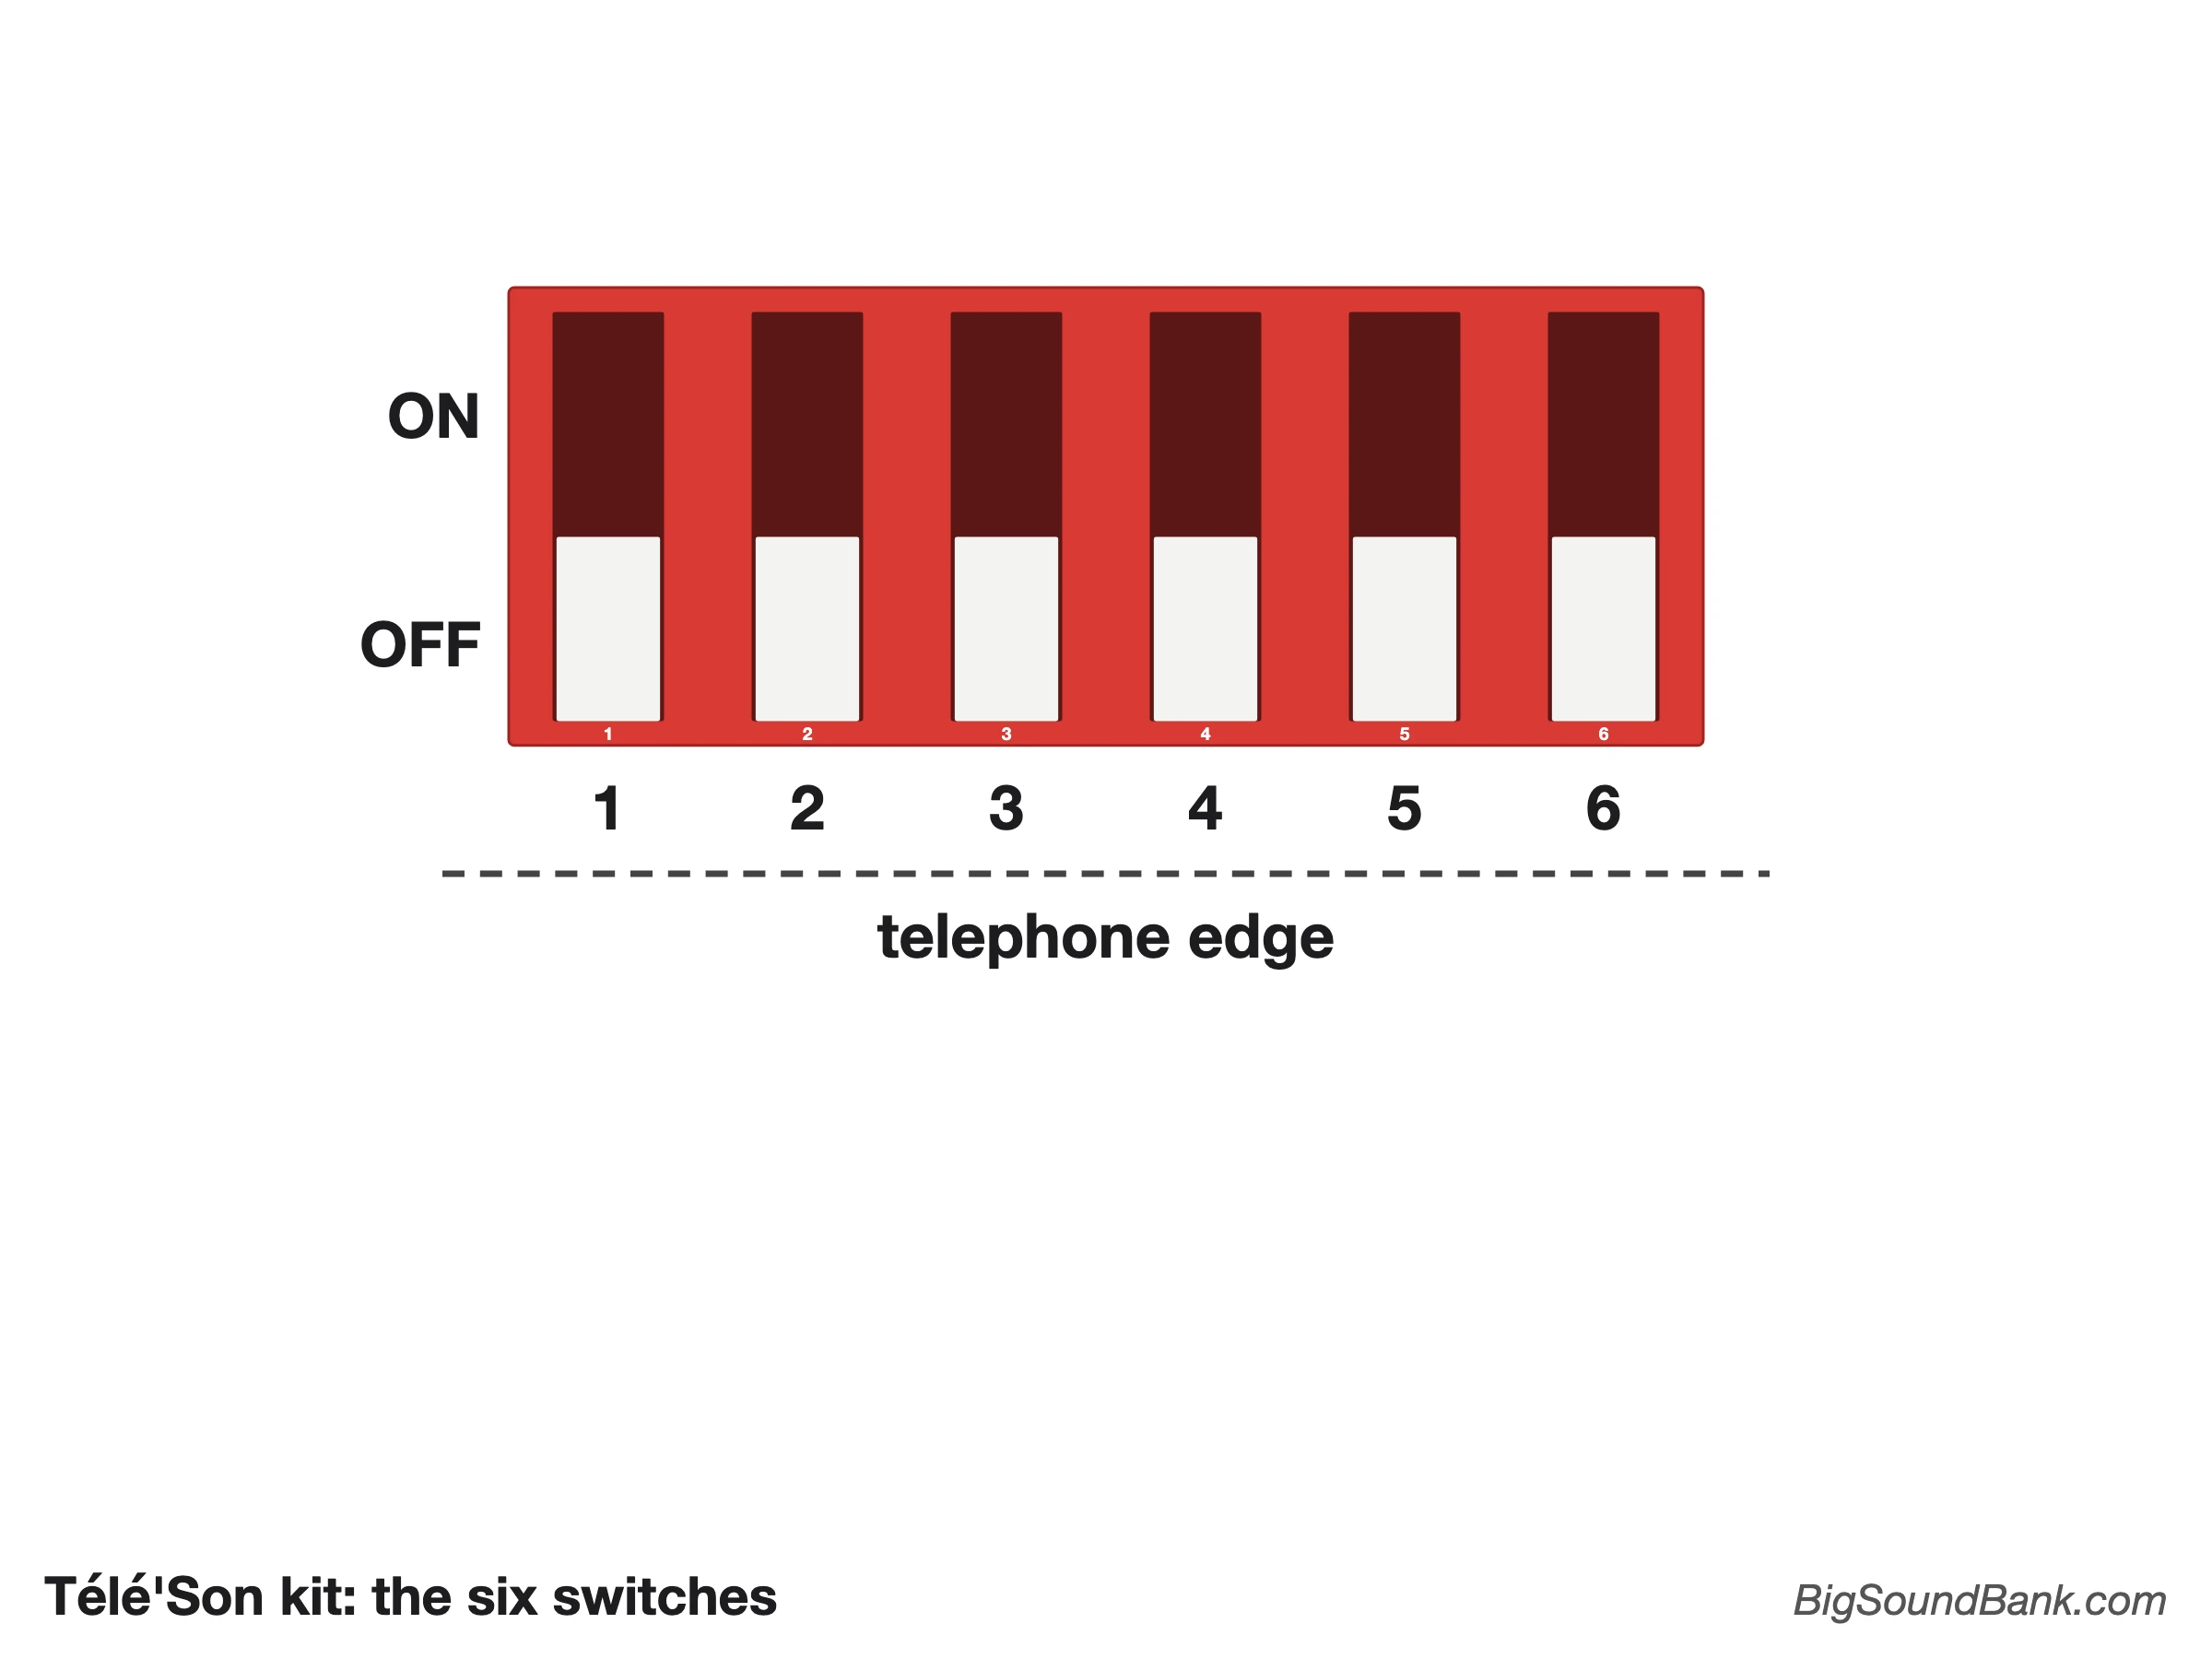
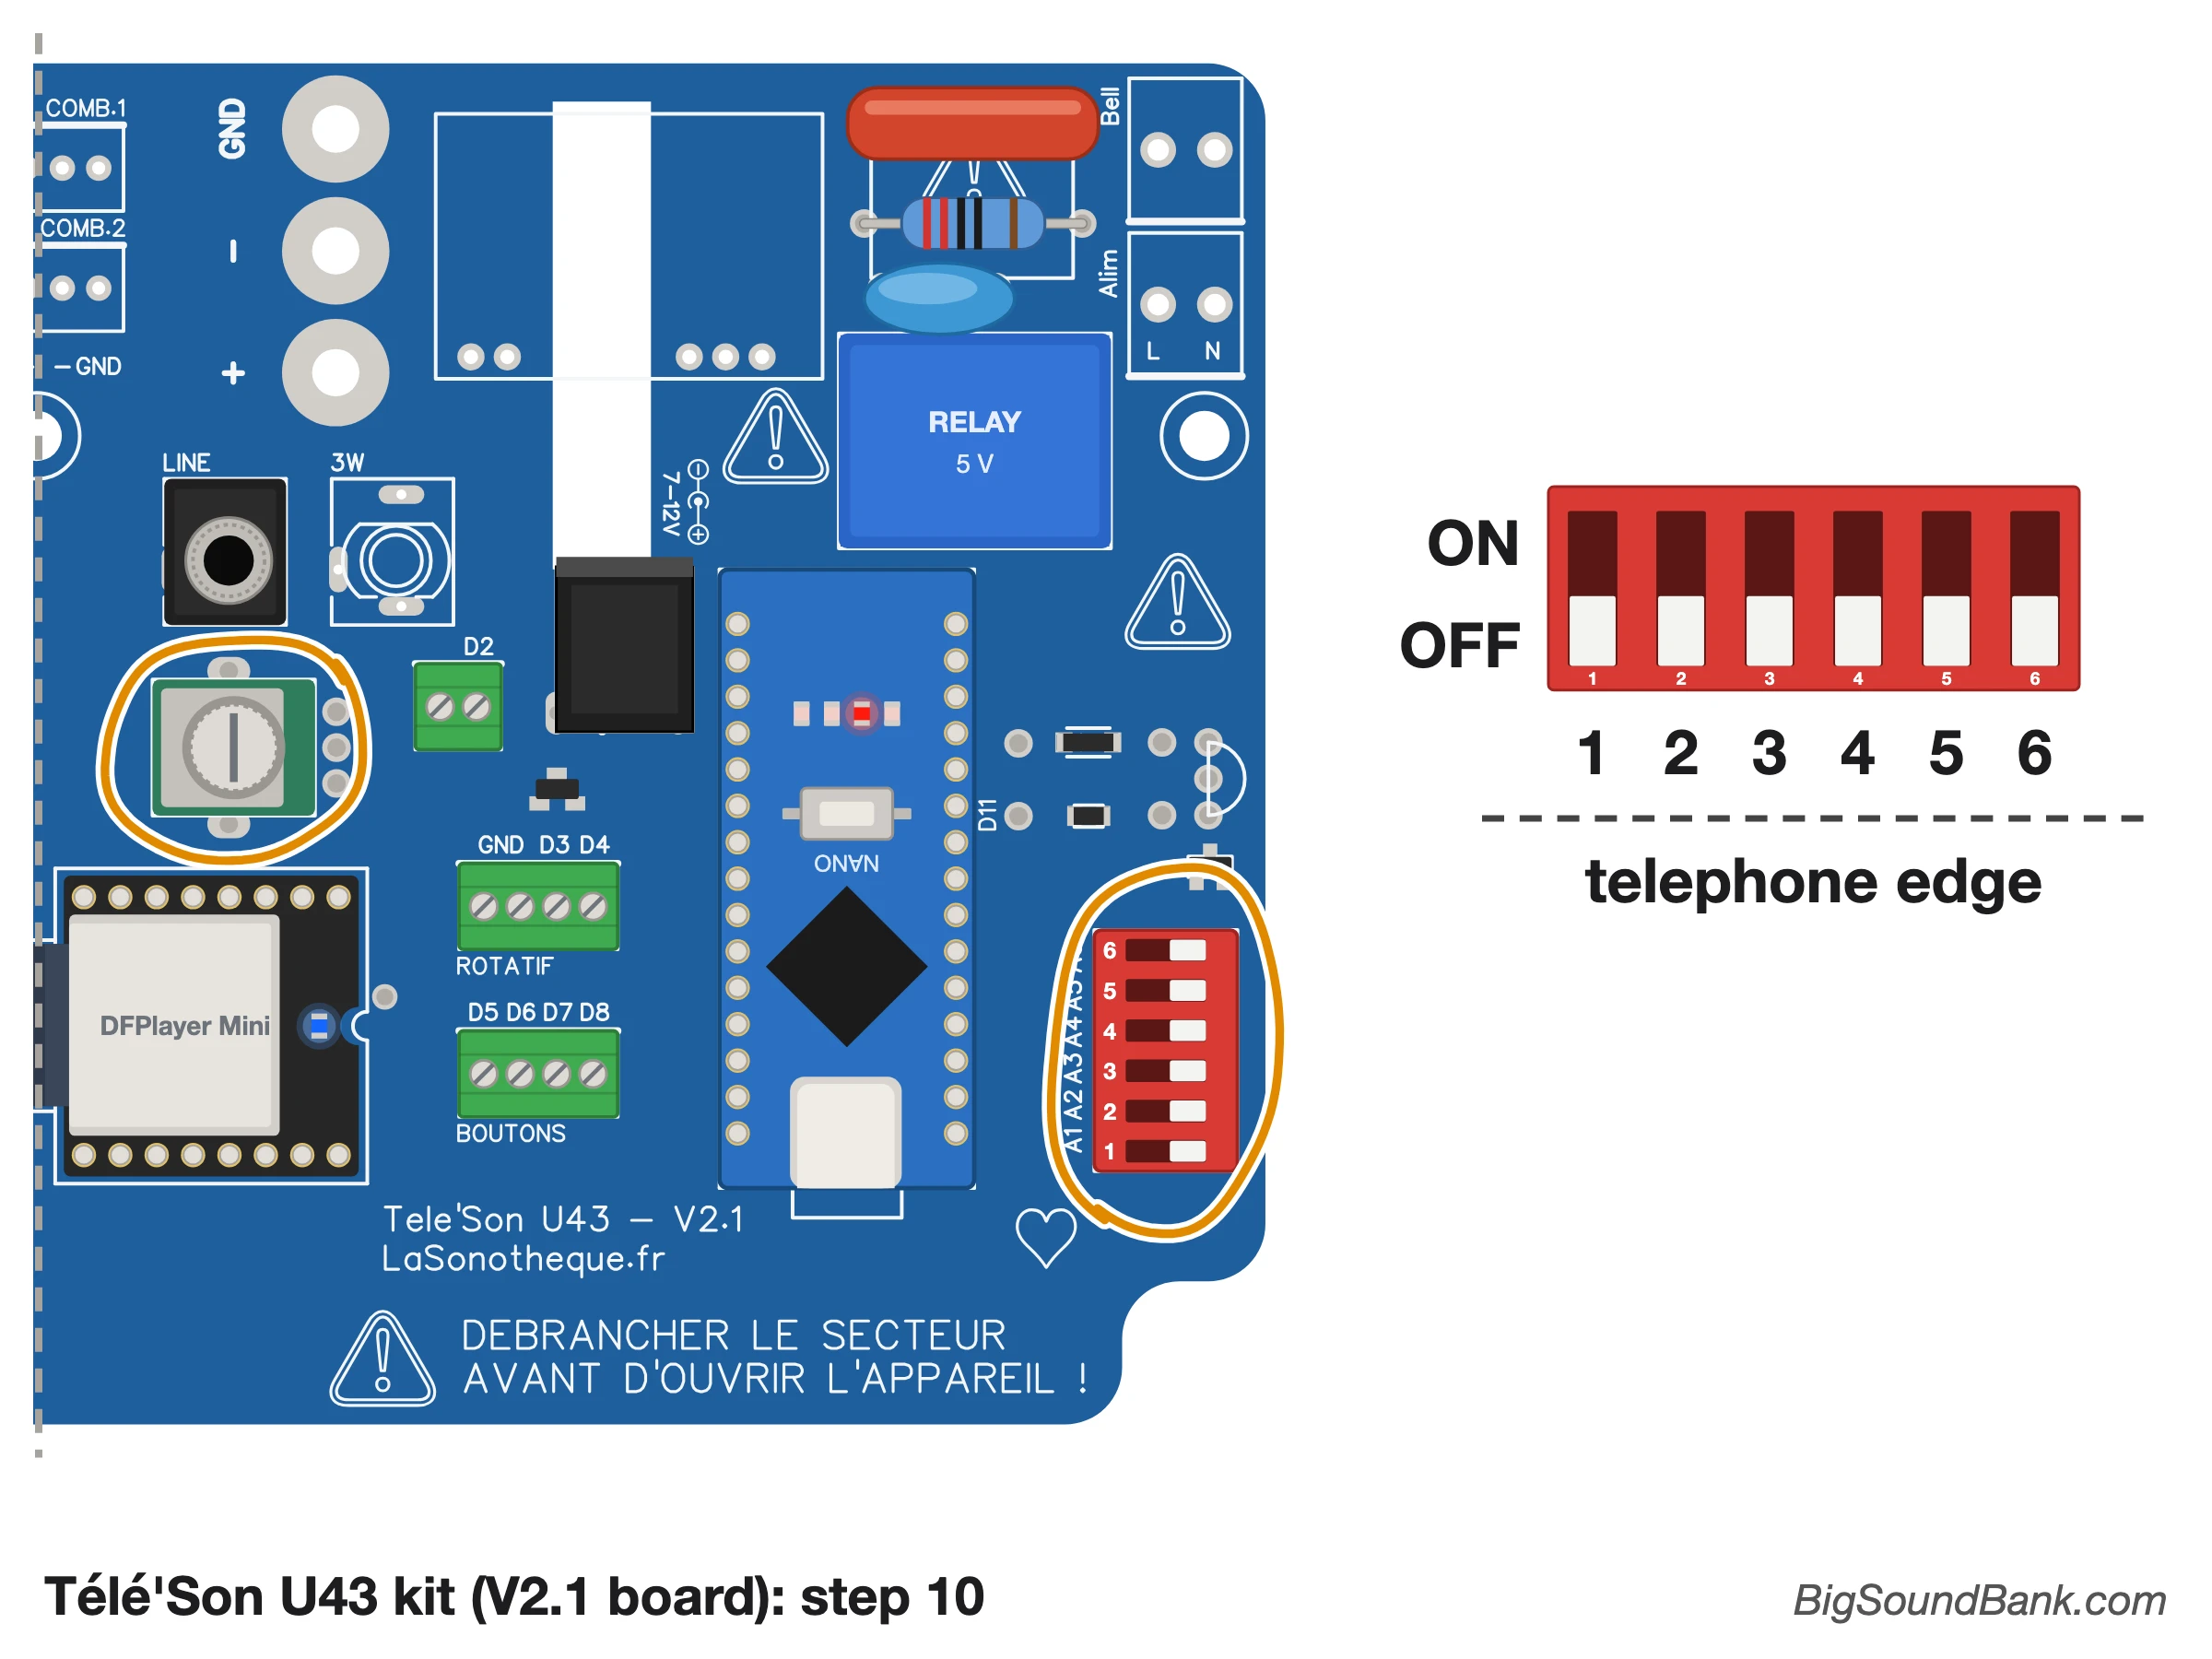
On the board, a red block 6 holds six small white switches. It is read from the nearest edge of the telephone: stand on that side, and switch 1 is then on the left and switch 6 on the right. Pushed up (towards the centre of the board and the markings A1 to A6), a switch is "ON"; pushed down, it is "OFF". Here is what they do:
- 1 Ringer: leave it OFF (see "Ringer" below).
- 2 Files played at random (OFF) or in order (ON).
- 3 No intro file (OFF), or back to the intro file, the last one on the card, when the handset is picked up and when a number that does not exist is dialled (ON).
- 4 Only one file is played each time the handset is picked up (OFF), or they follow one another automatically until the handset is hung up (ON).
- 5 Numbering disabled: each number dialled plays the next file (OFF); or enabled: if you dial 23, file 0023 is played (ON).
- 6 Rotary dial (OFF) or push-button keypad (ON). As the U43 only has a dial, leave it OFF.
Change the settings with the telephone unplugged, then plug it back in.
Volume
The volume is set by hand, by turning the shaft of the small potentiometer 7. It acts on all the outputs.
Listening
You usually listen through the handset (mono), whose wires are screwed onto the lugs 8: red on "+", blue on "−". If your telephone has one, the extra earpiece (a red wire and a blue wire) connects to the same place (mono as well). The two green microphone wires are screwed onto the "GND" lug: despite its name, it is not connected to anything on this board, it is only there to hold these wires so that they do not wander around inside the telephone.
You can also plug one or more headphones (with a splitter), an active speaker or an amplifier into the "LINE" jack socket 9, in stereo. Both outputs work at the same time. The handset output is bridged: never connect its "+" and "−" wires to a ground, nor to the input of an amplifier.
Ringer
The U43 has no ringer inside: you need to add a bell to it, which runs on 230 V AC, far too dangerous for an amateur. The kit's board carries the ringer relay 10 and its protection, but no terminal: wiring it is a job for an electrician. If it matters to your eyes (ears?), buy my fully equipped, ready-to-use Télé'Son U43 or S63.
Step-by-step installation

Step 1: preparation
Get hold of an old Socotel U43 telephone.
Step 2: dismantling
All the screws are underneath the telephone: work on a tea towel laid on a table, and turn the telephone over, taking care not to drop the handset (or the earpiece) and not to scratch it. Open it: first undo the front screw and the back screw, open the back flap, then undo the two screws inside this flap. Everything can then be taken apart. Empty it, keeping all the loose parts: screws, lugs, hook switch and dial. Above all, keep the two fairly long screws that held the telephone's old circuit board: they will hold the kit's circuit board.
Step 3: cleaning
Clean the shell and the parts with a damp sponge or a cloth, to remove dust and marks. Do not use an abrasive sponge, like the green side of a kitchen sponge: it scratches the plastic.
Step 4: insulation and fixing
The bottom of the U43 is made of metal. Cut a plate the size of the kit's circuit board out of thin cardboard and place it between the bottom of the telephone and this board. Then fix the kit's circuit board by its two holes, on the small plastic spacers supplied with the kit, with the two long screws kept during dismantling.
Step 5: hook switch
Cut off the lugs at the end of the two wires of the hook switch (the one of its contacts that closes when the handset is picked up), strip them over a few millimetres and tin them (a thin layer of solder with the soldering iron), then screw them into the "D2" terminal 3. If its wires are too short, solder longer ones.
Step 6: rotary dial
First cut off the lugs at the end of the wires, strip each wire over a few millimetres and tin it (a thin layer of solder with the soldering iron): otherwise, the wires will not hold in the screw terminals.
Then screw the 4 wires of your rotary dial into the "ROTATIF" terminal 4, and leave switch 6 OFF:
- GND: the two two-coloured wires;
- D3: the blue wire;
- D4: the red wire.
Step 7: buttons (optional)
If your U43 has buttons in addition to the dial and you write your own program, screw them into the "BOUTONS" terminal 5 (D5 to D8). Their other wire goes to ground, for example on a GND terminal of the "ROTATIF" block. With my program, they do nothing.
Step 8: handset and earpiece
Using the original screws and lugs, connect the handset wires to the lugs 8: red on "+", blue on "−", both green wires on "GND" (not connected to anything on the kit's circuit board). If your telephone has an earpiece, its two wires, a red one and a blue one, connect to the same place as those of the handset: red on "+", blue on "−".
To let people listen on one or more headphones, now is the time to plug the headphones, or a splitter, into the "LINE" jack socket 9: the sound there is in stereo.
Step 9: microSD card and content
Put one or more sounds, preferably in MP3 format (or WAV, up to 48 kHz / 16 bits), into a folder named "mp3". Name the first one "0001", then "0002" and so on, without skipping a number. Once done, insert the microSD card into the reader 2.
Step 10: settings
Choose your settings with the six switches 6 (see above), and set the volume 7.
Step 11: anti-theft (optional)
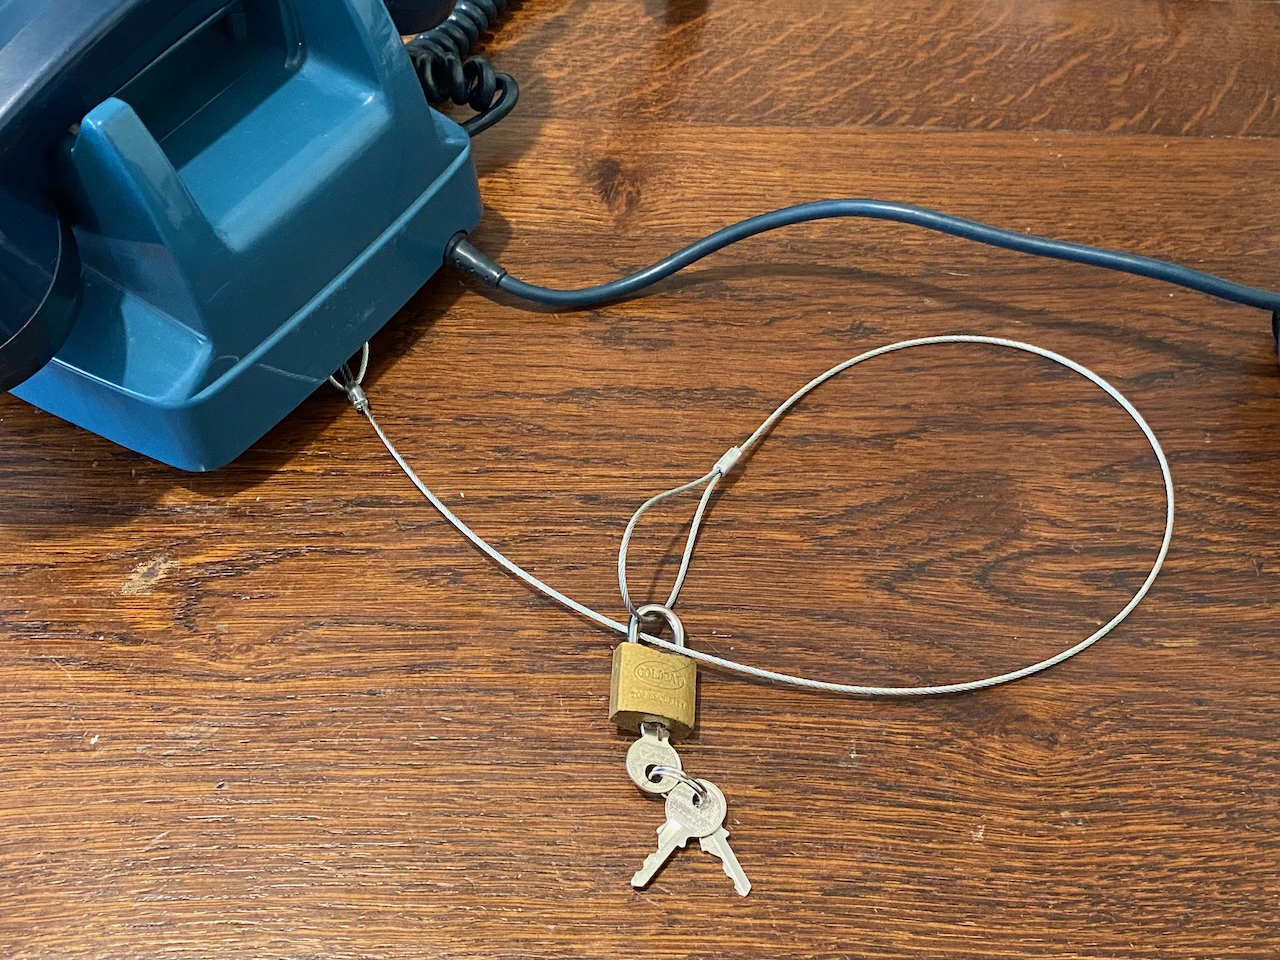
The anti-theft sling (sold separately) goes through the hole where the telephone's cables come out (power, handset and earpiece), then one of its ends slips around a metal rod inside the telephone. Close the padlock (combination or key, not included) on the furniture or anchor-point side, never on the telephone side.

Step 12: power supply
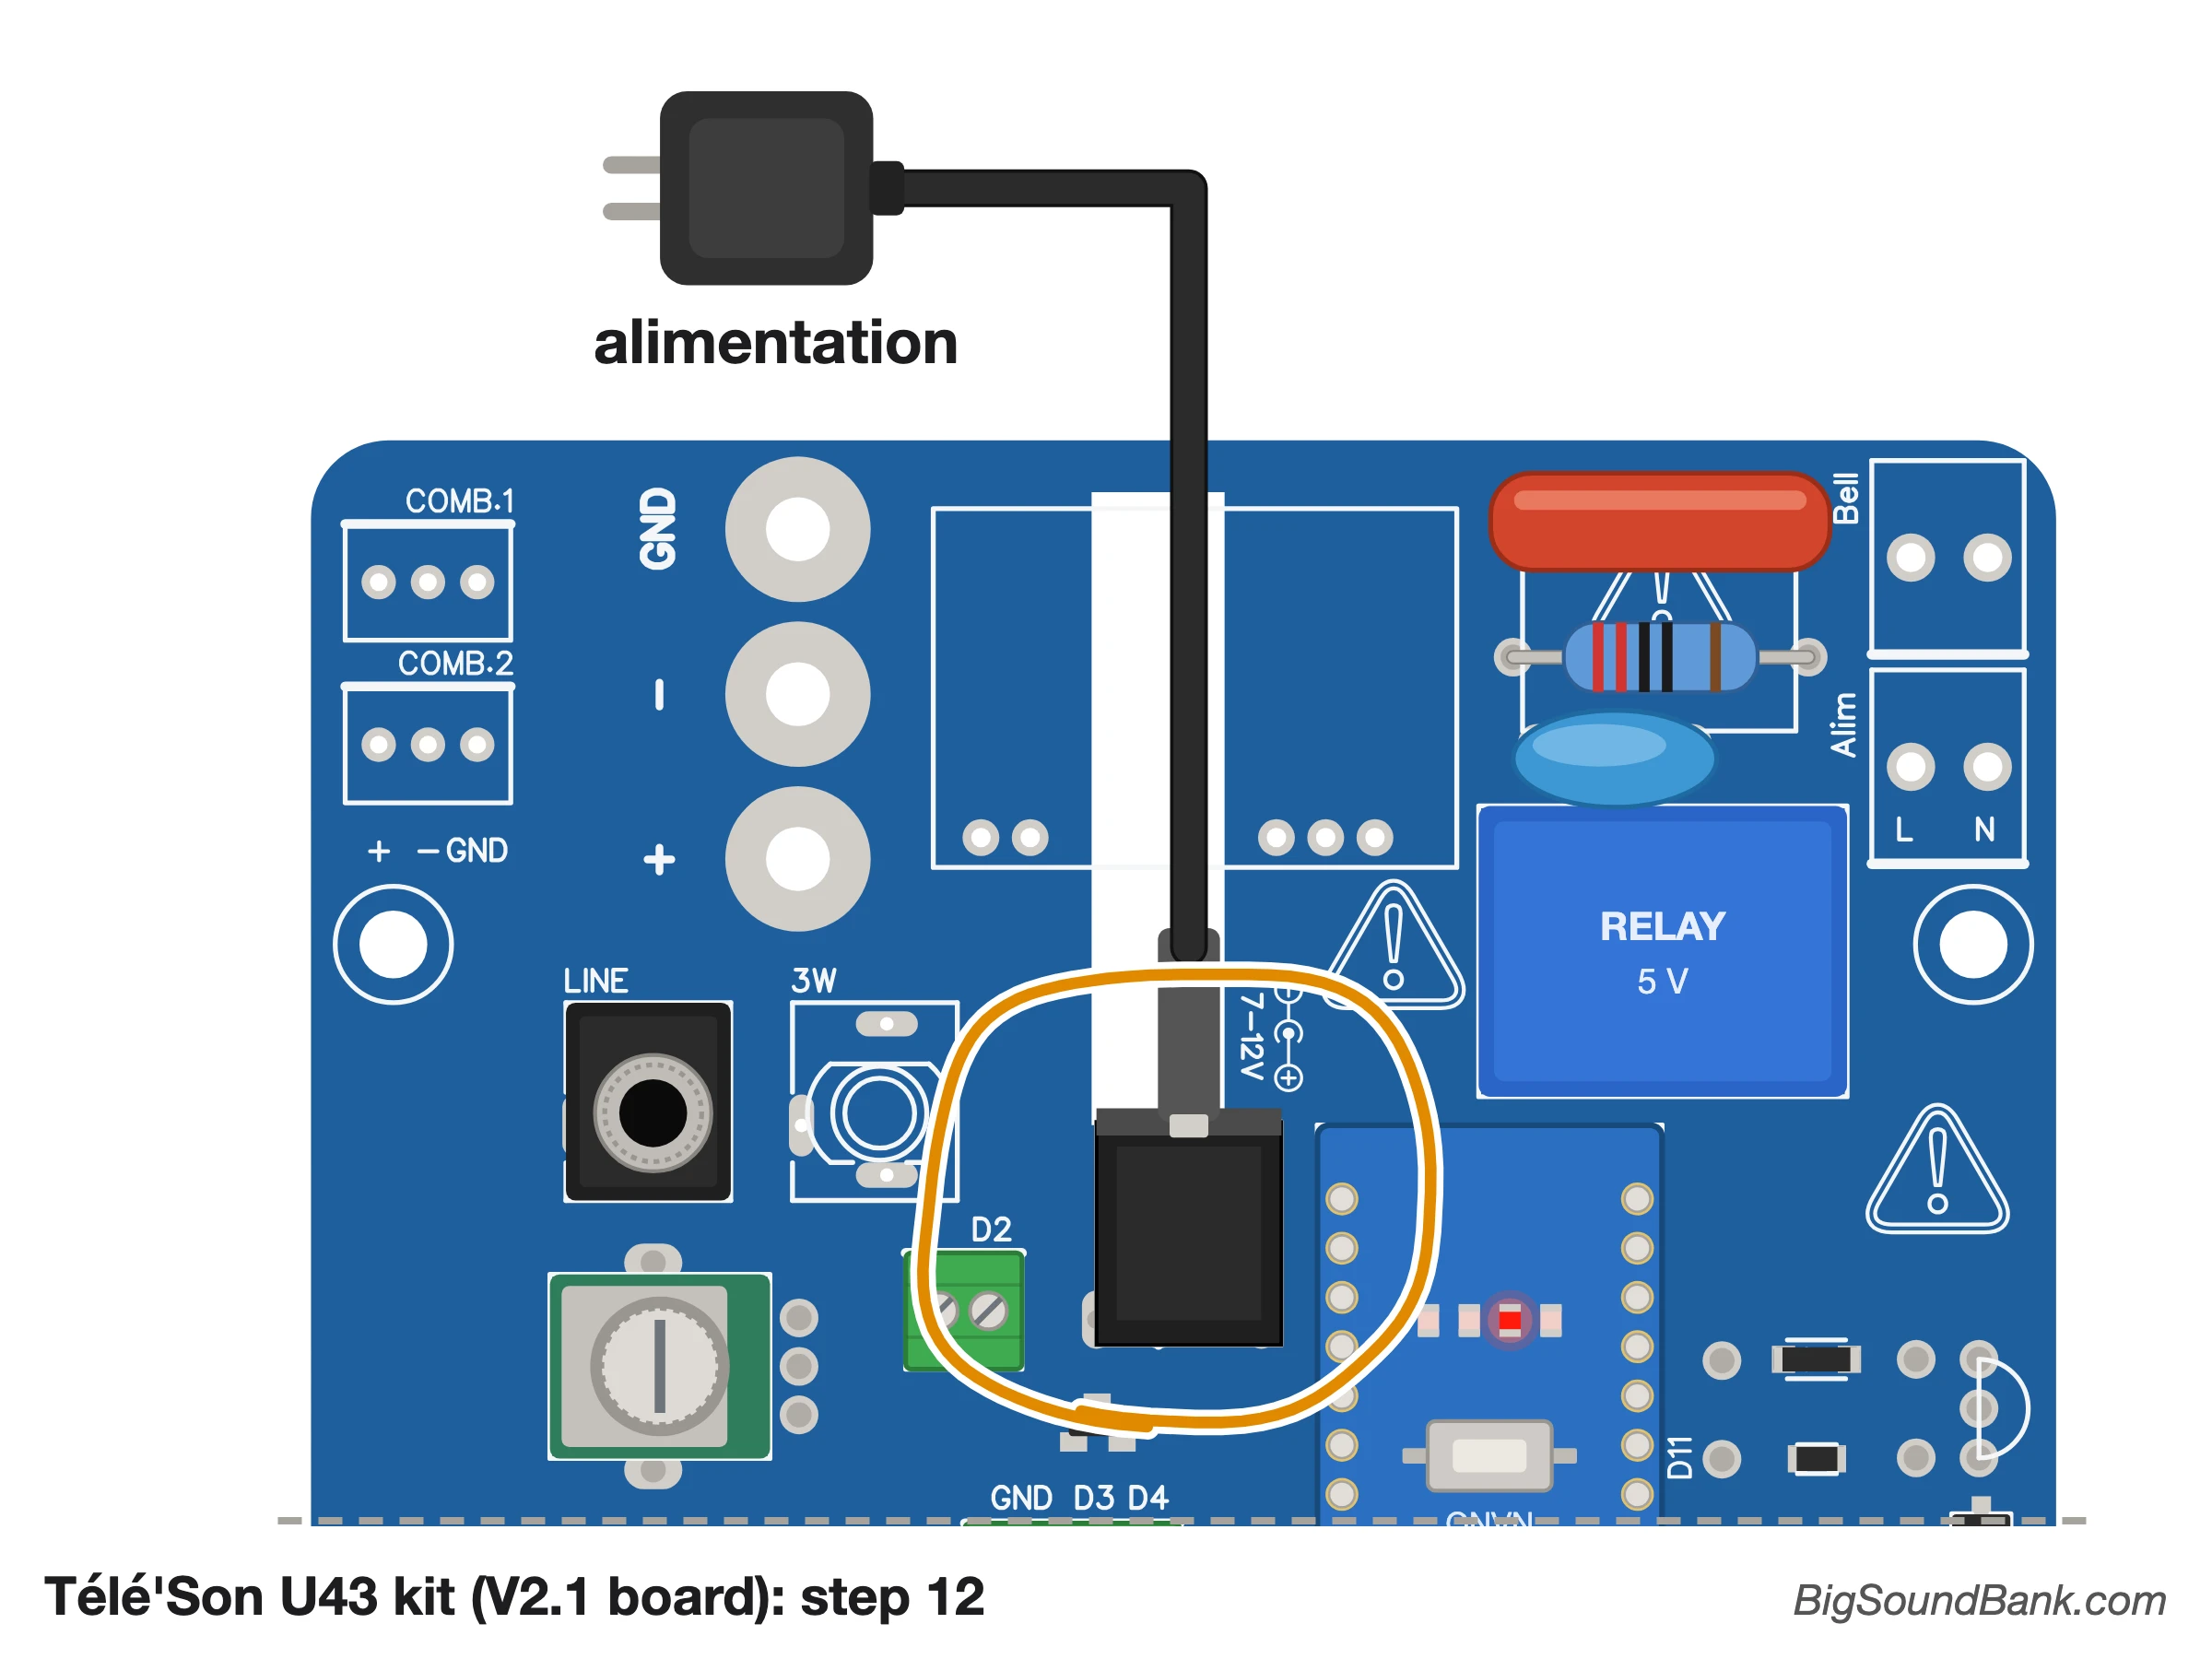
Plug your 7 to 12 V power supply into the socket 1, without plugging the power adapter into a wall socket yet.
Step 13: first test
Plug the power adapter into a wall socket and look at the Nano: its small red light should come on.
Then unplug the power adapter from the wall socket, whether the light came on or not.
If it stayed off, there is probably a short circuit somewhere: clean and check the lugs, the wires and the solder joints, then try this test again. If it still does not come on after several attempts, contact me and send me a photo of your assembly, ideally of the top and the underside of the kit's circuit board.
Step 14: closing
Turn the telephone over again on the tea towel and close it in the reverse order of opening: the two screws inside the flap, the flap, then the front screw and the back screw. The kit's circuit board can no longer be reached. Then put the telephone the right way up, on its feet, as for normal use, and put the handset back on its cradle, together with the earpiece.
First use
First test
- Plug in the power supply and wait 5 seconds.
- Pick up the handset and listen.
- Magic!
If nothing happens
- Unplug the power supply.
- Check the microSD card: formatted in FAT16 or FAT32, an "mp3" folder at the root, files named "0001", "0002"… without gaps, and nothing else.
- Check the connections of the hook switch 3 and of the handset 8, then the volume 7. If the sound starts when the handset is hung up and stops when it is picked up, the hook switch is wired to the wrong contact.
- Plug back in, wait 5 seconds, and pick up the handset.
Ideas & Recommendations
- When the handset is picked up, the sound starts immediately. Slow people may therefore miss the beginning of your file. So I recommend adding 1 to 2 seconds of jingle before your file. Silence is not enough, because people who pick up quickly might think the device is not working. The jingle lets them know that the file is about to start.
- Sometimes the telephone has an earpiece at the back. It may seem a good idea, so that two people can listen at the same time. However, you will quickly notice that some people use the back earpiece without picking up the handset. Since it is the handset that starts playback, these people will hear nothing. So I recommend simply removing this earpiece.
- The U43 handset only renders the mid frequencies well: there is no point putting a lot of bass or treble in it. I measured its response, and I offer a correction curve to download, in the Télé'Son U43 manual (in French).
- Because it is sometimes better to guard against theft, an anti-theft sling is easy to fit in a U43 (see step 11 of the installation). You can also extend it (sold in packs of 10).
Advanced use
Random explained
Although true randomness does not exist in computing, I am rather proud of mine and would like to explain it:
To prevent the (bad) luck of randomness from playing the same sound twice in a row (which is statistically possible, and frustrating), my program counts the number of files on the card, then plays them all at random, without repeating a single one until they have all been heard. Once the list is used up, it makes a new one, and so on.
Nano
The Télé'Son is controlled by a Nano. So it is perfectly possible, and easy, to create your own program, for example to make the buttons 5 speak. So have fun! Here are its pins, as my program uses them:
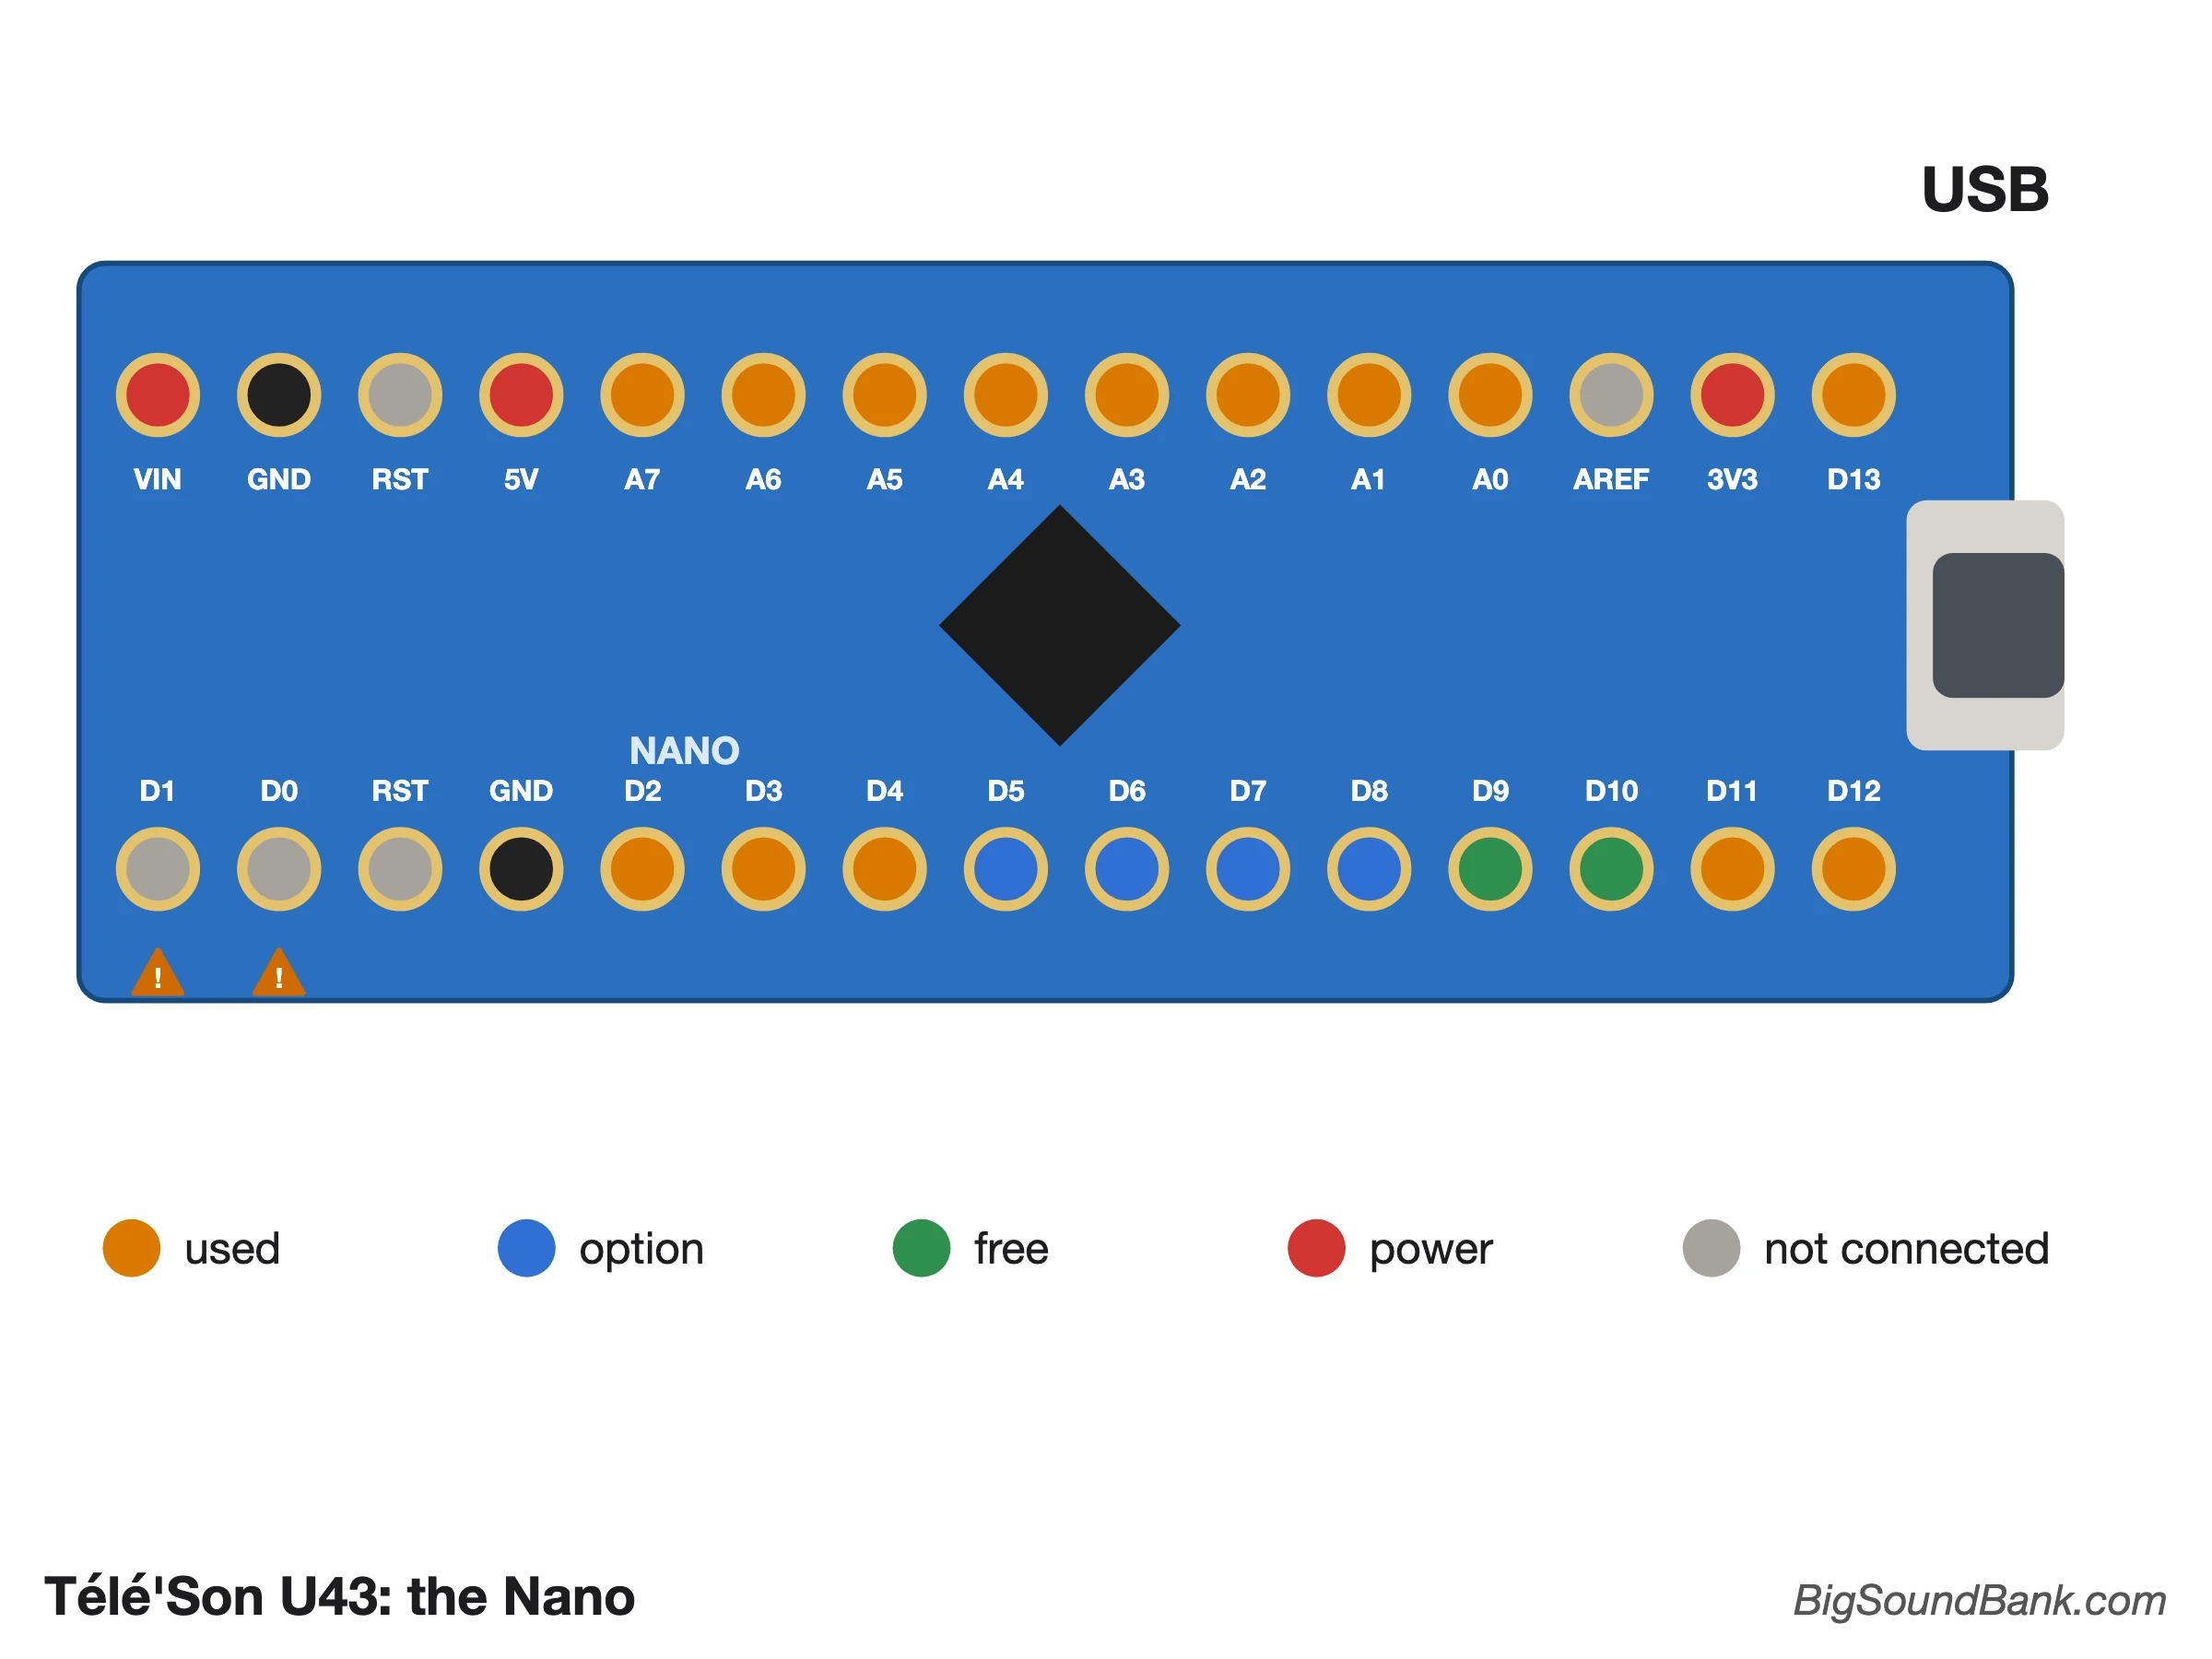
You can also get help from the DFPlayer Wiki.
Have an idea and want to know whether it can be done, and how? Feel free to contact me!
Problems & Solutions
While the DFPlayer is a brilliant little player that powers many of my creations, including this one, it has many small flaws that are nevertheless easy to work around. So here is an article dedicated to solving all the problems of the DFPlayer Mini.
Versions
Every time I launch a new production run of circuit boards, I make a few changes to the design. Feel free to send me your suggestions for the next versions.
- February 2025 - V1: First version.
- June 2025 - V2: Volume adjustable on the board, two jack sockets.
- November 2025 - V2.1: Separate "LINE" (stereo) and "3W" jack sockets, protection of the ringer output. The "3W" socket is no longer fitted.
Conclusion
Using this Télé'Son is really simple but, at the risk of repeating myself: feel free to contact me if you have the slightest question or suggestion about it!