

As someone passionate about electronics and audio, I discovered the "DFPlayer Mini" early on: a tiny, very cheap audio player that reads MP3 and WAV files from a MicroSD card, either on its own or driven by a microcontroller.
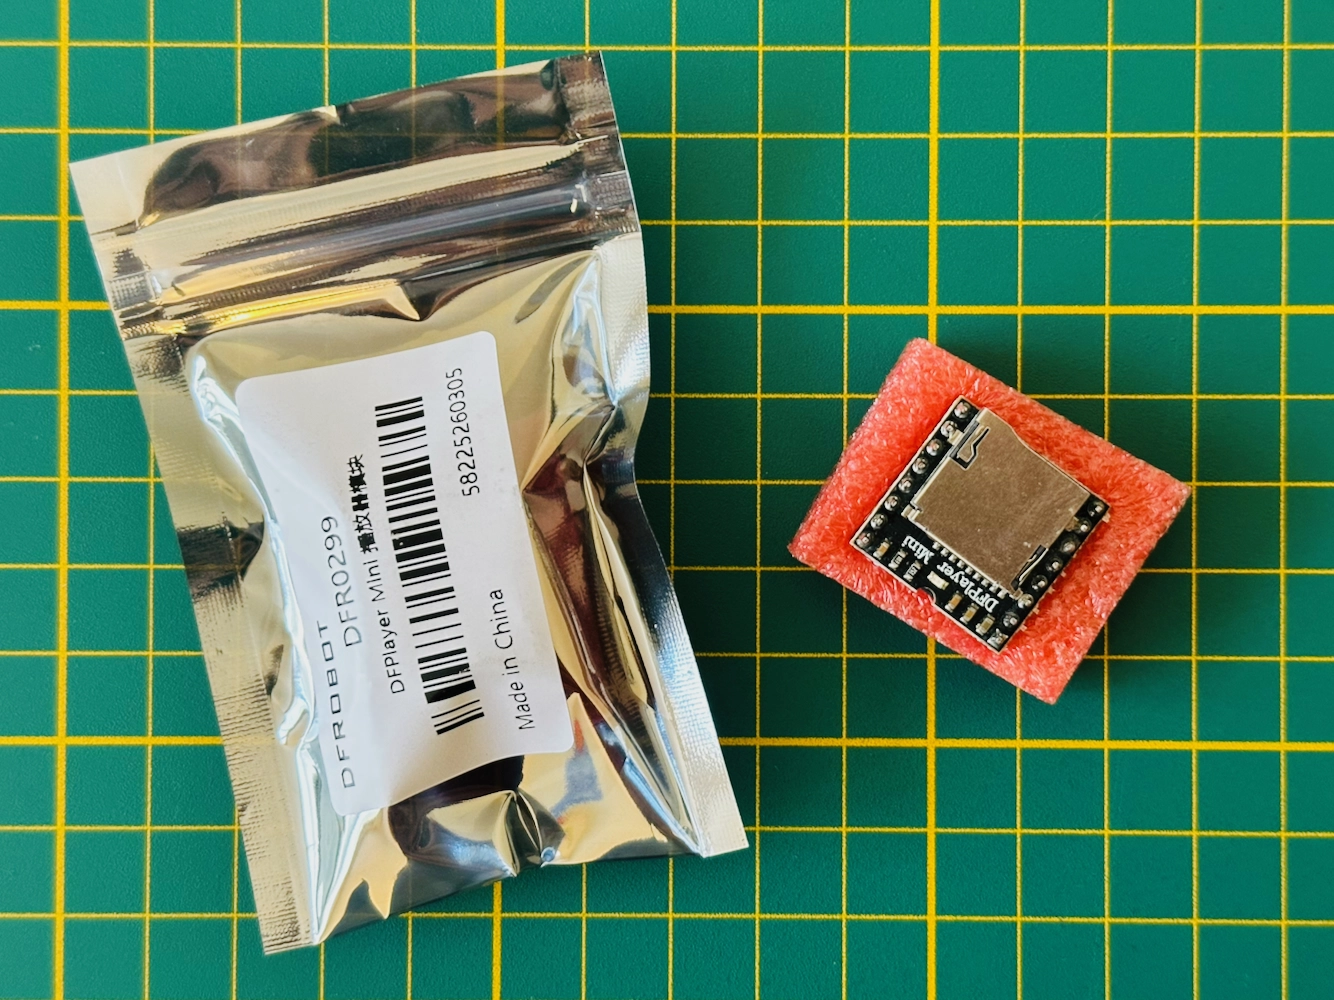
This guide is devoted entirely to the original "DFPlayer Mini" from DFRobot, part number "DFR0299": what it can do, how to recognize it, how to wire it, how to get the most out of it, and how to work around its quirks. The many clones in circulation are covered in a separate guide.
All of this may sound intimidating if you're new to electronics: resistors, a serial link, a bit of C++... Don't worry, it really isn't anymore. Artificial intelligence has put this kind of project within everyone's reach: it reads a schematic, explains an error, writes or fixes a program, and patiently answers the questions you'd be embarrassed to ask. I personally use "Claude" and it saves me real time. Take advantage of the new tools: jump in, you're no longer alone in front of your breadboard.
On that note, it's thanks to the (real) "DFPlayer Mini" that I offer the "Exposi'Son", "Ambi'Son" and "Boita'Son" modules in my shop, and that I publish two free guides showing you how to build these objects yourself, with the DFPlayer alone or with an Arduino (it can also be done without the DFPlayer, using a Raspberry Pi).
Overview
The "DFPlayer Mini" was designed by the Chinese company DFRobot, which sells it under the part number "DFR0299". It's a small board bristling with pins, able to hold a MicroSD card (sometimes called "TF"), read the audio files on it, and play them back either on a line output or straight into a speaker thanks to its built-in 3-watt amplifier.
Its great strength is that it works on its own, with no microcontroller, while still accepting serial commands from an Arduino or a Raspberry Pi when the project calls for it.
Physically
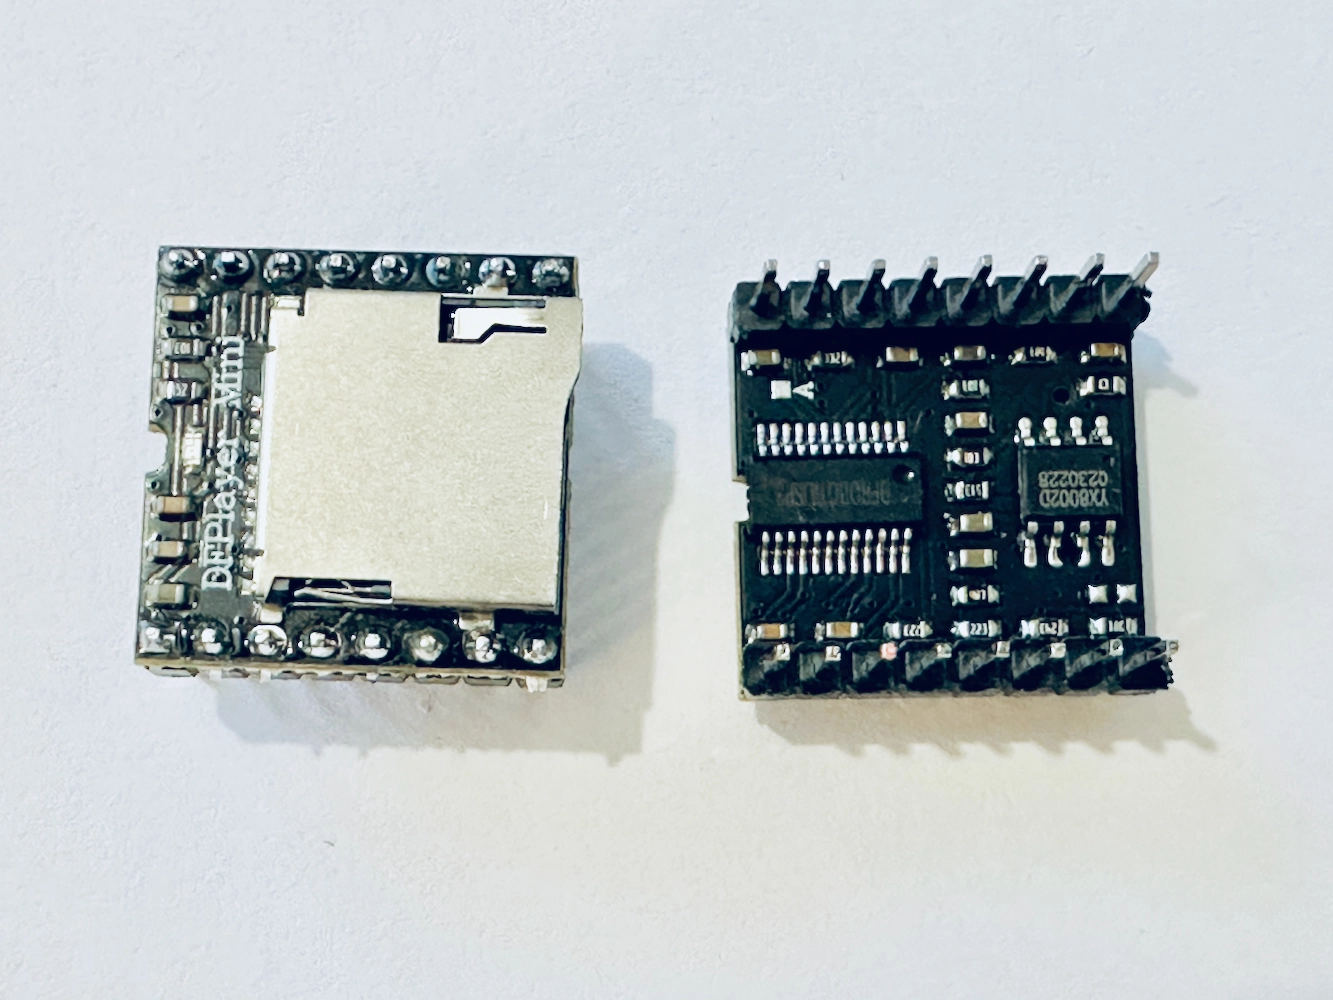
The board measures roughly 20 x 20 mm (about 0.8 x 0.8") and 3.4 mm thick, and weighs barely 3 grams. It carries 16 pins in two rows of eight, on the standard 0.1" (2.54 mm) pitch, so it plugs straight into a breadboard. You'll find the power pins, the audio outputs, the serial link, the "AdKey" inputs, the "IO" inputs, the "Busy" output, and the MicroSD card slot on the back.
An LED, blue on the DFR0299, lights up during playback. It's the simplest way to tell whether the module is working.
Electrically
It offers a "DAC" output, perfect for headphones or an external amplifier, and an amplified "SPK" output rated at 3 watts into 4 to 8 ohms for a speaker or a resonator.
It runs on 3.2 to 5 volts, drawing on the order of 20 mA at idle and considerably more when driving a speaker, where the amplifier accounts for most of the current. Size your supply generously: a 3 W speaker playing loud can demand several hundred milliamps on peaks.
All of its logic inputs and outputs run at 3.3 volts. That's an important detail when connecting it to a 5 V Arduino, and I'll come back to it below.
Digitally
This module reads WAV and MP3 files from a MicroSD card formatted as "FAT16" or "FAT32", and talks to an Arduino (or a clone like the one I use) or a Raspberry Pi over RX/TX.
On the format side, it swallows MP3s from 8 to 320 kbps, constant or variable bitrate, at the usual sample rates from 8 to 48 kHz. Some firmware versions also accept WMA, but I wouldn't count on it.
What you can build with it
This player costs about as much as a cup of coffee, and yet the list of what it makes possible is endless. A few ideas I've actually built:
- An ambient sound player to fall asleep to
- A sound-effects launcher for doing live foley in a play or a radio show
- A player for guided meditations or ASMR
- A board-game timer
- A backing-track launcher for improvising, or for a musician to play along with
- A player for children's stories that kids pick themselves, or for audiobooks
- A game-show buzzer, with a single sound and a big palm button
- A talking museum label, a listening station, an interactive artwork
- A station announcement for a model railroad, triggered as the train goes by
- An old telephone that rings and delivers a message to whoever picks up
- Or whatever else you dream up!
How to spot the real one
Before you wire anything up, you need the right module in your hands. This is the trickiest part of buying one: many boards sold as a "DFPlayer Mini" are nothing of the sort. Here's how to identify a genuine DFR0299:
- "DFRobot" and "DFR0299" printed on the packaging
- "DFPlayer Mini" silkscreened in white on the board, with no "HW-247A" marking
- Audio chip marked "DFROBOTILISP3"
- Amplifier marked "YX8002D"
- Every component footprint is actually populated (and there are a lot of them)
- Blue LED
I bought mine in 2024 for $5.90, straight from "DFRobot" (watch out for customs fees: in my case they came to about $4.50 for two boards). It's also available for around $7 at "BerryBase" and at "Mouser".
Be wary of cheap multi-packs on general marketplaces: a suspiciously low price is almost always the sign of a clone, and the photo in the listing doesn't reliably match what lands in your mailbox. Whenever you can, buy from a serious electronics distributor that guarantees the source.
Paying $6 for the real thing instead of $2.50 for a clone isn't fussiness: the copies lose stereo, lose the bass, lose the "AdKey" inputs, and sometimes lose the silence between files altogether. A breakdown of every version I've had on my bench is in the guide devoted to the clones.
Pinout
Sixteen pins, of which you'll never use more than half in practice:
- 1 - VCC: power, 3.2 to 5 V
- 2 - RX: serial receive (to the Arduino's TX)
- 3 - TX: serial transmit (to the Arduino's RX)
- 4 - DAC_R: line output, right channel
- 5 - DAC_L: line output, left channel
- 6 - SPK_2: speaker, terminal 2
- 7 - GND: ground
- 8 - SPK_1: speaker, terminal 1
- 9 - IO_1: "previous" button (short press) / volume down (long press)
- 10 - GND: ground
- 11 - IO_2: "next" button (short press) / volume up (long press)
- 12 - AdKey_1: analog button input 1
- 13 - AdKey_2: analog button input 2
- 14 - USB+: USB data (D+), to read a flash drive instead of a card
- 15 - USB-: USB data (D-)
- 16 - Busy: playback status, held low while a file is playing
The "Busy" pin is extremely handy: it lets an Arduino know a sound is playing without polling the module, and lets you drive an LED or a relay for the duration of playback. Few tutorials use it, and I think that's a shame. It's low during playback, high the rest of the time, and it swings 3.3 V like everything else on the board.
Power and wiring
A good share of the "noisy sound" blamed on the DFPlayer actually comes from its power supply or its wiring. Here are the basic schematics, and the precautions that make all the difference.


What to power it with
Officially, 3.2 to 5 volts. In practice, almost anything works: three alkaline AA or AAA cells (1.5 V) in series, three or four rechargeable NiMH cells (1.2 V) in series, a USB-C phone charger (which sometimes reaches 5.5 V), a 3.7 V 18650 battery, or the 5 V rail of an Arduino or Raspberry Pi.
I also run it on four AA cells, or 6 volts, and it seems to take it. A word of caution though: that's beyond the manufacturer's specification, so it's at your own risk. Keep in mind that fresh cells sit slightly above their nominal voltage, which pushes things a little higher still.
The two grounds
The DFPlayer has two GND pins. If you're using the DAC output, use one for the power supply and the other for your audio output ground. Yes, they're supposed to be the same net, and you could tie them together: don't. The DFPlayer's circuitry is very noisy, and that noise ends up in the sound. Keep the two separate.
On a printed circuit board, that translates into something concrete: the power ground can perfectly well join a ground plane shared by the whole board, and it should. The audio ground, however, must stay a dedicated trace, thin and direct, with no ground pour around it. A large copper plane tied to the audio ground behaves like an antenna and drags every bit of digital noise back into the signal: that's the recipe for a guaranteed buzz.
Decoupling
Again for the DAC output, add the following as physically close to the DFPlayer as you can, between the + and - of its supply:
- a 1000 µF electrolytic capacitor (mind the polarity)
- a 100 nF ceramic capacitor
The big one absorbs the amplifier's current surges, the small one filters high-frequency noise. Both are useful; they don't do the same job.
Protection
- A 1 kΩ resistor in series with the RX pin, between the Arduino's TX and the DFPlayer's RX. It damps noise on the serial link, and more importantly it protects an input designed for 3.3 V from a signal that swings 5 V. To do it properly, a voltage divider (1 kΩ in series, then 2 kΩ to ground) is cleaner still.
- Two 27 Ω / 1 W resistors in series with the amplified output, in one specific case: when you bring the 3 W amplified output out to a jack socket. The arrangement is convoluted, I'll grant you, but it prevents a disaster. The SPK output is bridged, so neither terminal sits at ground. Plugging a mono plug into a stereo jack shorts two contacts together, and therefore both terminals of the amplifier. The resistors absorb that short circuit instead of the module. Don't skip this if your users might plug in any old connector, or the DFPlayer's amplifier may not survive it.
And if your supply is marginal, or shared with hungry accessories (relays, displays, servos), give those a second supply of their own, with the ground tied to the module's.
The audio outputs
Contrary to a widespread belief, the two outputs aren't mutually exclusive: the amplifier is permanently wired behind the converter, with no internal switch whatsoever. So there's nothing stopping you from running a speaker on SPK and a line output on DAC at the same time.
Two caveats, though. First, a working amplifier draws current and feeds noise back into the DAC, so for critical listening it's better to leave SPK unconnected. Second, the module doesn't mute the speaker when you insert a jack: if you want that behavior, you need a switched jack socket that breaks the speaker circuit itself.
The line output (DAC)
The "DAC_L" and "DAC_R" pins deliver a line-level signal in true stereo, meant for headphones, an external amplifier, or a line input. This is where the DFR0299 is at its best.
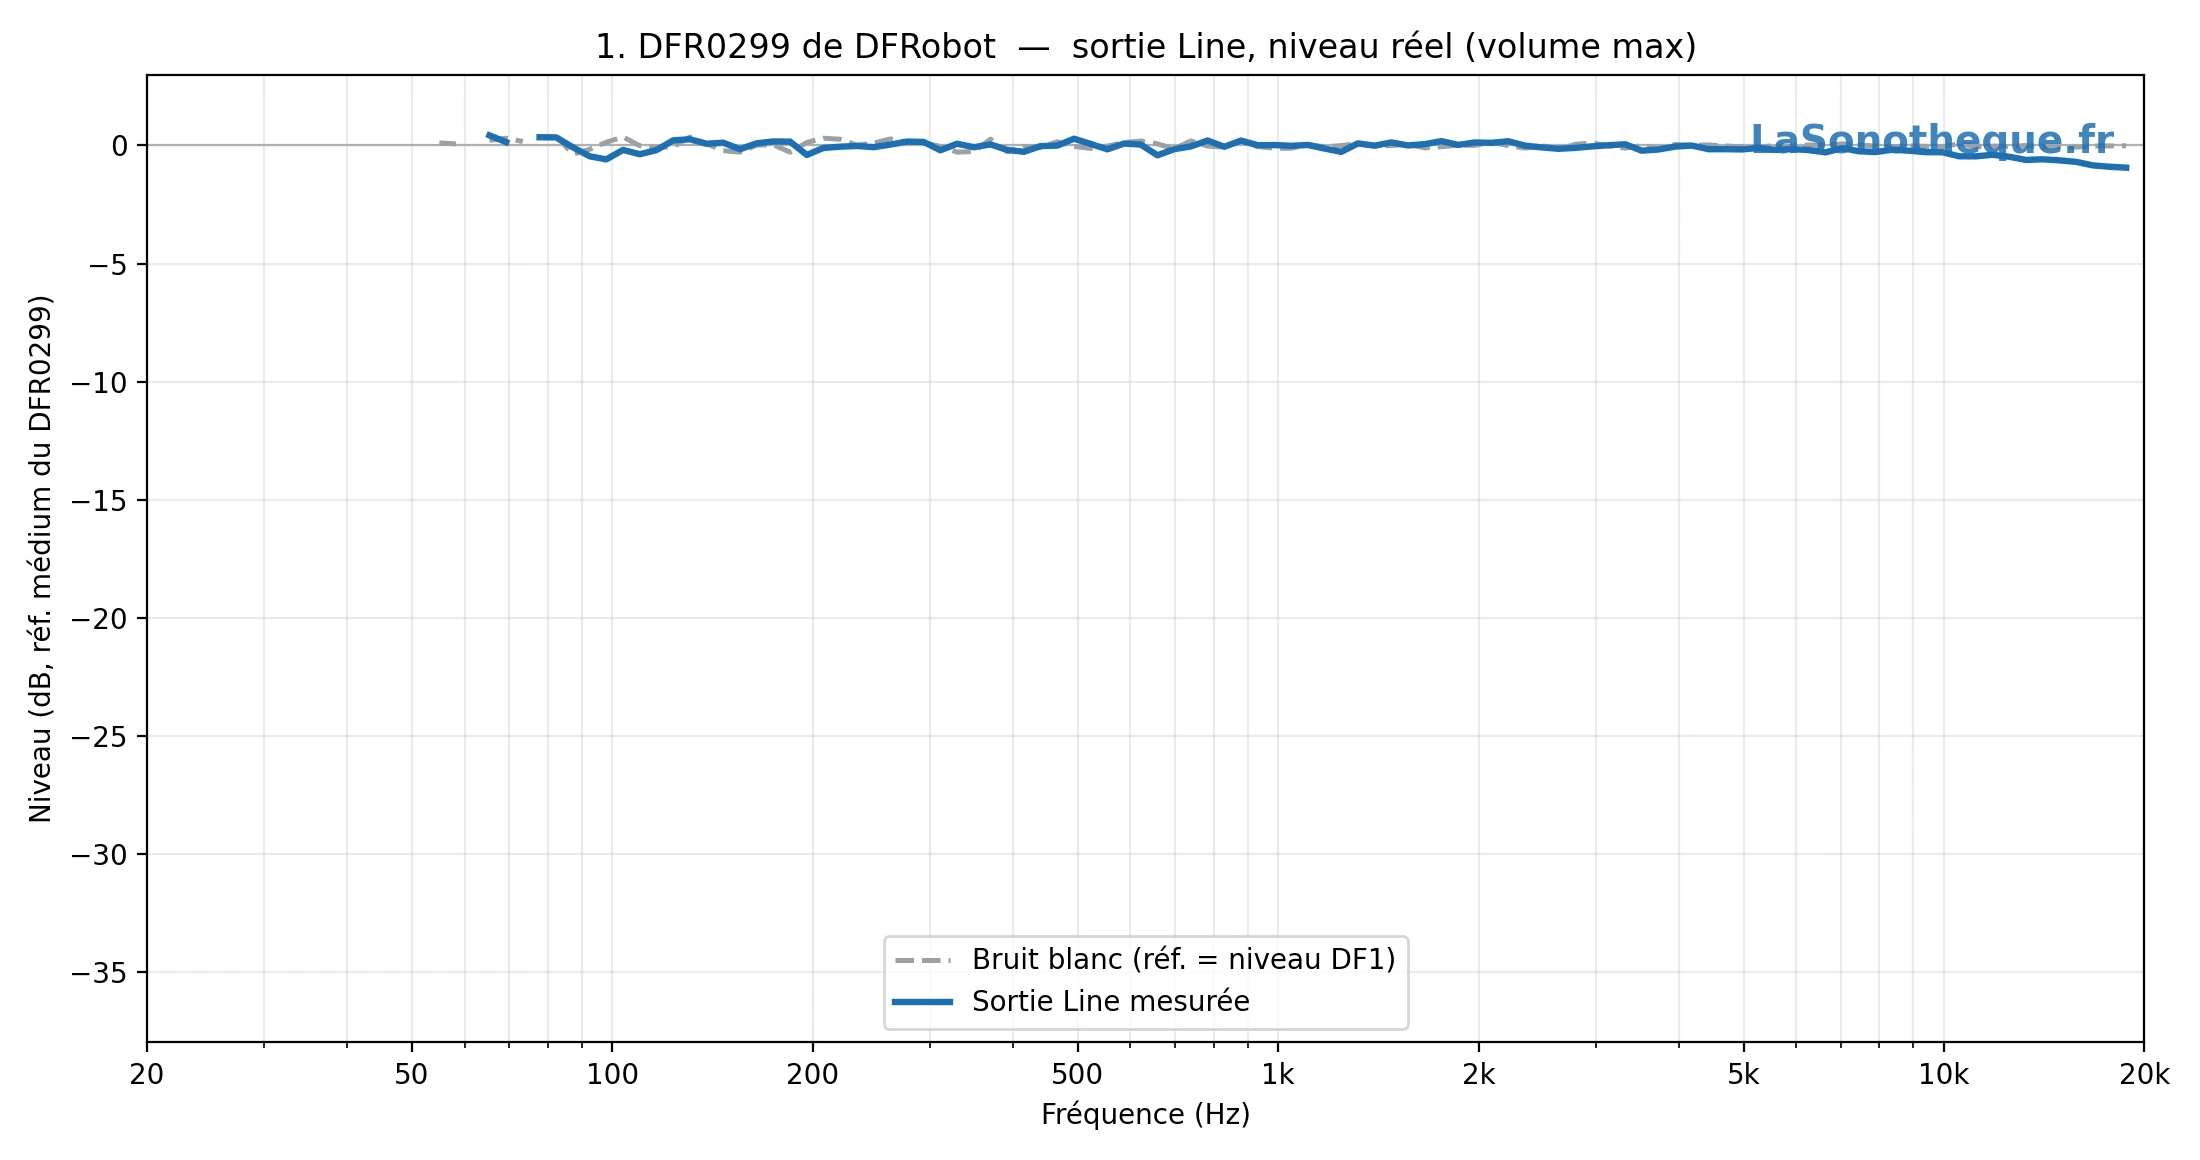
I measured its frequency response by having it play white noise (a flat spectrum) at maximum volume: it's flat from the bass to the treble, and it's also the loudest of all the other versions I tested, all of which were clones. The reference, plain and simple.
The amplified output (SPK)
The "SPK_1" and "SPK_2" pins drive a speaker or a resonator directly, thanks to the onboard amplifier: 3 watts into 4 to 8 ohms. Go with 8 ohms, which draws less current.
Note that this output is mono: it sums the two channels (left + right). Nothing is lost, but the stereo image is. One more thing worth knowing: don't tie the speaker to ground. It's driven from both "SPK" pins, in bridge mode.
A word about the rated power: 3 watts is the theoretical figure into 4 ohms with a generous supply. Into 8 ohms, or with three tired cells, you'll get considerably less. That's plenty for a sound box or a museum label, but not for filling a room.
Volume
Without a microcontroller, volume is set with a 500 Ω to 10 kΩ potentiometer, ideally audio-taper, placed at the output. A stereo setup needs two, or a dual-gang unit. Under serial control, volume is set in software, from 0 to 30.
Note that the software setting acts before the converter:
- turning the volume way down over serial degrades the dynamic range. For quiet but clean listening, keep the digital volume fairly high and attenuate in the analog domain, at a potentiometer or on the amplifier that follows.
- changing the volume over serial during playback generates electronic noise.
The equalizer
The DFR0299 has 6 built-in EQ curves: Normal, Pop, Rock, Jazz, Classic and Bass. They're useful for compensating for a small speaker or roughing out a tone without editing your files.
But they only apply to MP3 files: on a WAV file, no EQ has any effect. That's a limitation of the decoder, not a hidden setting: if your project needs equalization, encode your sounds as MP3.
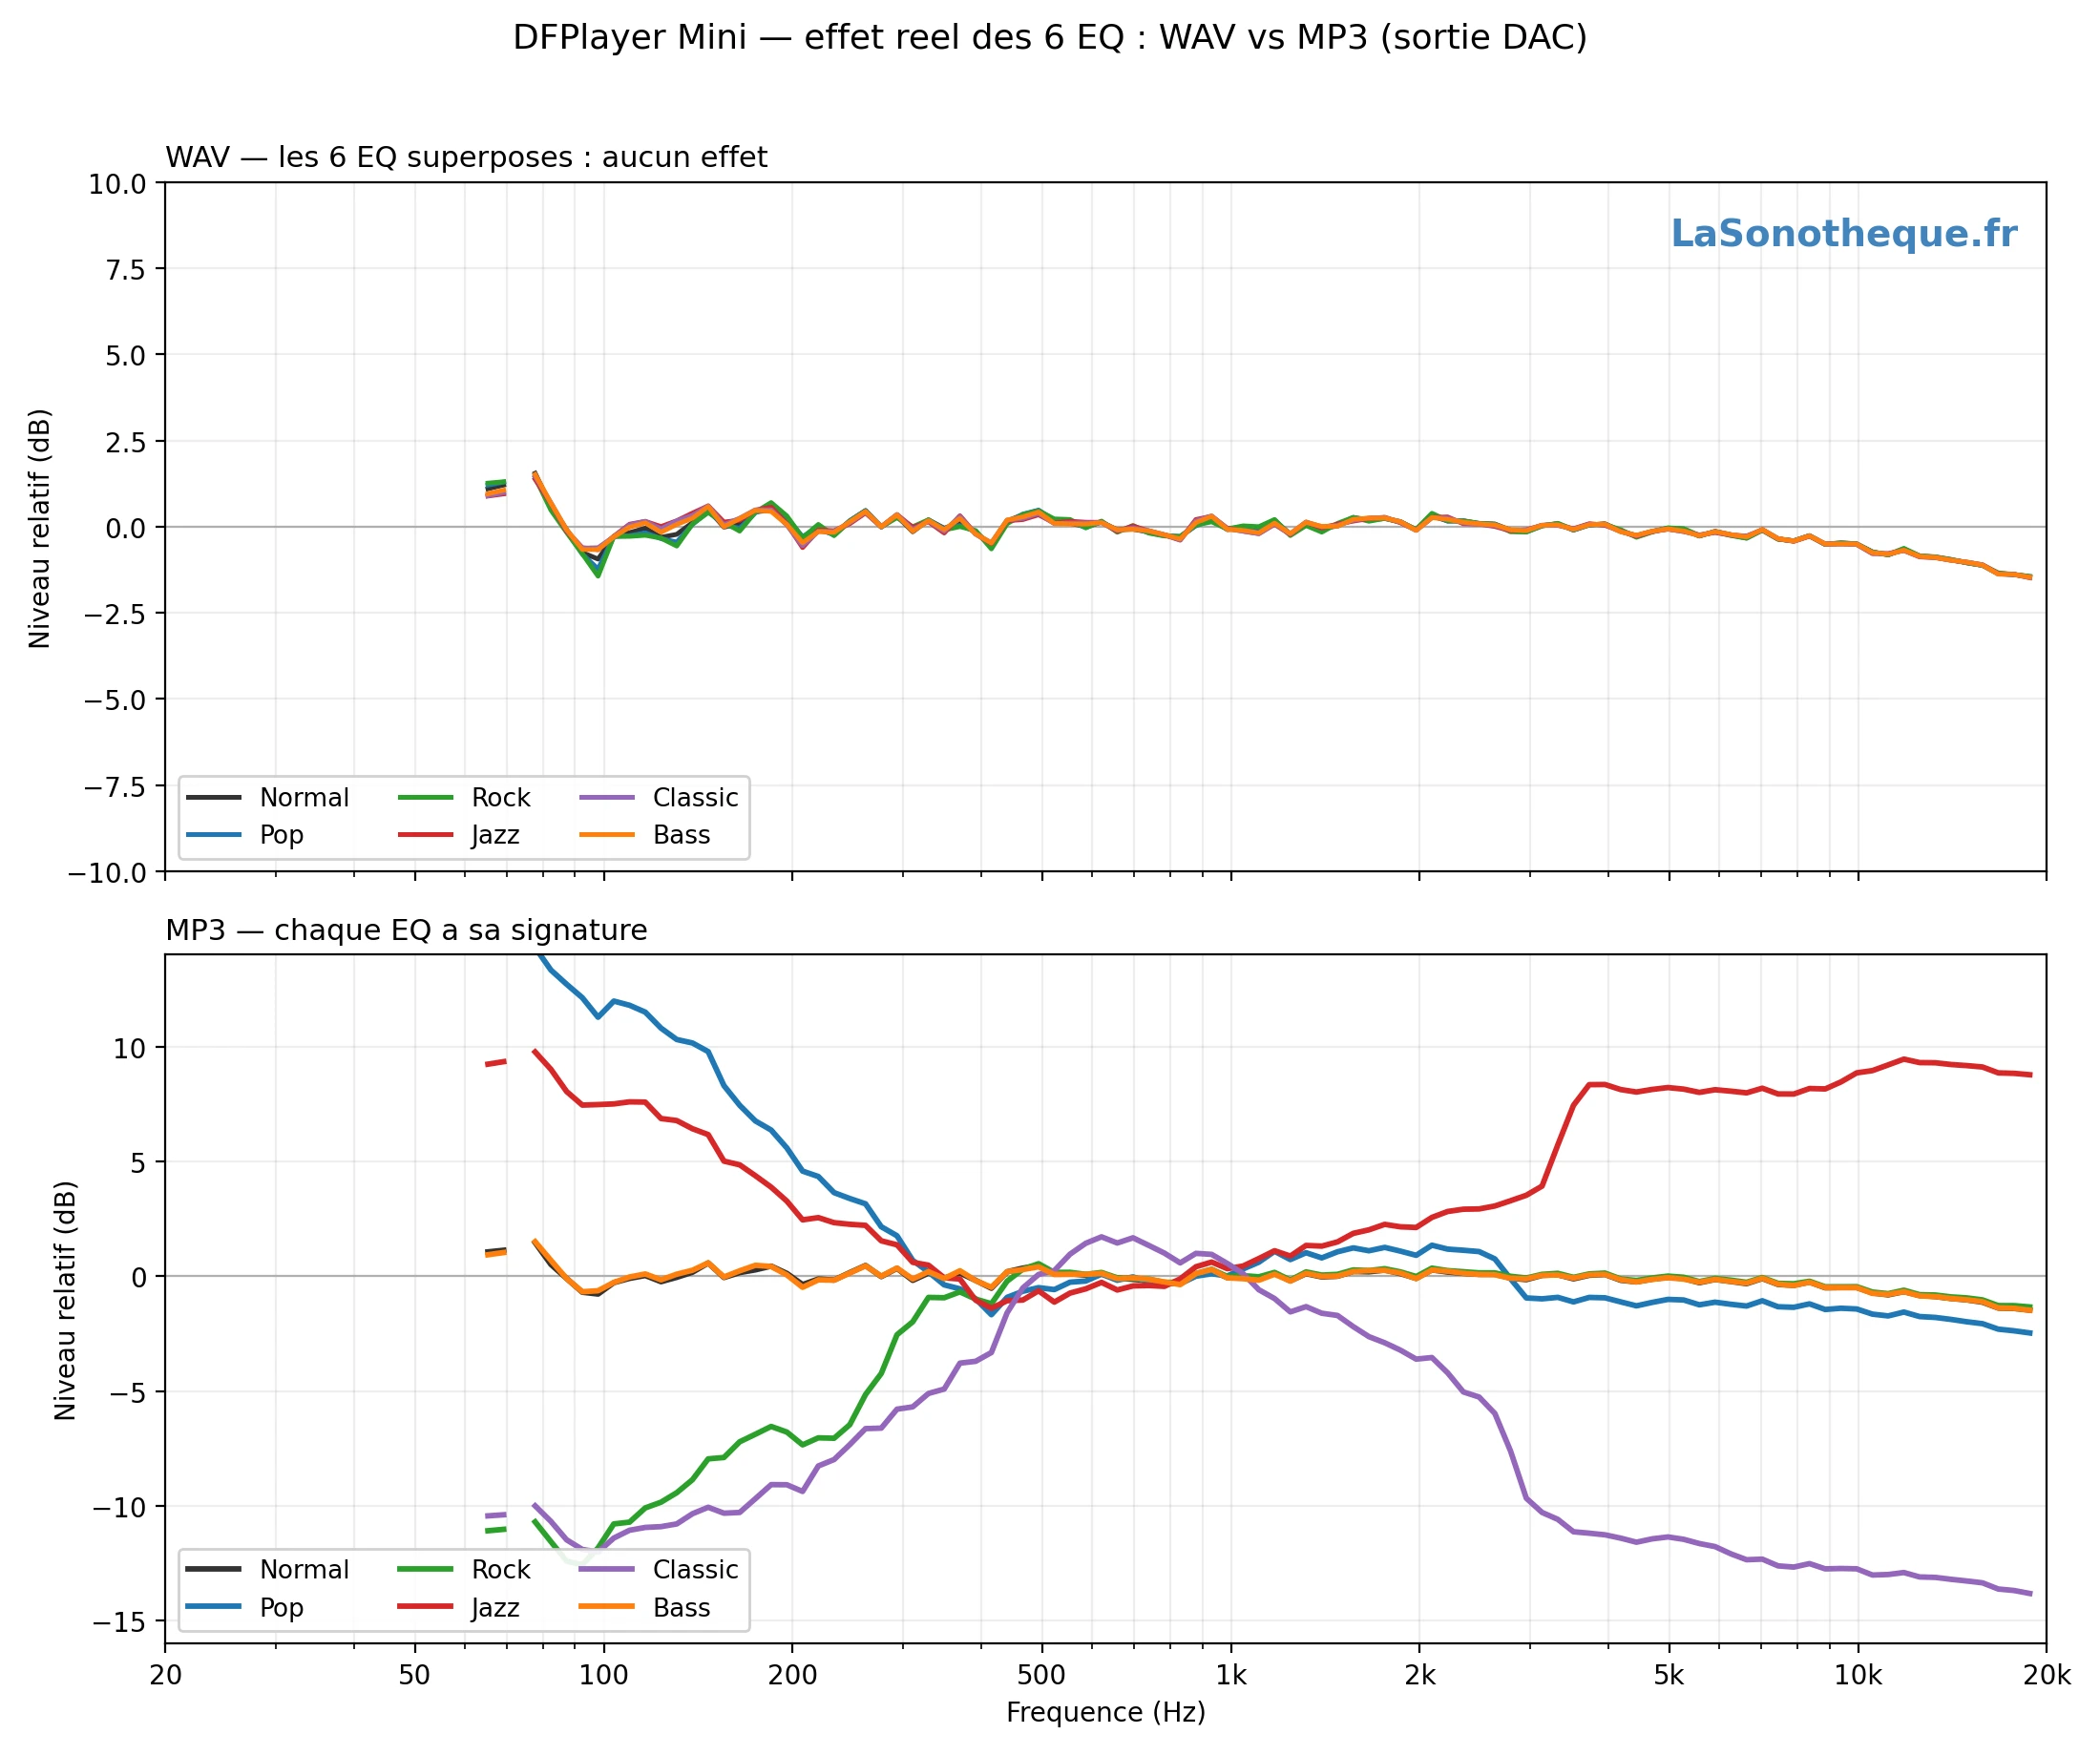
I measured what each of them actually does, curves included, in the guide devoted to the DFPlayer's equalizers.
The card and the files
This is where 90% of the trouble with this player comes from. The DFPlayer is picky: follow these instructions to the letter, down to the capitalization and the spaces.
The storage
MicroSD card or USB flash drive, always formatted before each new addition or change to its contents, as "FAT16" or "FAT32". Name the volume "SD", with no spaces or special characters.
The manufacturer quotes a maximum capacity of 32 GB. I did try a 64 GB MicroSD card anyway: it worked perfectly. So it's possible, but it's out of spec, with no guarantee that the next module or the next firmware will behave the same way. For a project you're installing at a client's site or in a museum, stay within the published limits.
Avoid bargain-basement cards: a bad card can produce a hum, prevent playback entirely, or even make the reader run hot. A small, slow, modest card from a known brand beats a big no-name one.
File formats
MP3 for preference, or WAV at 16-bit / 48 kHz maximum. Beyond that, the sound turns "robotic" or distorted. For MP3s, aim high: 320 kbps.
WAV has one advantage: no compression, so no decoding latency and no gap at the start. It has two drawbacks: much larger files, and no equalizer available. Pick according to the project.
Naming
- Name your files 0001, 0002, and so on (with the .mp3 or .wav extension, of course)
- Name them in a folder on your computer, in the right order, before copying them to the card. NEVER rename them once they're on it.
In reality, other filenames work too: the DFPlayer is perfectly happy reading a "distant-thunder.mp3". But since it works by index order rather than by name, you lose your bearings the moment the project grows. So I strongly recommend four-digit numbering: it's the only way to know, six months later, which button fires which sound.
Numbered folders
The module understands several ways of organizing the card, and the layout you choose determines which command to use:
- Files at the root: files are called by the order in which they were copied. The simplest, and the most treacherous.
- Numbered folders: "/01/001.mp3" through "/99/255.mp3". Two digits for the folder, three for the file. This is the layout to favor as soon as you have several families of sounds, because you can call file 4 in folder 15 precisely, independent of copy order. Up to 99 folders of 255 files each, and this is where the 255 limit applies.
- The "mp3" folder: "/mp3/0001.mp3" onward, four digits. A single folder, called by a dedicated command, that accepts far more files than the numbered folders: the index runs up to 2999, as it does at the root. So this is the right layout for a large flat library.
- The "advert" folder: "/advert/0001.mp3". The least known, and the cleverest. A file from this folder interrupts whatever is playing, plays, and then hands control back to the interrupted track, which resumes where it left off. Ideal for an announcement over an ambience, a confirmation beep, or a guidance voice. It isn't called like the others: you have to use the
advertise()function, described below in the section on serial control.
A bit of common sense: don't mix layouts on the same card until you're comfortable. Pick one and stick with it.
Copy order
Here's the least intuitive quirk of this player: it doesn't read files by name, but by the order in which they were written to the card. If you ask for file 3, it won't play "0003" but the third sound copied to the card. So you have to copy your files one after another, from first to last, onto a freshly formatted card.
And if two files are of no use to you but you need "0003" in third position, put any old sounds in slots 0001 and 0002.
The reason is simple: the module reads the FAT allocation table in the order it was filled, not in the alphabetical order your operating system so helpfully displays. It's also why dragging and dropping several files at once gives unpredictable results: the system copies them in whatever order suits it.
Housekeeping, not optional
Once your files are copied, operating systems have the annoying habit of dropping invisible files alongside them, which the DFPlayer sees perfectly well and counts as tracks.
- On Windows: turn on "Show hidden files and folders" and delete any that are on your card.
- On Mac: open Finder > Applications > Utilities > Terminal, paste the command below ("SD" being the name of your volume) and press Return. The Terminal will report that it didn't work, but it did.
dot_clean /Volumes/SDThe usual culprits are called ".DS_Store" and "._0001.mp3" on Mac, "System Volume Information" and the recycle bin on Windows. Then eject your card properly, put it back in the module, and test.
Reading from a USB drive
With a bit of hacking, you can solder a USB type A socket onto the DFPlayer to read files from a flash drive: just connect the socket's D- and D+ to the player's. Everything else works exactly the same, with the same formatting and naming rules.

The same trick works with USB type C, which is far more current, but that one is a little more demanding and calls for a few extra resistors.
A small bonus: when both storage devices are present, the module can switch between them. Over serial, or without a microcontroller using button B9 on the "AdKey 1" input (the 100 kΩ one, see the table below). Handy for an installation where the operator changes the content without opening the enclosure.
Controlling it
Without a microcontroller: IO_1 and IO_2
The "IO_1" and "IO_2" pins need nothing more than two pushbuttons to ground, with no resistor: a short press for the previous or next file, a long press (over a second) to lower or raise the volume.
It's the fastest setup to build: two buttons and you already have a usable player. Worth noting that on many modules, "Vol-" and "Vol+" are swapped relative to what you'd intuitively expect.
Without a microcontroller: the AdKey inputs
This is the most underrated feature of the DFPlayer, and the one that makes it truly self-sufficient. The "AdKey 1" and "AdKey 2" inputs don't read a simple contact closure: they measure a voltage. By putting a pushbutton in series with a resistor of a specific value, each button produces a different voltage, and the player knows which one was pressed. Ten values per input, so up to 20 buttons on a single DFPlayer, without a line of code.
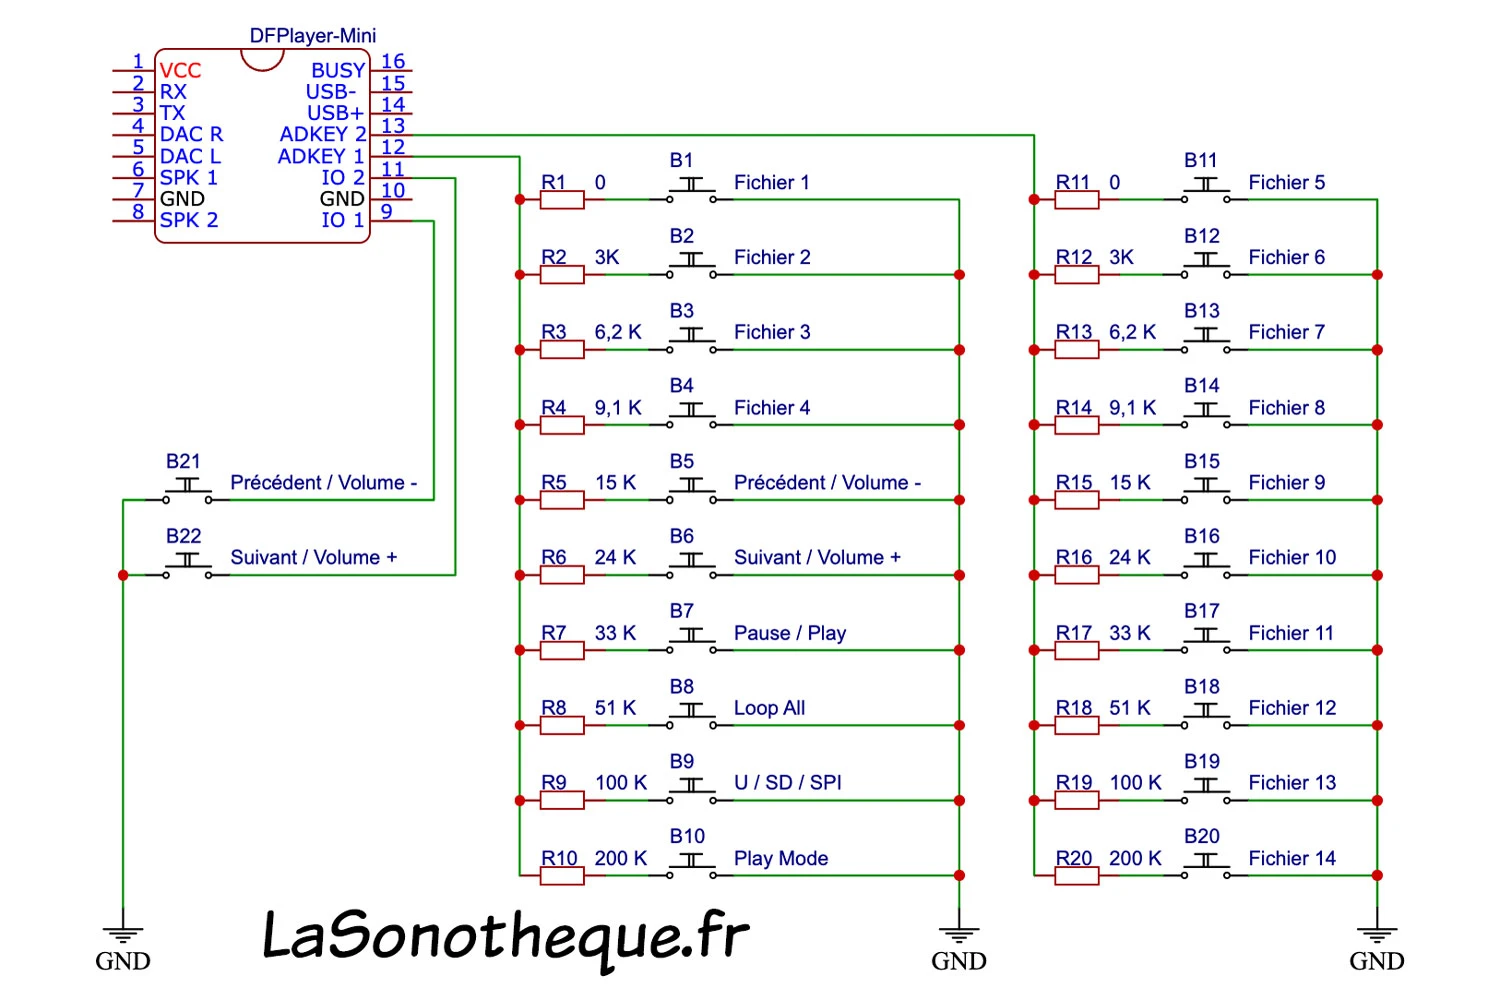
The actions available on "AdKey 1":
| Button | Resistor | Short press | Long press |
|---|---|---|---|
| B1 | 0 Ω | Play file 1 | Loop file 1 |
| B2 | 3 kΩ | Play file 2 | Loop file 2 |
| B3 | 6.2 kΩ | Play file 3 | Loop file 3 |
| B4 | 9.1 kΩ | Play file 4 | Loop file 4 |
| B5 | 15 kΩ | Previous file | Volume – |
| B6 | 24 kΩ | Next file | Volume + |
| B7 | 33 kΩ | Play one file / Pause | |
| B8 | 51 kΩ | Play all files in a loop / Pause | |
| B9 | 100 kΩ | Select storage (U-Disk / microSD / SPI bus) | |
| B10 | 200 kΩ | Playback mode: interruptible or non-interruptible |
And on "AdKey 2", ten more files:
| Button | Resistor | Short press | Long press |
|---|---|---|---|
| B11 | 0 Ω | Play file 5 | Loop file 5 |
| B12 | 3 kΩ | Play file 6 | Loop file 6 |
| B13 | 6.2 kΩ | Play file 7 | Loop file 7 |
| B14 | 9.1 kΩ | Play file 8 | Loop file 8 |
| B15 | 15 kΩ | Play file 9 | Loop file 9 |
| B16 | 24 kΩ | Play file 10 | Loop file 10 |
| B17 | 33 kΩ | Play file 11 | Loop file 11 |
| B18 | 51 kΩ | Play file 12 | Loop file 12 |
| B19 | 100 kΩ | Play file 13 | Loop file 13 |
| B20 | 200 kΩ | Play file 14 | Loop file 14 |
A few practical notes on these tables:
- The resistor values come from the E24 series; use 1% parts if you can, because it's the exact voltage that identifies the button. An approximate value will trigger the neighboring one.
- One button at a time: two simultaneous presses create an equivalent resistance that corresponds to something else, or to nothing at all.
- The files being called are the ones at the root, by index order, with all the consequences described above.
- A long press starts at roughly one second.
The first row of each table explains two behaviors that are usually discovered by accident, since a 0 Ω resistor is nothing but a piece of wire:
- At power-up, shorting "AdKey 1" (with no series resistor) plays every file on the card, in a loop
- After power-up, shorting "AdKey 1" for more than a second plays file 0001, in a loop
A power supply, a speaker, a button, and you're done. That's exactly the principle behind my "Exposi'Son" module. The clones have often lost this capability, when they haven't lost it entirely.
Over serial (RX/TX)
This is the most complete mode: the DFPlayer takes orders from an Arduino or a Raspberry Pi through its RX and TX pins, using the "DFRobotDFPlayerMini.h" library. These days I recommend version 1.0.6, which is more complete and better maintained. Version 1.0.3 is still more reliable with certain clones, though: if your module misbehaves with the latest release, drop back, that's often the fix.
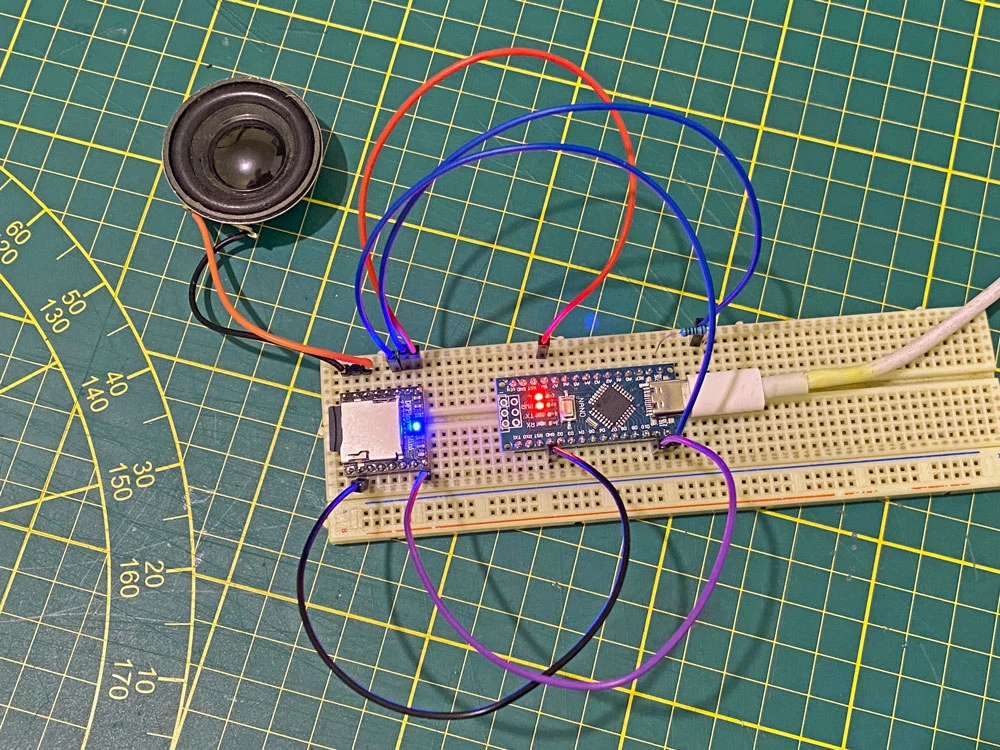
The DFPlayer is powered from the Arduino's 5V and GND. Its TX, RX and Busy pins go to D13, D12 and D11, and don't forget the 1 kΩ resistor on RX. The link runs at 9600 baud, 8 data bits, no parity, one stop bit.
On an Arduino Nano, you go through "SoftwareSerial" to keep the hardware port free for uploading and for the serial monitor. On a board with several hardware UARTs, use a real one: the software serial link gets fragile as soon as your program gets busy.
Once it's wired, everything is within reach:
myDFPlayer.play(2);plays the second file,loop(2)plays it in a loopnext()andprevious()move to the next or previous filepause()andstart()suspend and resume playbackstop()stops playbackplayFolder(15, 4);plays file 4 in folder 15 (folders 1 to 99, files 1 to 255)playMp3Folder(4);plays file 0004 in the "mp3" folderadvertise(3);interrupts playback with file 0003 from the "advert" folder, then resumesloopFolder(2);loops an entire folderenableLoopAll()anddisableLoopAll()turn looping of all files on or offrandomAll()plays every file in random orderreadFileCounts()counts the sounds at the root of the card,readCurrentFileNumber()reports the one playingvolume(30);sets the level, 30 being maximum;volumeUp()andvolumeDown()move one stepEQ()selects one of the 6 equalizers, on MP3 files onlyoutputDevice()switches between SD card and USB drivesleep()puts the module to sleep,reset()restarts itavailable()andreadType()retrieve messages from the player, notably end of track
Good news on the genuine DFR0299: the TX/RX messages are inaudible in the sound, which isn't true everywhere.
Getting a "plop" at startup? That noise happens when the Arduino initializes the DFPlayer. In your code, simply replace:
myDFPlayer.begin(mySoftwareSerial)with:
myDFPlayer.begin(mySoftwareSerial, true, false)The second parameter ("true") enables acknowledgments, and the third ("false") disables the reset that causes the noise. Simple and effective!
Also remember to put a delay(3000); on the first line of your setup(): the DFPlayer needs to be fully awake before the rest of your code runs, otherwise your program will attempt things that can't work yet.
The complete code, commented line by line, is in my guide "Building a sound box with an Arduino and a DFPlayer".
Getting help from an AI
A piece of advice I give without reservation: get an artificial intelligence to help you with the programming side. Whether you're starting from nothing or stuck on an incomprehensible error message, an assistant like "Claude" or "Claude Code" hits the mark, fixes your code, or writes the whole thing from your description.
Give it context: the board you're using, the library and its version, your wiring, how your SD card is organized, and what the device is supposed to do. You'll have a working program in minutes, and more importantly an explanation of what it does. It's what I use myself, and it's what has made hobby electronics accessible to so many people who thought they couldn't do it. It pays to make use of the new tools.
One precaution only: read it and test it. An AI can invent a function that doesn't exist in your version of the library. Check that it compiles, and that it does what you wanted.
The serial protocol in detail
For those who want to skip the library, drive the module from a Raspberry Pi in Python, or simply understand what's traveling down the wire, here's the protocol.
Each command is a ten-byte frame: a start byte (0x7E), the version (0xFF), the length (0x06), the command, the acknowledgment byte (0x01 to request one, 0x00 otherwise), two parameter bytes, two checksum bytes, and an end byte (0xEF). The checksum is the two's complement of the sum of the six middle bytes; some modules accept it even when it's missing.
The main commands:
| Code | Action | Parameter |
|---|---|---|
| 0x03 | Play a track by number | 1 to 2999 |
| 0x06 | Set the volume | 0 to 30 |
| 0x07 | Select the equalizer | 0 to 5 |
| 0x08 | Loop a track | number |
| 0x09 | Select the source | 1 = USB, 2 = SD |
| 0x0A | Enter sleep mode | |
| 0x0C | Reset the module | |
| 0x0D | Resume playback | |
| 0x0E | Pause | |
| 0x0F | Play a file from a folder | folder, file |
| 0x11 | Loop all files | 1 = enabled |
| 0x12 | Play from the "mp3" folder | number |
| 0x13 | Insert an announcement ("advert") | number |
| 0x15 | Stop the current announcement | |
| 0x16 | Stop playback | |
| 0x17 | Loop an entire folder | folder |
| 0x18 | Random playback | |
| 0x19 | Loop the current track | 0 = enabled |
| 0x1A | Mute or unmute the DAC | 1 = muted |
The module replies in the other direction. The most useful messages are 0x3D (end of a track on the SD card, with its number), 0x40 (error), 0x41 (acknowledgment), 0x42 (current status), 0x43 (volume), 0x48 (file count) and 0x4C (current track). It's 0x3D that lets you chain sounds cleanly without polling the "Busy" pin.
The tilt at the start and end of each track
Here's a phenomenon that rarely gets discussed, and that kept me busy for a while: that little electronic "tilt" you hear just before the sound and just after, like a small burst of digital pollution. Don't confuse it with the "plop" caused by the Arduino during initialization, covered above in the section on control: this one is a different beast.
Here's how it sounds, over a run of files played back to back. Listen just before and just after each sound:
Rest assured, it isn't this intrusive in normal use: for this recording I deliberately set the player's volume to 1/30 so that the tilt would take up all the room and become clearly audible. At the volume you'll actually be listening at, it stays discreet — but it's there.
It is intrinsic to the DFPlayer: you can hear it with no Arduino and no serial connection whatsoever, on a module sitting entirely on its own, and it's independent of the digital volume. Its intensity, on the other hand, is decided at each power-up: sometimes inaudible, sometimes obvious, and it then stays rigorously identical for every file until the next time you unplug it. A software reset changes nothing; only a clean break in the power supply reshuffles the deck.
I explored and then ruled out several leads, measurements in hand: the content and encoding of the files, the digital links to the Arduino, the board carrying the module, and above all the power supply. On that last point I long believed I had the answer, but a switch placed right in front of the player, flipped a second after the 5 V rail has fully settled, changes absolutely nothing. Neither a soft-start, nor filtering, nor a dedicated regulator will do a thing about it.
To understand it, I ended up recording the DAC output and looking closely at the waveform. Here, isolated and normalized, is the double burst you hear between two tracks: the tilt at the end, the silence, then the tilt at the start.
It isn't an isolated click, but a very short buzz, about thirty milliseconds long, that fades in and then fades out — while the sound in the file itself starts and stops dead. Its signature is distinctly digital, and once playback has fully stopped, the output goes perfectly clean again.
My interpretation: the codec has an internal clock or state machine running at its own rate, whose activity leaks into the audio output. When the module switches its output stage on and then off, it does so gradually — and it's that ramp-up that makes the artifact audible for a brief moment at both ends of every playback. The operating point of that stage is locked in at power-up, which explains the lottery. It's inside an undocumented chip: there's nothing there to fix.
The most effective workaround comes down to how you set the level: leave the digital volume at maximum and set your output level in the analog domain, with a potentiometer between the DAC and your amplifier. The tilt's amplitude doesn't budge an inch with the digital volume, while it tracks an analog attenuator faithfully: at the same listening level, you gain several decibels of cleanliness without adding a single component. Incidentally, trimming the silence at the head and tail of your files won't mask it — it happens before and after playback, not during — but it does shorten the moment when you hear it.
Common problems
Here are the symptoms people report to me most often, and their usual cause:
- The card reader doesn't work and/or runs hot? Unplug everything immediately, then change both the power supply and the MicroSD card. Yes, sometimes a cheap card can destroy the lot.
- A "robotic" or distorted sound? Unsuitable file format: use MP3, or WAV at 16-bit / 48 kHz maximum.
- Clicks or noise between files? Re-encode your files as 320 kbps MP3 with a clean converter, such as NCH's "Switch" (free).
- Sounds jumbled or offset? Reformat, recopy in order, and never rename files once they're on the card. It also happens that you expect the first file and hear the last one: in that case, shift everything by one slot.
- A hum? Power up the module, play a file at minimum volume, then eject the card while it's running. If the buzz stops, the card is the culprit. If not, change the power supply, or clean the contacts on the DFPlayer and its card slot, which get dirty faster than you'd think.
- Nothing happens at all? Check that one board's TX goes to the other's RX, and not TX to TX. It's the most common mistake, and it produces no visible symptom whatsoever.
- The first sound is cut short? The module takes roughly 1.5 to 3 seconds to boot. Give it that time before the first command.
- The Nano isn't recognized by the IDE? Use version 1.0.3 of the "DFRobotDFPlayerMini.h" library, and try the "ATmega328P" boards with and without "Old bootloader".
- The module reboots when the sound gets loud? The supply is collapsing under the amplifier's current draw. Put a 1000 µF capacitor as close as possible, and use a beefier supply.
Do you own one of my modules? I've gathered the step-by-step procedures and the specific quirks of each one in a guide dedicated to troubleshooting.
The verdict
Strengths
- Reads MicroSD cards (sometimes called "TF") and USB flash drives
- Plays MP3 (8 to 320 kbps) and WAV
- Good audio quality, flat response and high output level
- Line output in true stereo
- 3 W amplified output into 4 to 8 ohms, usable at the same time as the line output
- 6 EQ curves available on MP3 files (more on this)
- Up to 20 buttons via the "AdKey" inputs, with no microcontroller
- An "advert" folder that interrupts and then resumes playback
- A "Busy" output to report playback status
- Talks over RX/TX using "DFRobotDFPlayerMini.h"
- The TX/RX messages are inaudible
- Tiny footprint and 0.1" pin pitch, breadboard-friendly
Limitations
- No EQ available on WAV files (more on this)
- Speaker output is mono, summing both channels (left + right)
- Playback order dictated by copy order, never by filename
- One sound at a time: no mixing of tracks
- Inputs and outputs at 3.3 V, requiring level shifting with a 5 V Arduino
- 32 GB quoted as the maximum, and no access to the card's contents without removing it
- Very sensitive to the quality of the card and the power supply
- Twice the price of the clones, and harder to find at European resellers
- A tilt at the start and end of each track
What about the clones?
This player is legally cloned by several companies, and the copies don't all work the same way, when they work at all. Lost stereo, collapsed bass, dead "AdKey" inputs, serial messages audible in the sound: I compared four versions, measurements included, in the guide "The DFPlayer and its clones". I'm also thinking of the "MP3-TF-16P" and the various "BY8001-16P": stay away from them!
Conclusion
For a few dollars, the DFR0299 does everything you ask of it: it plays cleanly, it gets along with an Arduino, and it also knows how to do without one. It's the only one I use in my own creations these days.
Do you use it in your projects? Do you have tips, suggestions or questions? Get in touch or leave a comment on this guide below.