In a previous guide, we saw how to use the "DFPlayer" audio player to build a sound box very easily. Today, I suggest connecting it to an "Arduino" microcontroller (or a clone, like I use) to make it more versatile and "intelligent". In another guide, I also explained how to build a sound box with a Raspberry Pi (multi-track possible). As always, if you have any questions: contact me!
If you're not a DIYer, I offer the entire set, already built and soldered, in my shop: the "Ambi'son" module.
Here’s an illustration of what can be done with a DFPlayer + Arduino. My famous "Quiz'O'Phone, Christmas special":

But also:
- A sound box.
- A single-question Quiz'O'Phone.
- An old poetic hotel phone.
- Another vintage phone.
- And more.
YOUR ATTENTION PLEASE!
DF Player Mini modules come in various versions, from different manufacturers and suppliers. I don't know which DFPlayer you have, or will get, and what it will be capable of.
More information in my guide on the "DF Player Mini".
Overview
The DFPlayer is a small component that plays audio files stored on its micro-SD card. It has a stereo "Line" output and even a 3W (mono) amplified output. It's very easy to use, but on its own, it's quite basic. The Arduino will be in charge of giving it orders.
The Arduino is a "microcontroller," which means it's a small computer. It doesn't have an OS (unlike Raspberry Pi), but it can run a small program written in C++. It will control our DFPlayer to make it autonomous.
In the long run, since the Arduino has many inputs and outputs, you could create whatever you want based on this guide:
- An old phone that rings and plays a random file to whoever answers.
- Railway model fans could install an RFID sensor to differentiate their trains before they arrive at the station and thus play a specific announcement.
- And more.
Here is a short video illustration before detailing step by step how to set up the same installation:

Step by step
1. Preparation
Take an Arduino. The "Nano" version is powerful enough for our low-demand usage. No need to buy a brand-name "Arduino" for €20. A Chinese clone for €3 works just as well. In any case, both are made in China...
You'll also need a DFPlayer, a breadboard, some wires, a 1 kOhm resistor (1,000 Ohms), as well as a jack socket and headphones, or a 3W / 4 Ohms speaker. You'll need a computer to power the Arduino and program it.
You also need to insert a micro SD card into the DFPlayer containing several MP3, WAV, or WMA files. Preferably short files, downloaded from LaSonotheque.org, to quickly see the result of this tutorial.
2. Wiring
We will place the jack (or speaker), the Arduino, and the DFPlayer on the breadboard so that all the pins are independent. Then follow this wiring diagram.

In this diagram, the DFPlayer is powered by the 5V and GND from the Arduino. We connect the TX, RX, and Busy pins of the DFPlayer to the D13, D12, and D11 pins of the Arduino, and connect a jack socket or a 3W / 4 Ohms speaker to the output of the DFPlayer. Don't forget the 1 kOhm resistor.
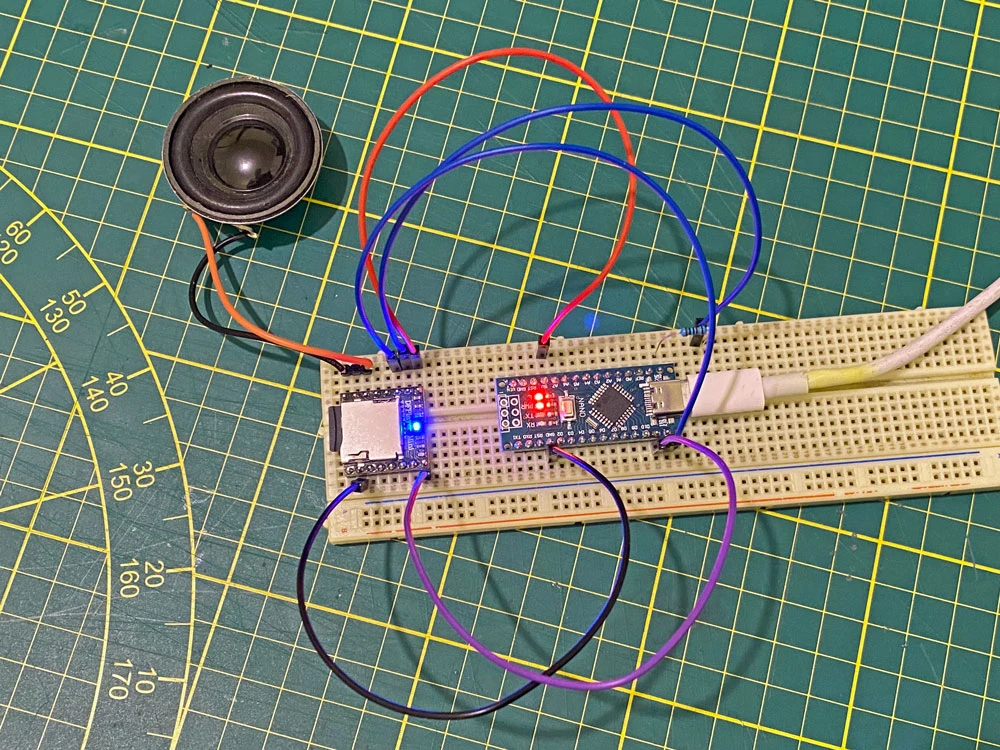
In general, it should look like this, with USB power and a 3W speaker:
It's not mandatory to connect the Busy pin from the DFPlayer; many tutorials don't mention it. However, I personally find it essential for many uses, so I recommend using it too.
The power for the whole setup will be provided by the USB cable that connects the computer to the Arduino for programming. Later, you can supply 5V to the "5V" pin or between 7 and 12V to the "Vin" pin of the Arduino.
3. Programming
The idea is to write a C++ program on the computer and then upload it to the Arduino.
Download and install the "Arduino IDE" application on your computer (for Mac, Linux, and Windows). An IDE (Integrated Development Environment) gathers all the necessary tools for programming the Arduino.
Once in the IDE, go to "Manage Libraries" and install "DFRobotDFPlayerMini.h". Version 1.0.3 works best for me.
Next, I suggest copying/pasting the entire code. Or right-click on this link to directly download the file:
#include "SoftwareSerial.h"
#include "DFRobotDFPlayerMini.h"

SoftwareSerial mySoftwareSerial(12,13);
DFRobotDFPlayerMini myDFPlayer;

void setup() {
  delay(3000);

  mySoftwareSerial.begin(9600);
  Serial.begin(9600);

  pinMode(11,INPUT_PULLUP);

  if (!myDFPlayer.begin(mySoftwareSerial)) {
    Serial.println(F("Communication error: check SDcard"));
    while(true);
  }

  myDFPlayer.setTimeOut(500);

  myDFPlayer.volume(30);
  myDFPlayer.play(1);
}

void loop() {
  if(digitalRead(11)==1) {
    play();
  }
}

void play() {
  myDFPlayer.next();

  delay(500);
}
Once the program is pasted, click on the arrow pointing to the right at the top to "Upload". A few seconds later, the program will be on the Arduino.
The Arduino will play the next file every time the previous one finishes.
To explain this code simply:
- We import the "SoftwareSerial" and "DFRobotDFPlayerMini" libraries.
- We connect the DFPlayer to digital pins 12 and 13.
- We name the DFPlayer "myDFPlayer".
- We define the "setup()" function:
- The 3000 millisecond delay ensures the DFPlayer is fully powered on before running the rest of the code.
- We set both serials to 9600 baud rate.
- We set pin 11 as an input to check if the DFPlayer is playing.
- We check the micro SD in the DFPlayer and display a message if there is an issue.
- We set the TimeOut to 500.
- We set the player volume to 30, which is 100%.
- We play the first file.
- We define the "loop()" function:
- We check if the DFPlayer is already playing.
- If not, we call the "play()" function.
- We define the "play()" function:
- We move to the next file on the micro SD.
- We add a short 500 millisecond delay to ensure the DFPlayer starts properly.
4. Going further (optional)
It is possible to use many other functions:
- myDFPlayer.next(); // Play the next file
- myDFPlayer.previous(); // Play the previous file
- myDFPlayer.play(2); // Play the second file
- myDFPlayer.loop(2); // Loop the second file
- myDFPlayer.pause(); // Pause playback
- myDFPlayer.start(); // Resume playback from pause
- myDFPlayer.readFileCounts(); // Count the number of sounds at the root of the SD
- myDFPlayer.playFolder(15, 4); // Play the 4th file in folder 15. Folder names range from 1 to 99, and file names from 1 to 255
- myDFPlayer.enableLoopAll(); // Loop all files
- myDFPlayer.disableLoopAll(); // Stop looping all files.
- myDFPlayer.randomAll(); // Play all files randomly
- myDFPlayer.enableLoop(); // Enable looping
- myDFPlayer.disableLoop(); // Disable looping
- And more.
Known Issues
No technical project is without issues. Indeed, I have encountered many:
- Problem counting files with "readFileCounts()"!
- Different reactions from Arduinos, whether they have mini, micro, or C USB ports!
- Different reactions from Arduinos, depending on whether they are connected to a computer or a power supply!
So, with these few points, I hope to help you solve the main ones I have encountered:
- In the IDE, install version 1.0.3 of "DFRobotDFPlayerMini.h", which I find works best.
- Format the micro SD as "ExFat". For me, this format has always worked.
- In the IDE, try the boards "ATmega328P" with or without "(Old bootloader)".
- Name your files in numerical format "0001" (at the root) or "001" (in a folder), followed by the extension. Although normally named files often work, this is not always the case.
- Be sure to allow the DFPlayer time to start with the 3000-millisecond delay at the beginning of the setup(). Otherwise, the program will try to perform actions that are impossible and will not work.
- Name the SD card without spaces or special characters.
- If you encounter problems and/or find solutions not listed, please contact me!
Conclusion
Building such a project is not difficult. Just follow my instructions precisely. However, if you have any issues, as always: contact me!