
The "Exposi'Son" module is an affordable, easy-to-use audio player, ideal for building a sound installation, adding sound to a work of art, and so on. It is sold in the BigSoundBank shop.
This small device plays the audio file(s) stored on the microSD card (not supplied). It plays, in mono, the WAV and MP3 files on the card.

Examples
Here are a few examples of what you can do with it:
- An old telephone
- A listening station with headphones and up to 14 buttons (in French)
- A sound sign for a museum or gallery
- My Fruit'Sons
- An electronic "moo box"
- Adding sound to a work of art
- My "real waterfall"
- A sound night light
- Matthieu C.'s old telephone
- And millions of other things. Contact me to discuss whether your ideas are feasible.
Quick overview
I designed this module myself, from drawing the circuit board to soldering the components. It is made by my own hands, to order.
In the options, you can choose:
- Power supply:
- USB-C connector, recommended, on the mains or a power bank (adapter, cable and keep-alive not supplied)
- OR AA battery holder, recommended (batteries not included)
- OR AAA battery holder, recommended (batteries not included)
- OR holder for one 18650 battery (battery not included).
- Audio output:
Users or tinkerers, feel free to contact me if you have any questions at all!
Warning
Caution: the module is supplied without a case. No conductive object must touch the circuit board (including the metal of a speaker). Risk of a short circuit and of destroying the module. It is up to you to make a case for this module.
In detail
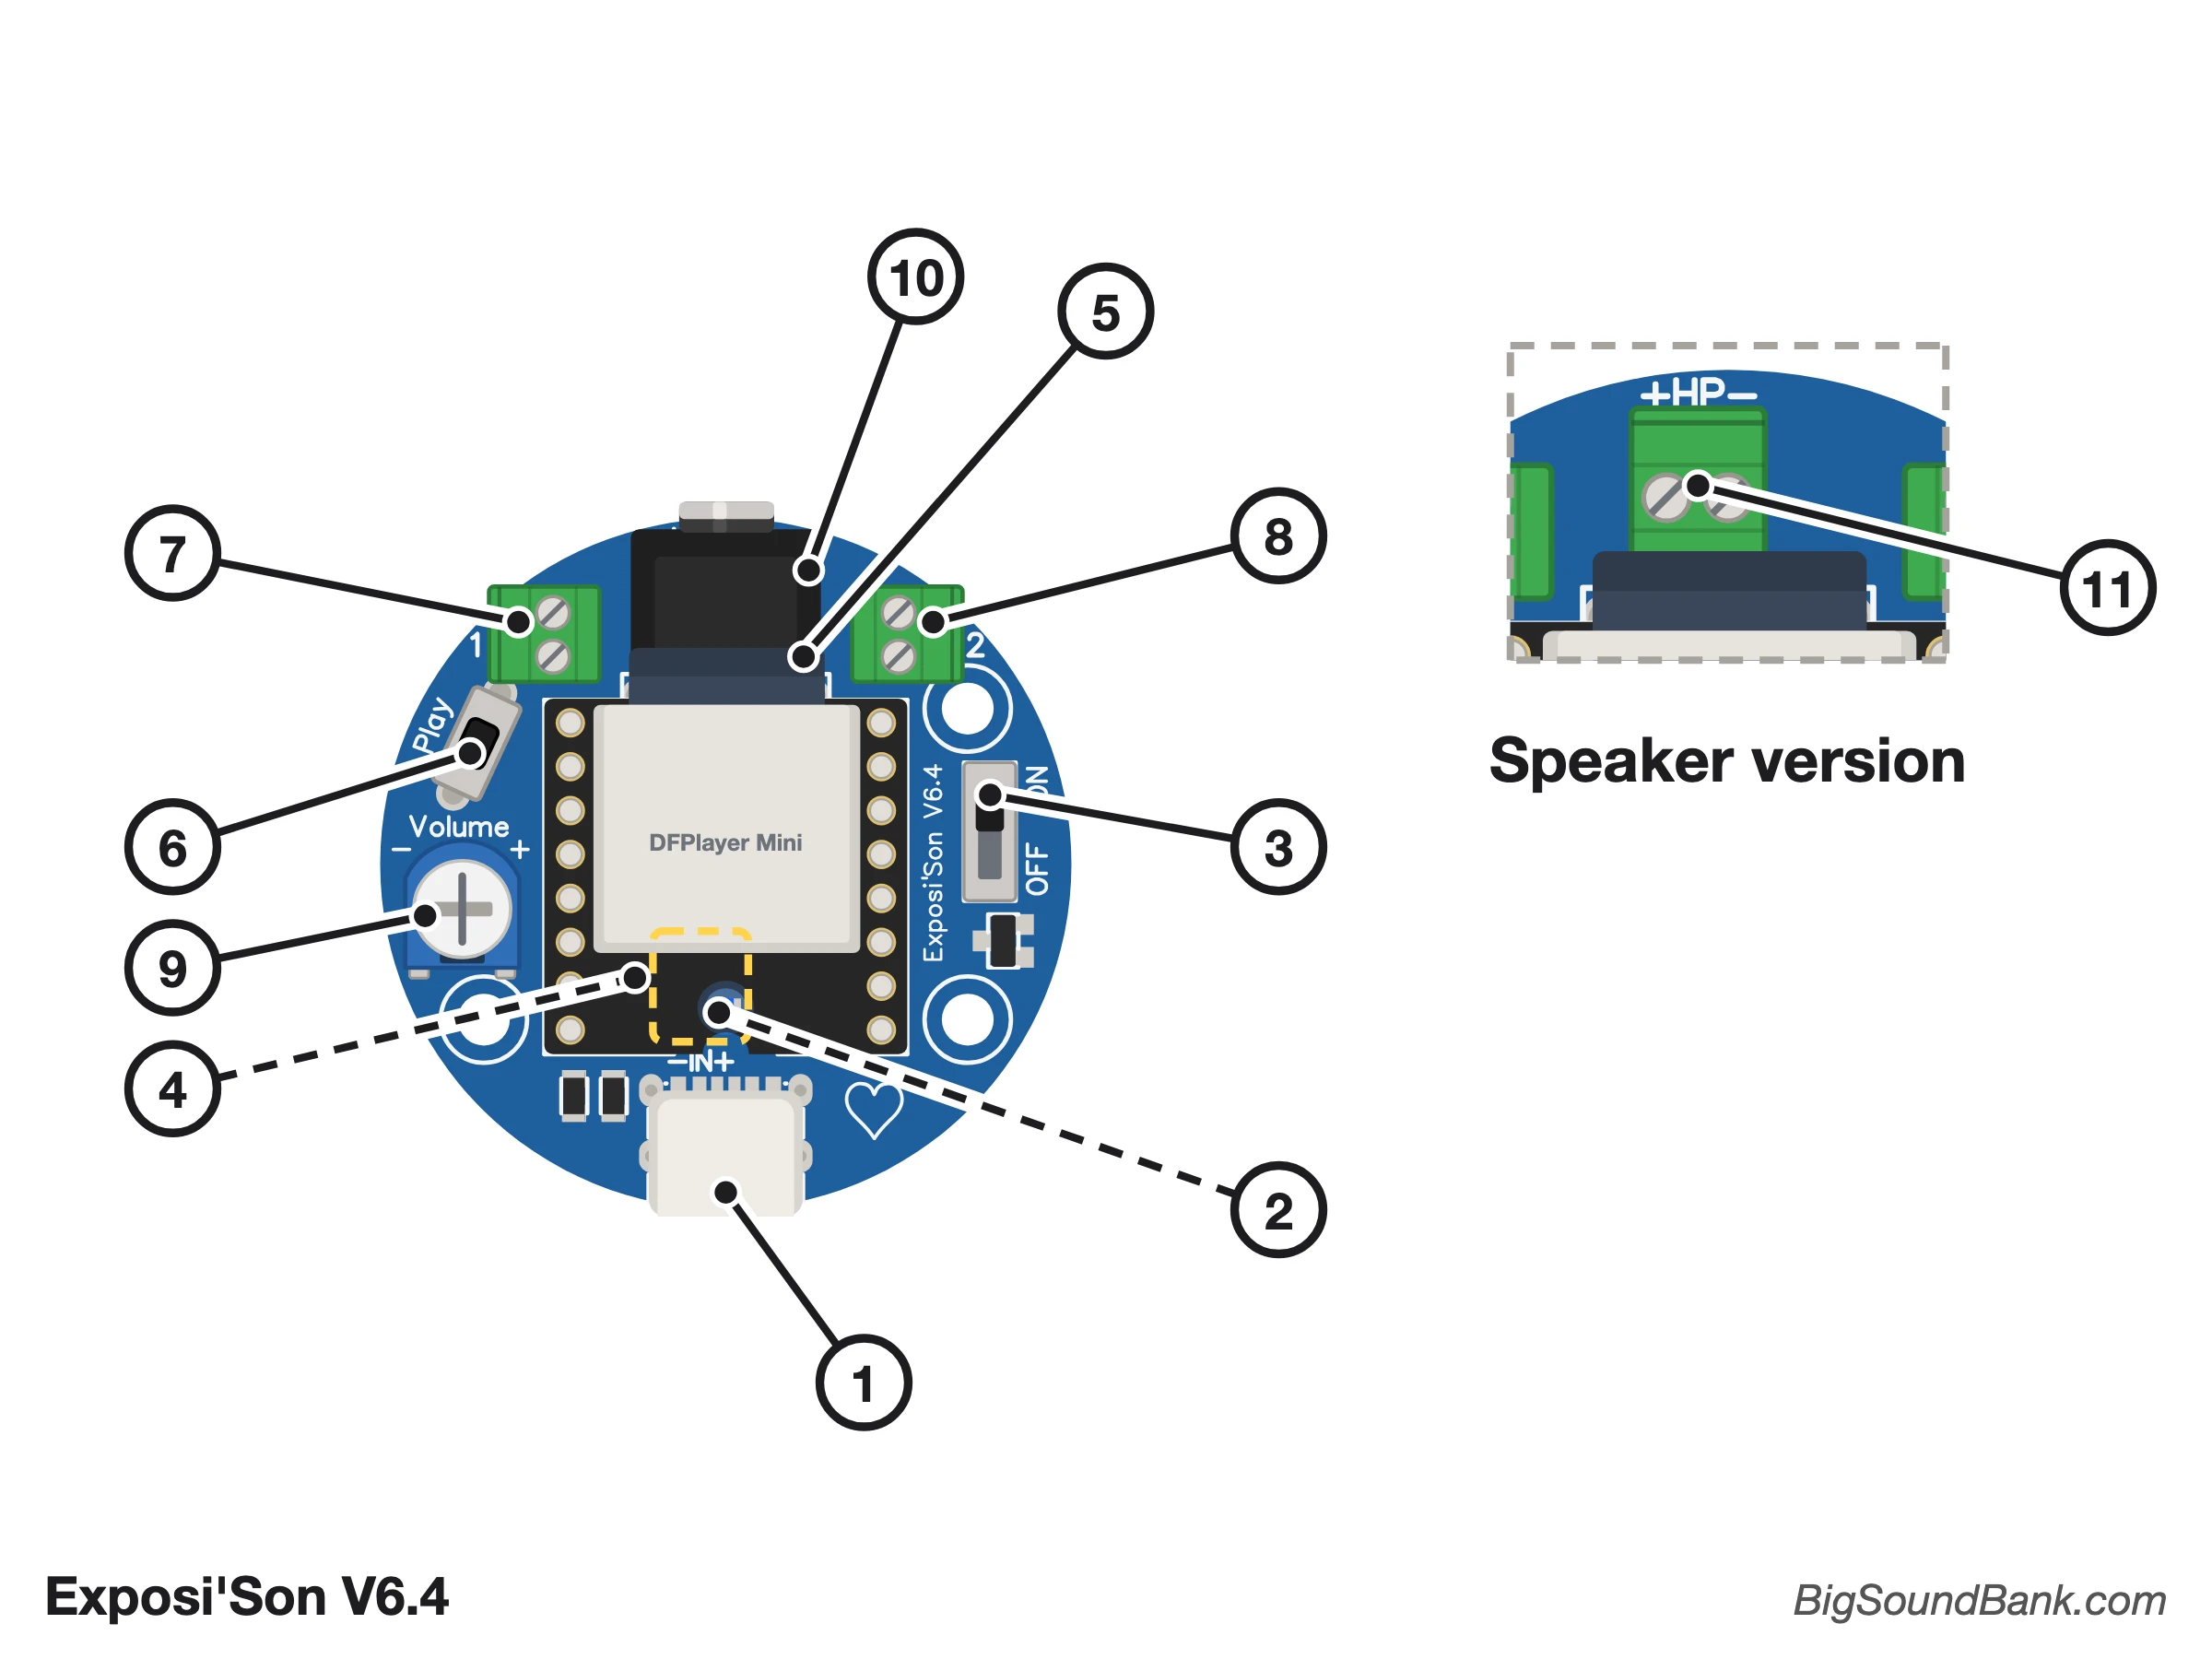
Key
The diagram shows a V6.4 board with the jack socket, the USB-C socket and the battery terminal. The inset shows the speaker version, where the "+HP−" terminal takes the place of the jack. Dotted lines show what is hidden under the player.
- 1: power through the USB-C socket, at 5 V (USB-C version).
- 2: "−IN+" screw terminal for the battery holder (battery version), hidden under the player.
- 3: ON/OFF switch.
- 4: power output, next to the battery terminal, hidden under the player. In the USB-C version, a screw terminal is fitted here instead of the battery one, to connect a keep-alive.
- 5: microSD card reader.
- 6: "Play" push button, to play file 1.
- 7: screw terminal "1", for advanced use (AdKey 1).
- 8: screw terminal "2", for advanced use (AdKey 2).
- 9: volume, set with a small screwdriver.
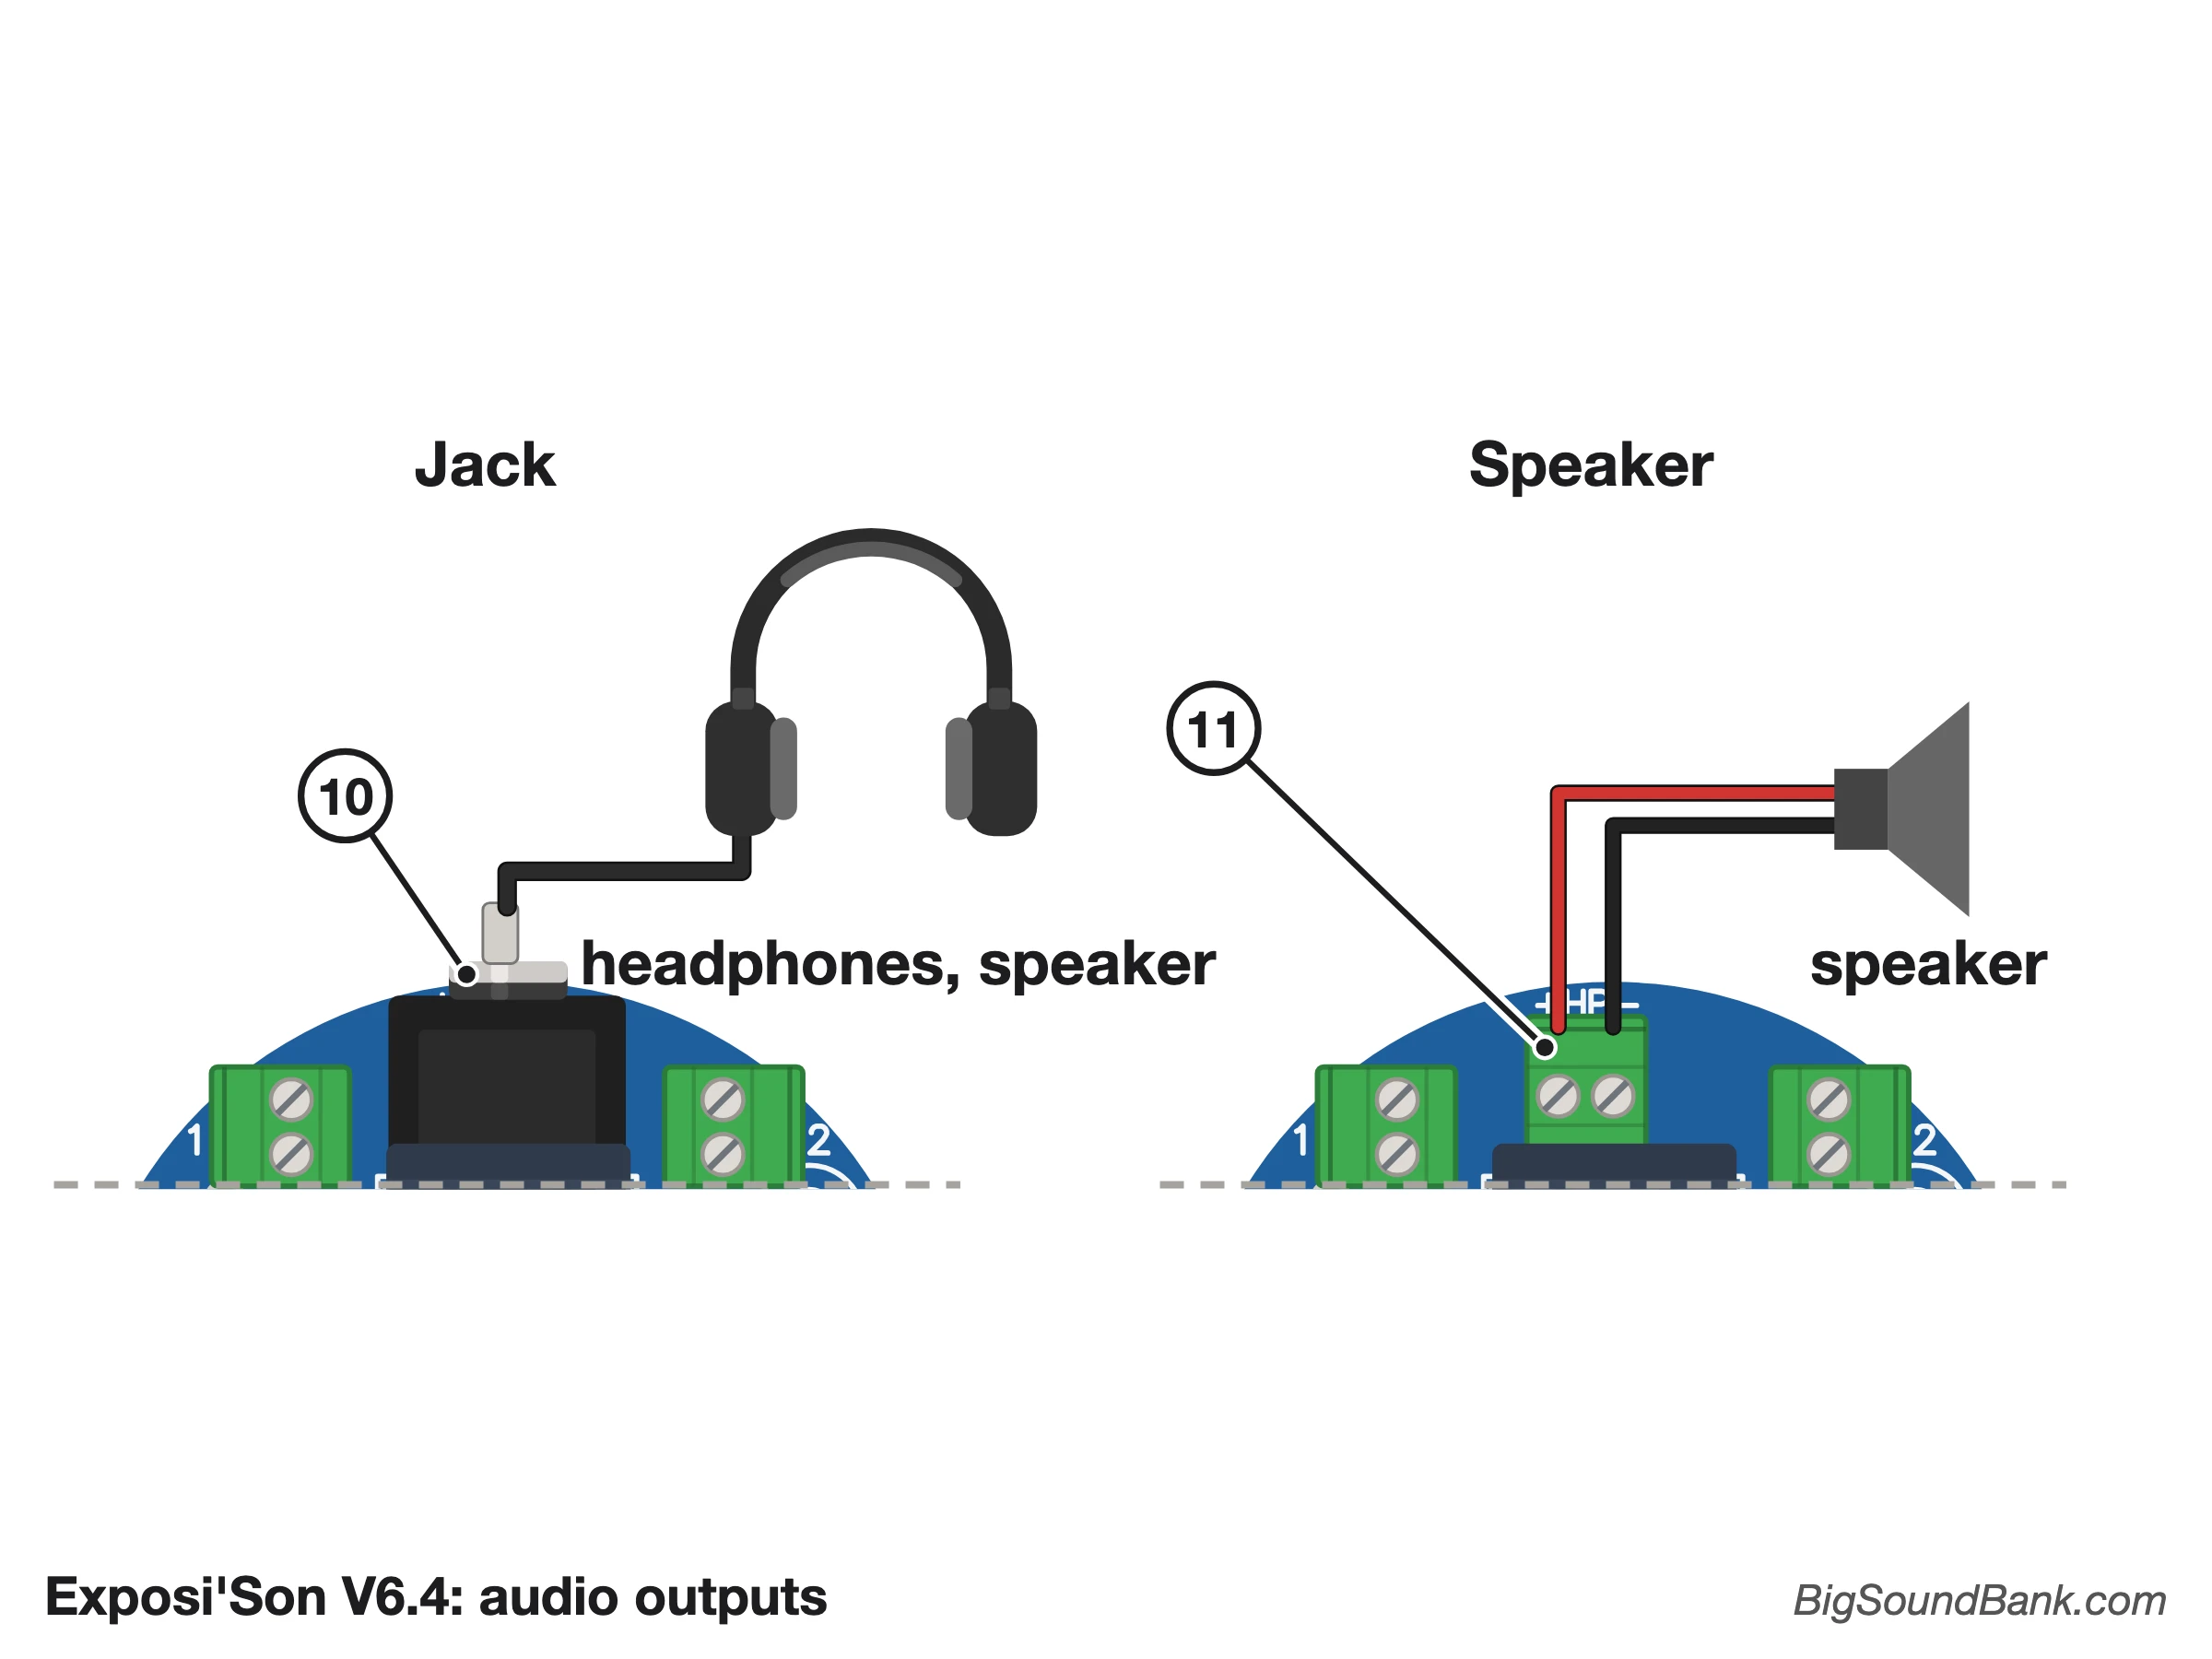
- 10: audio output on a mini-jack socket (jack version).
- 11: audio output on the "+HP−" screw terminal, for the 3 W speaker or resonator (speaker or resonator version, in the inset: it takes the place of the jack).
Explanations
Power supply
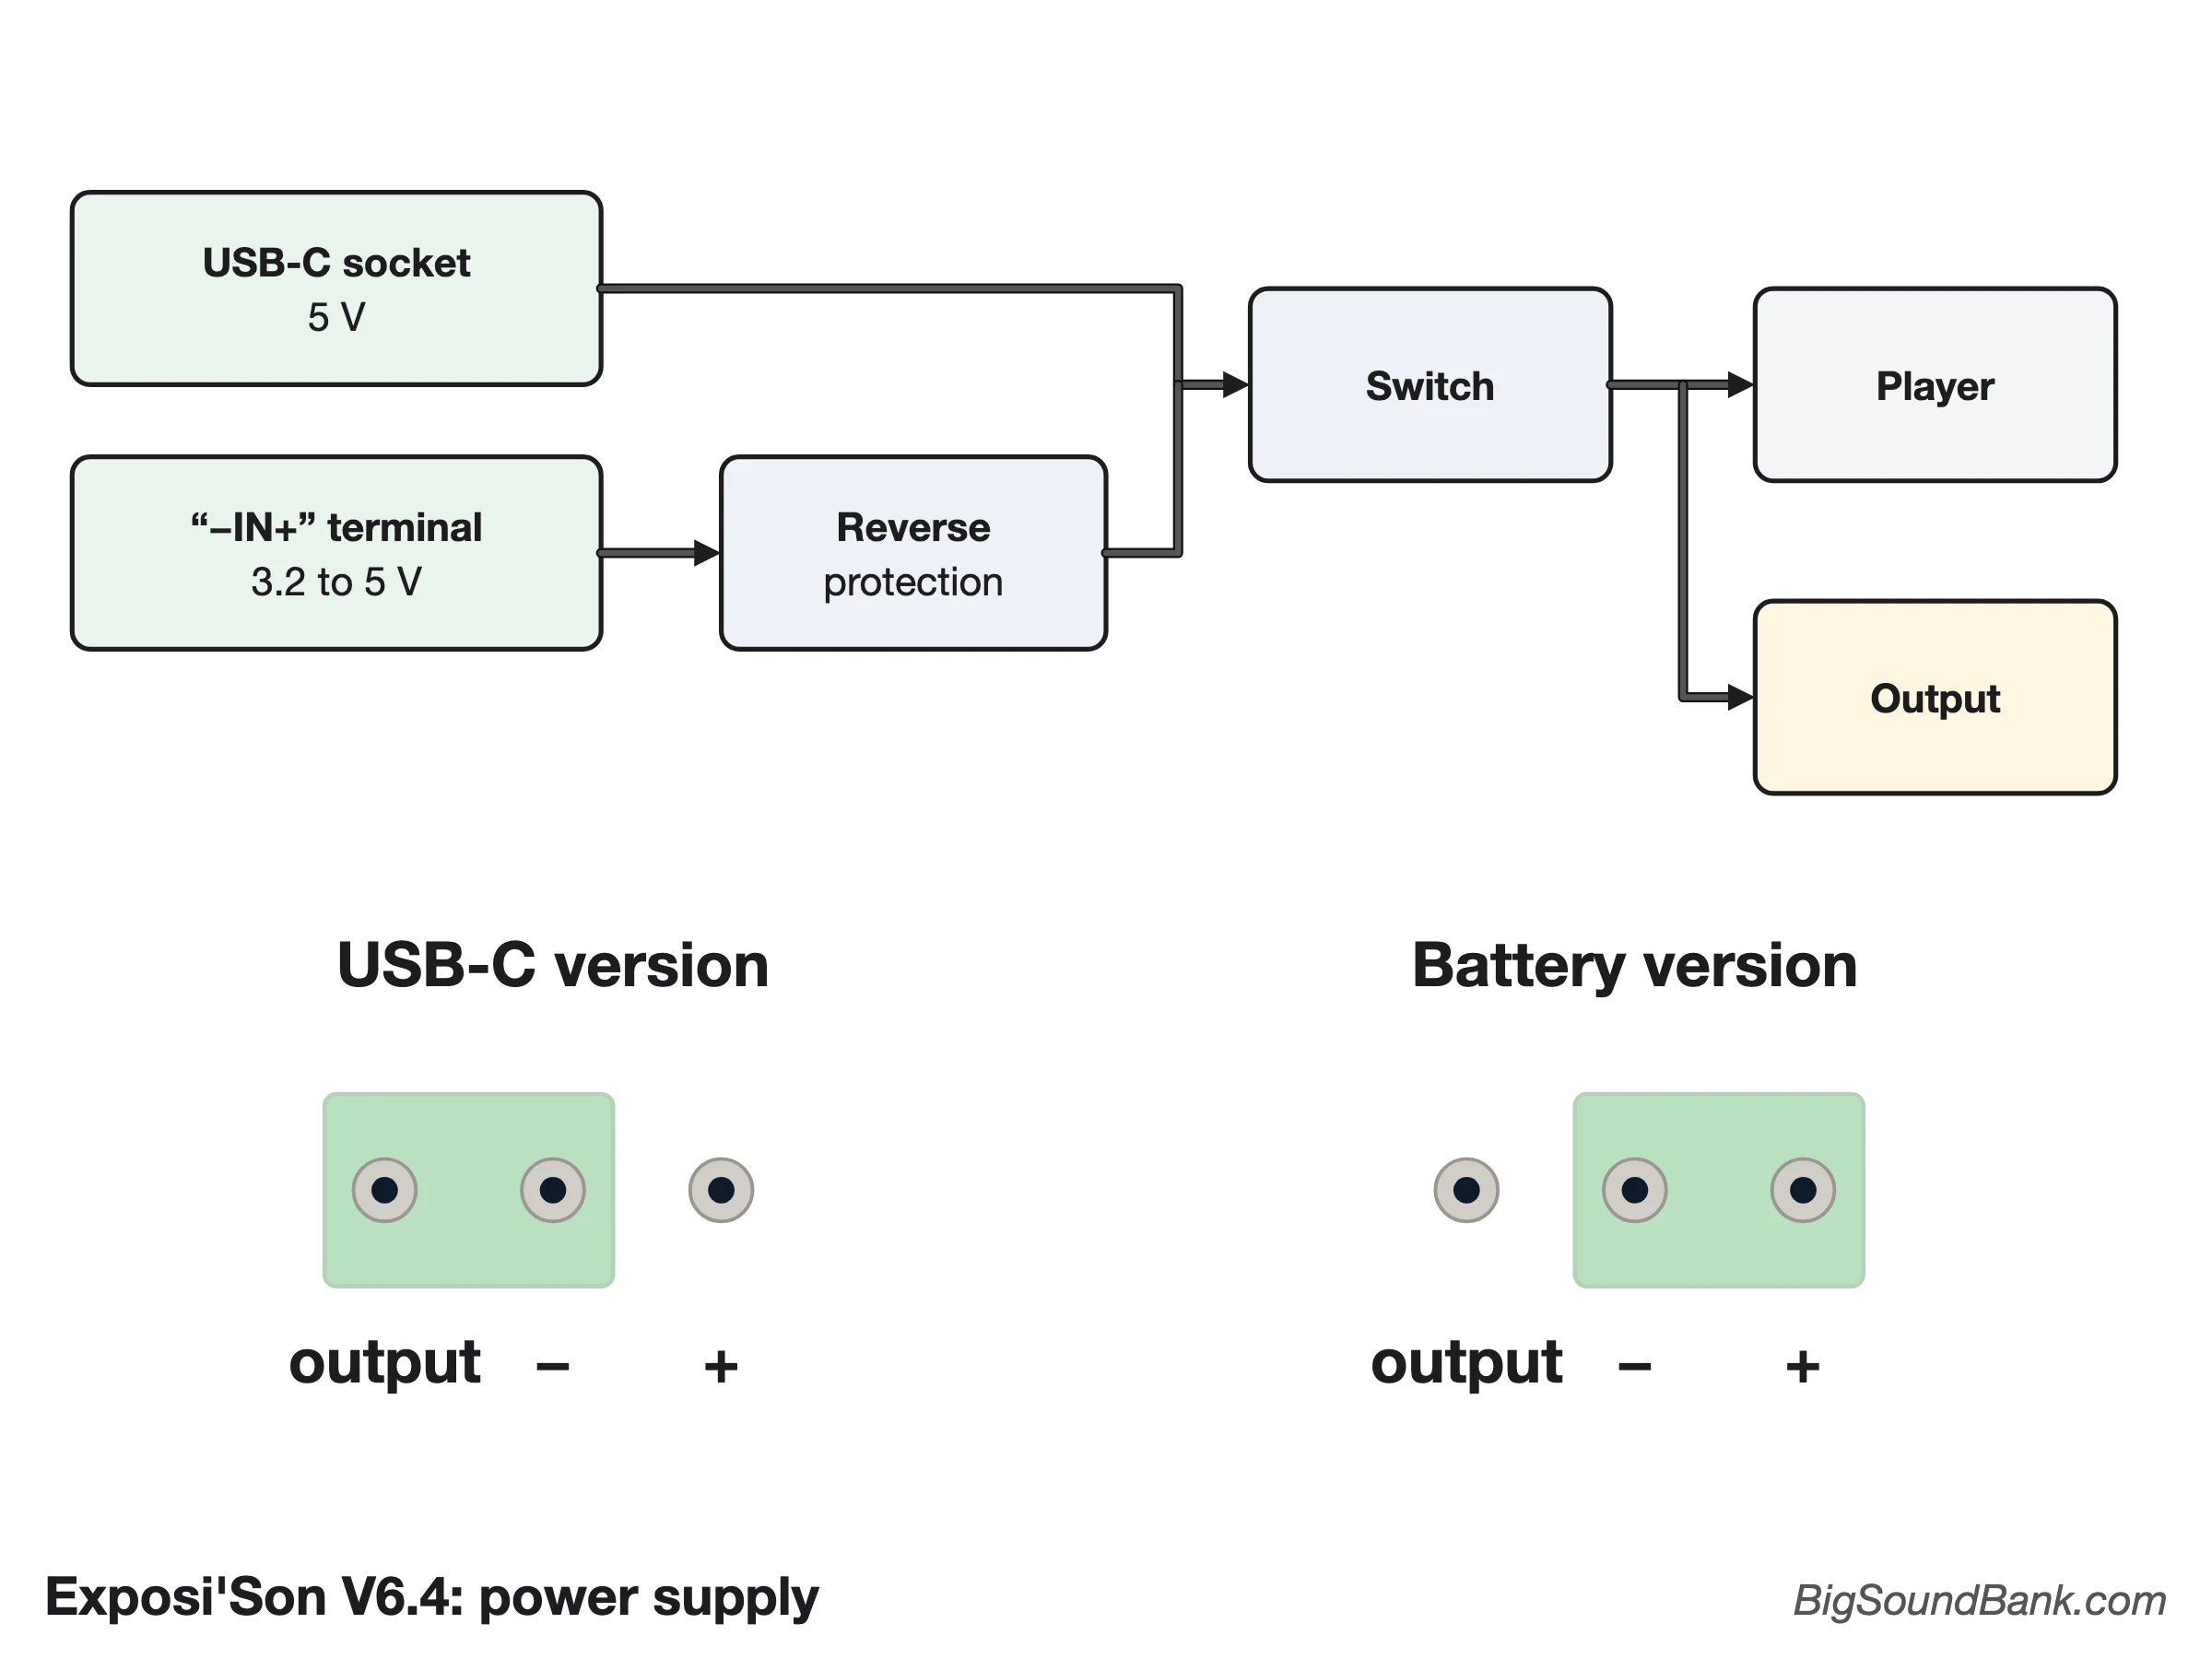
The module runs on 3.2 to 5 V, but 5 V is recommended to get the maximum audio power. Two options, depending on the version: the USB-C socket 1, or a battery holder screwed onto the "−IN+" terminal 2 (black wire on −, red wire on +). The terminal is protected against reversed wires. The switch 3 turns everything off.
Right next to it is a power output 4: it passes the same voltage, after the switch, on to another device. In the USB-C version, the screw terminal is fitted on this output and on −, so that you can connect a keep-alive if needed (see below).
For the best running time, I recommend USB-C: on the mains with a power adapter, or on a power bank. Otherwise, rechargeable batteries. For environmental and economic reasons, I NEVER recommend alkaline batteries, which cannot be recharged. They are cheaper, but quickly thrown away...
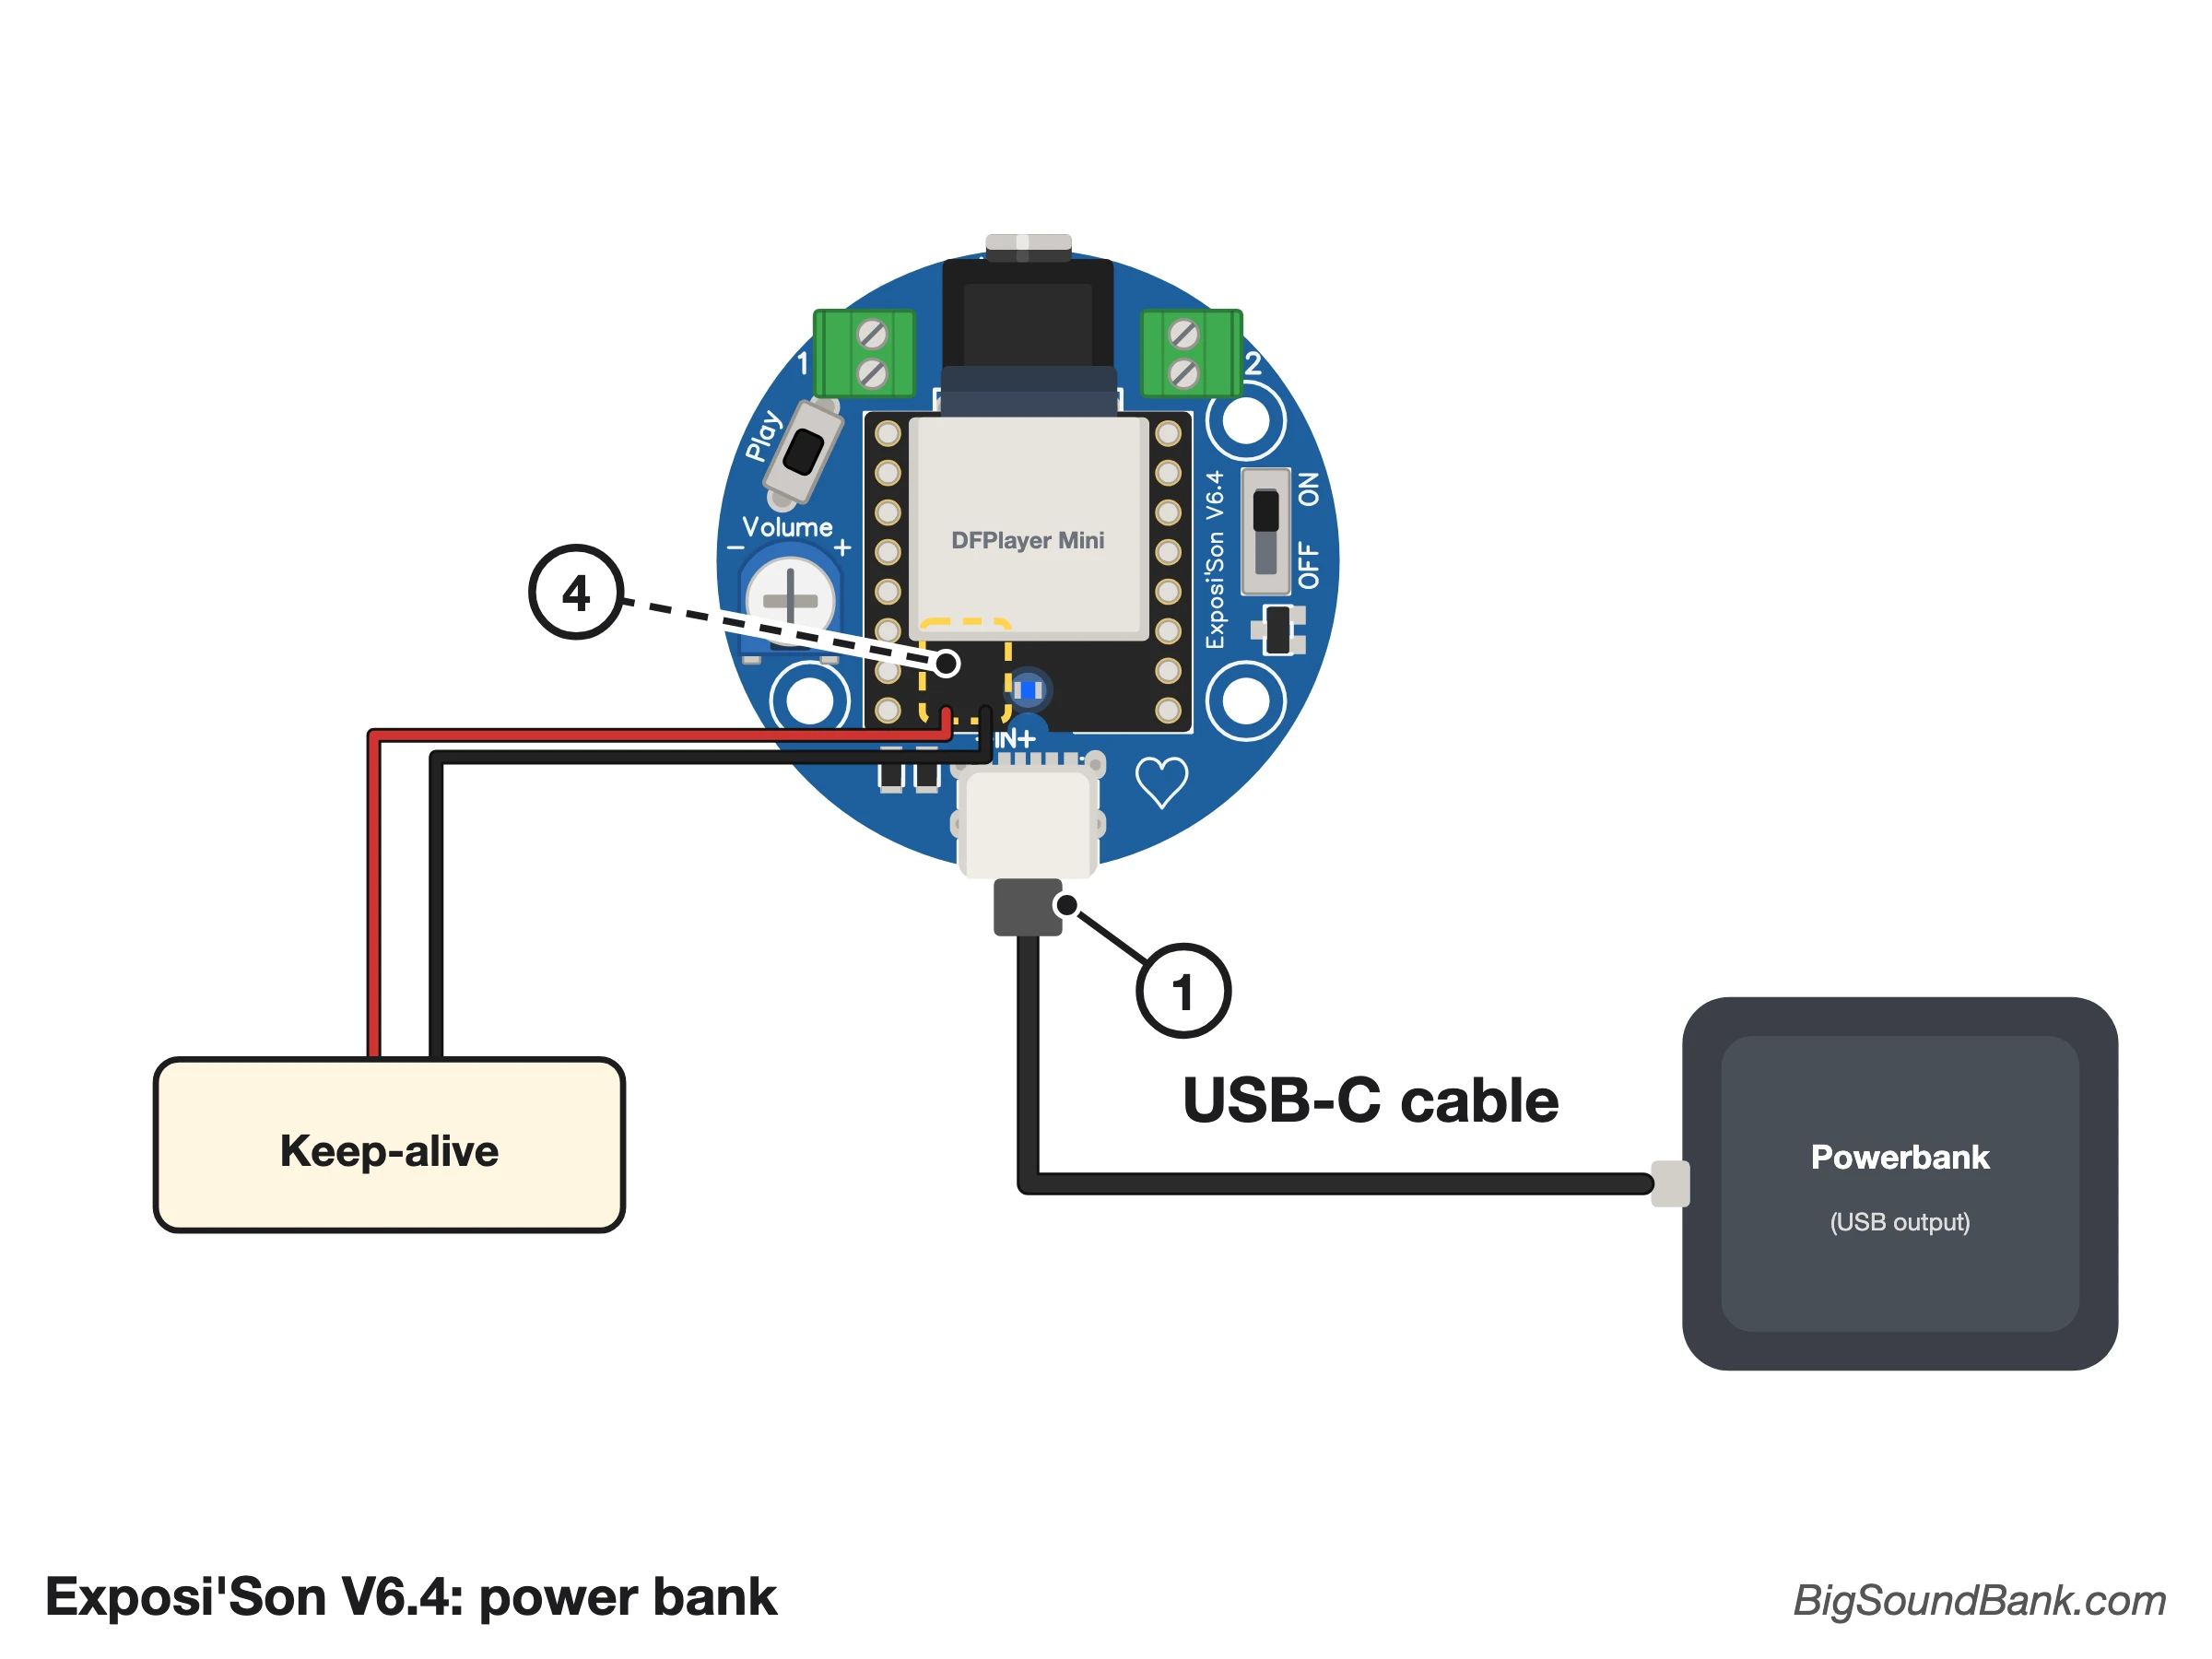
The module uses very little energy: 27 mA at rest, 35 mA with headphones and about 390 mA with a speaker or resonator played loud (measured at 5 V, white noise, maximum volume). That is an advantage on batteries but, at rest or with headphones, a trap with power banks: most of them go to sleep when the current drawn is too low, and cut the module's power after a few seconds or a few minutes. The risk is high, especially with headphones, at low volume or between two plays.
- Have time? First test your power bank on its own, in real conditions: same audio output, same volume, and leaving the module at rest for a good while. If it does not switch off, you are all set.
- No time to test, or nothing must ever stop? Add a keep-alive: it keeps the power bank on, with no setting at all. It connects to the power output terminal 4, on the output and −.
Some power banks have an "Always-on" or "low current" mode (meant for connected devices): if yours has one, turn it on, it may be enough.
Files
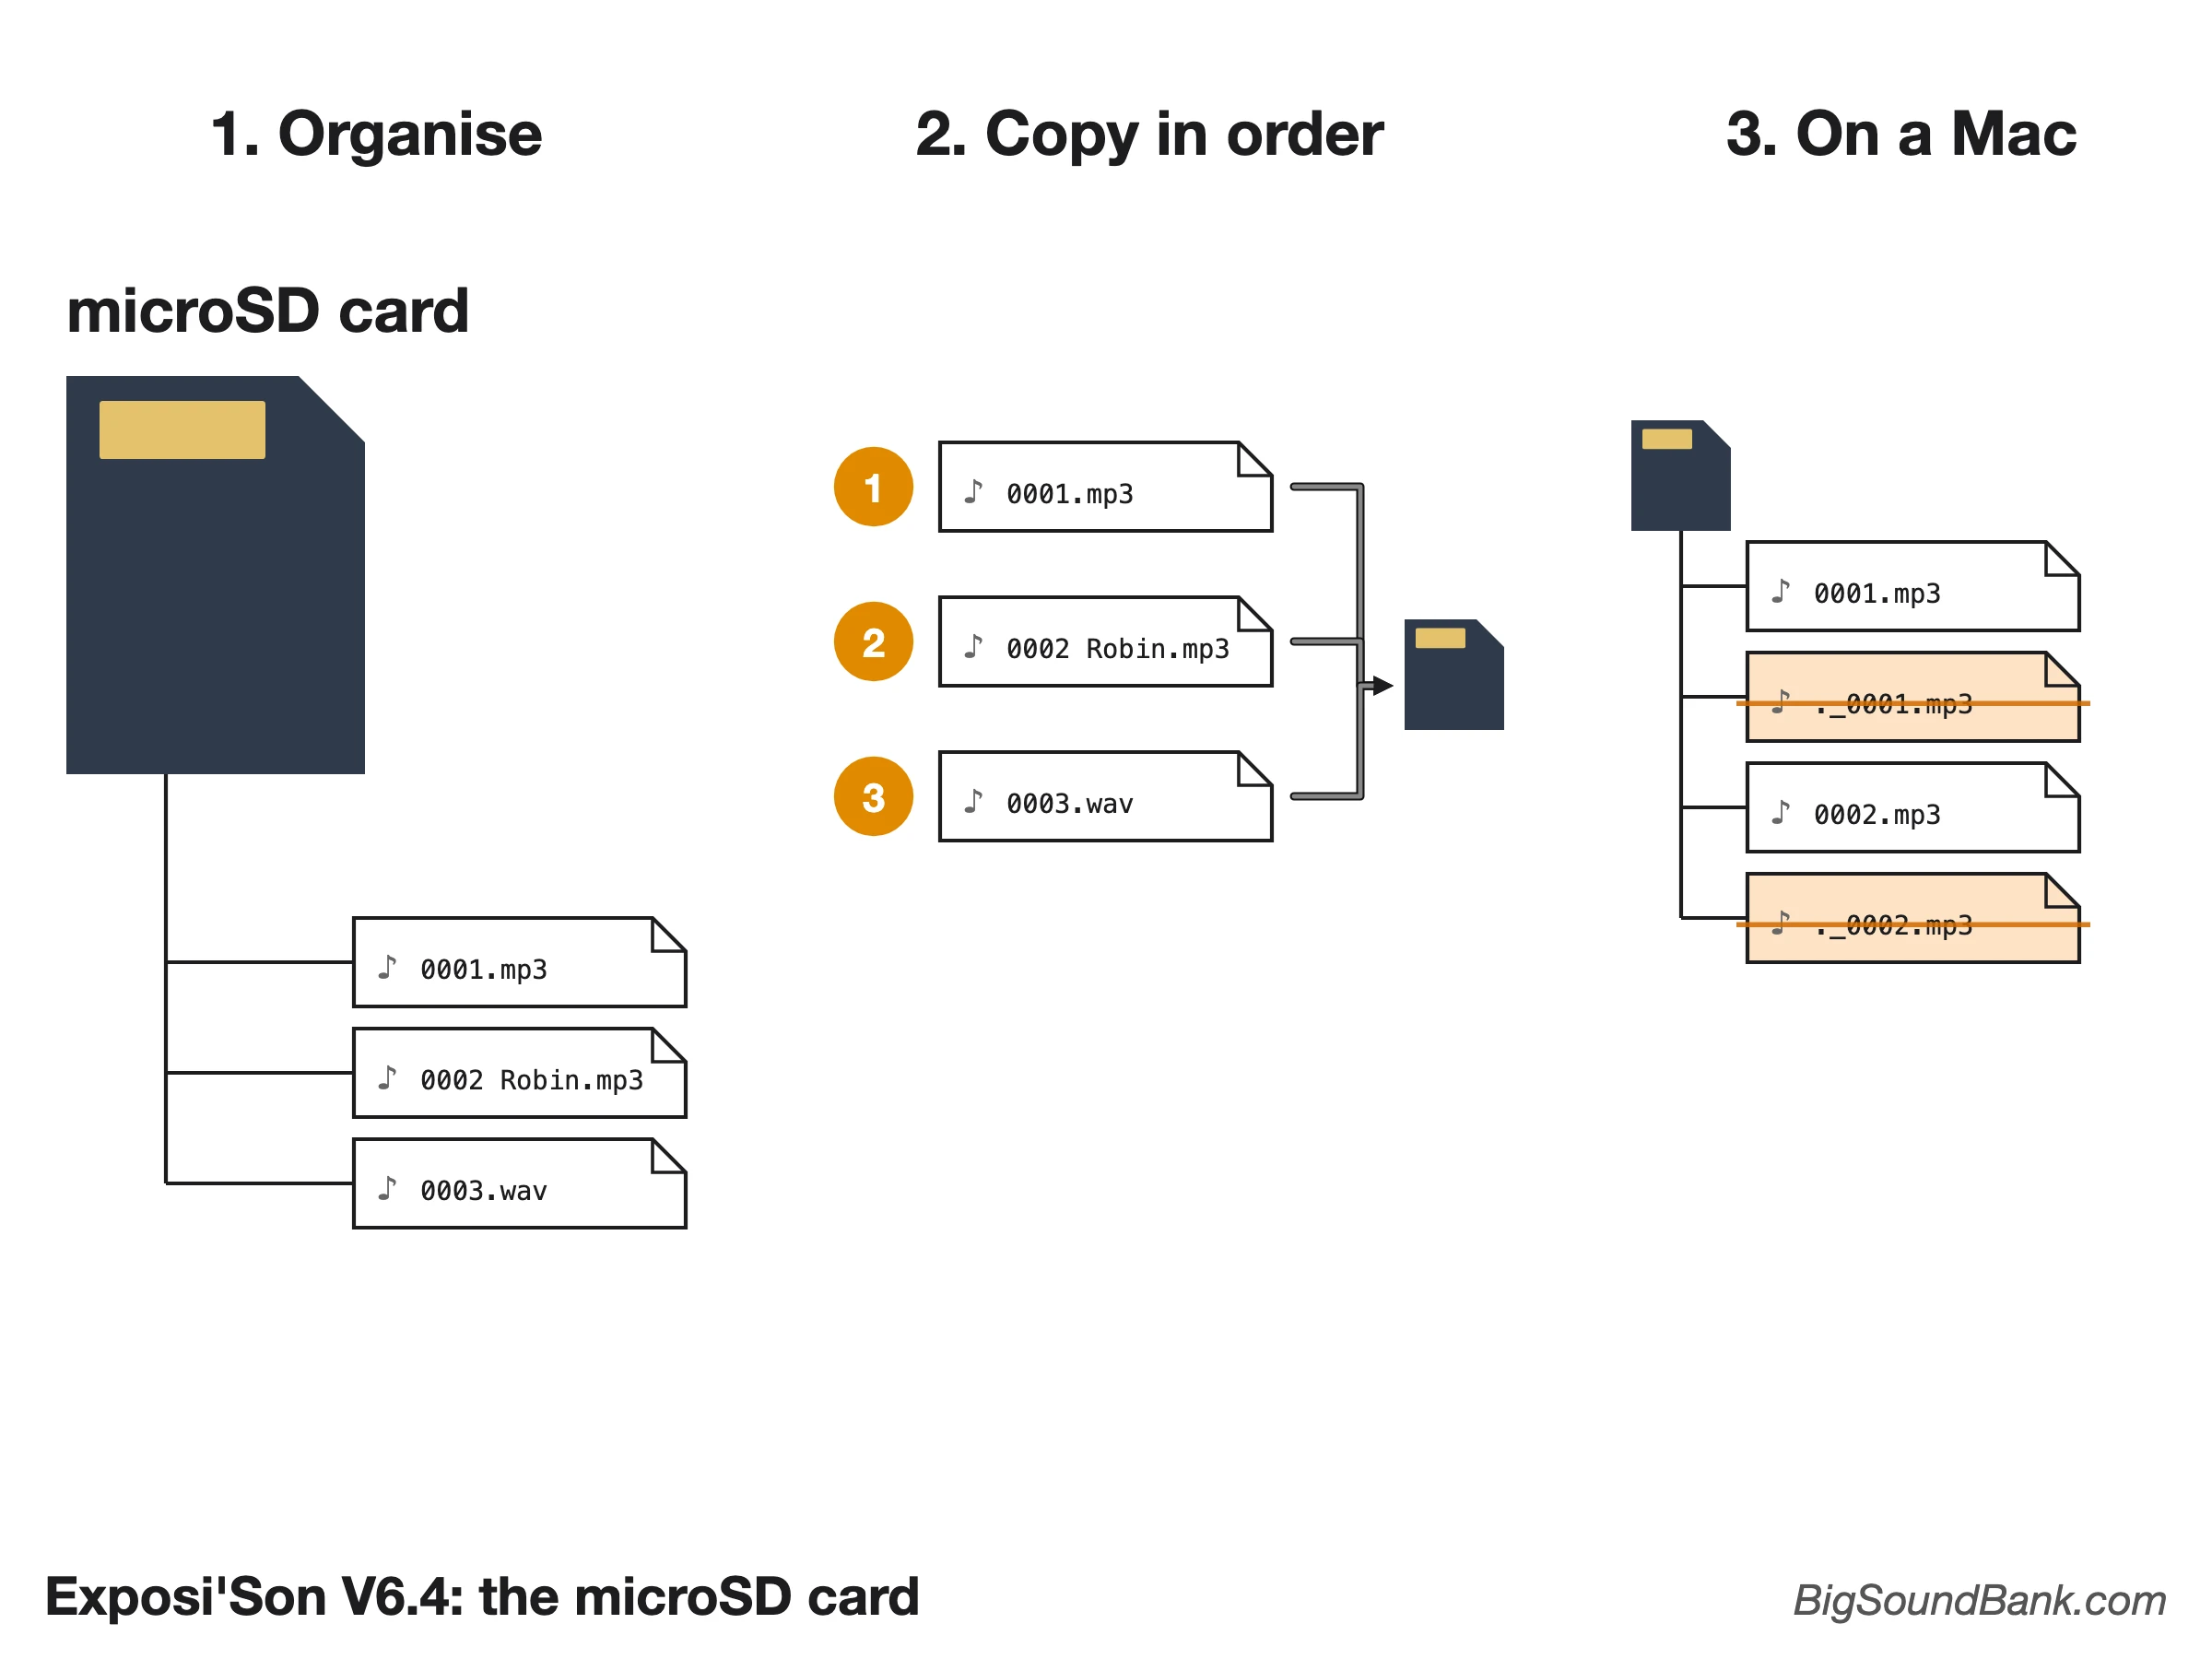
The DF Player Mini accepts microSD cards formatted as FAT16 or FAT32. You can put MP3 and WAV files on it (48 kHz / 16 bits maximum), at the root of the card.
The module numbers the files in the order they were copied: "file 1" is the first file copied onto the card, "file 2" the second, and so on. So copy them one by one, in the order you want, preferably onto a freshly formatted card. On a Mac, hidden "._" files are added, which the player counts as sounds: type dot_clean /Volumes/CARD_NAME in the Terminal to remove them.
Playback
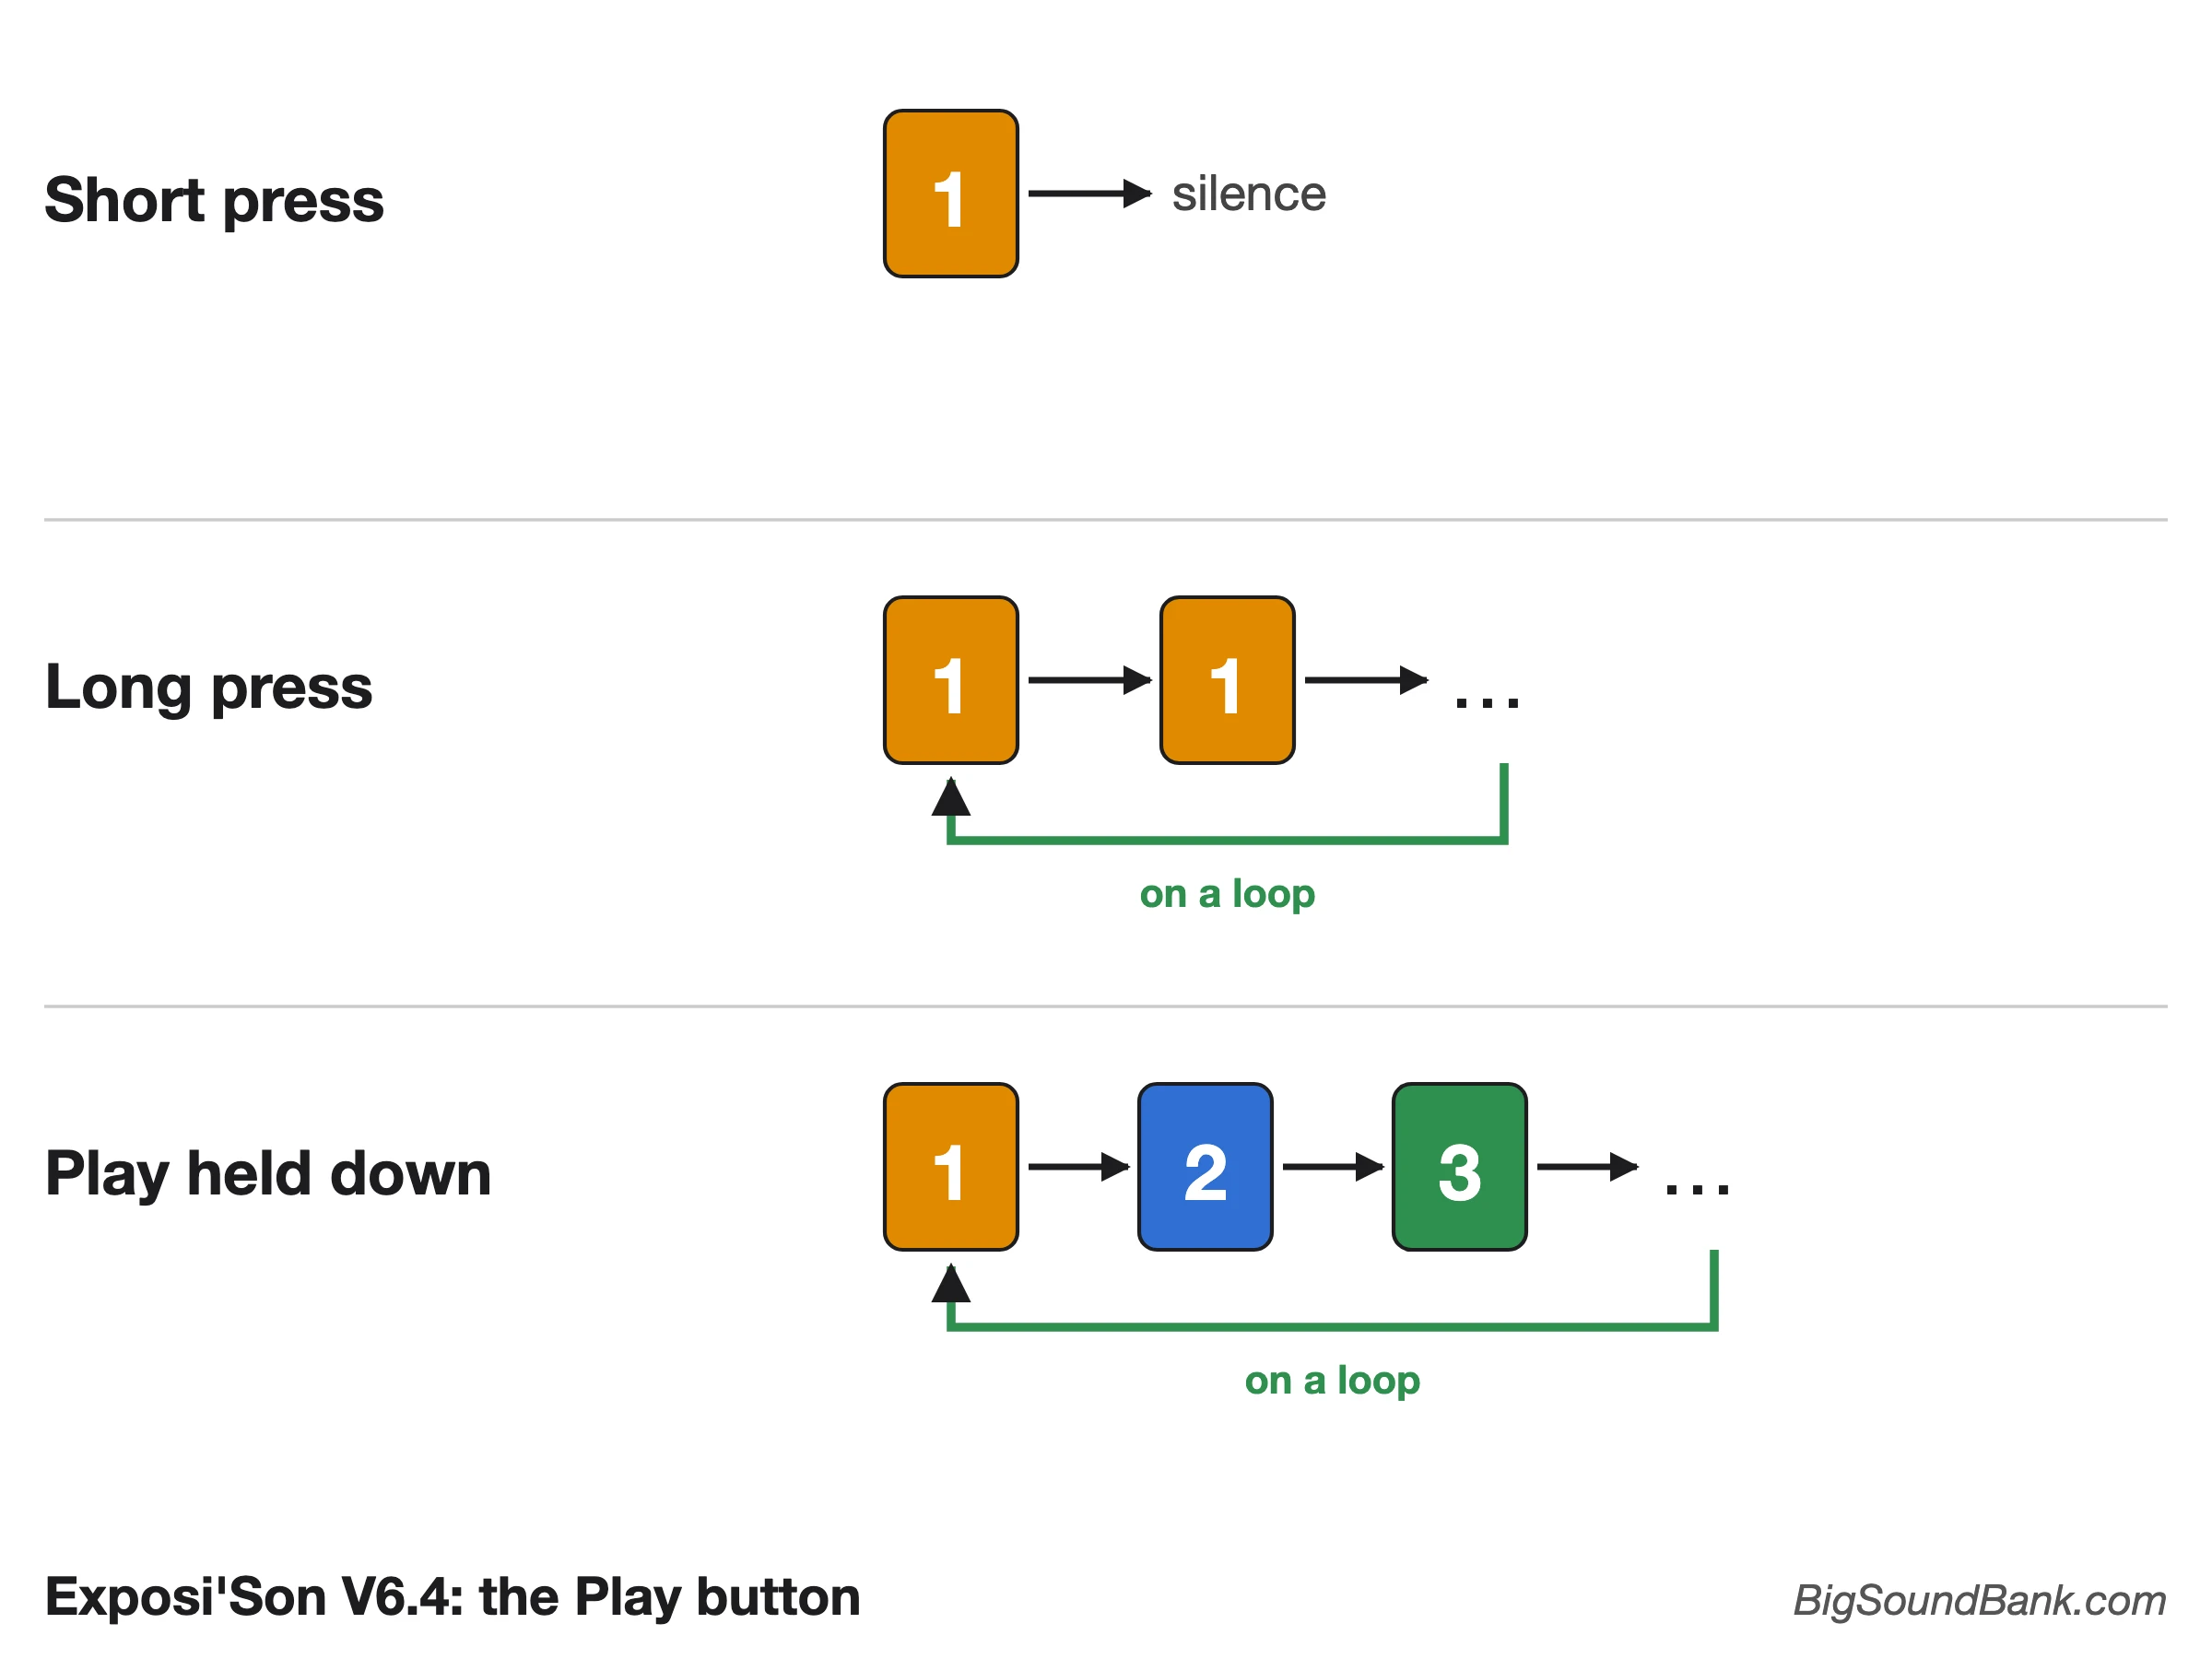
The Play button 6 offers 3 actions:
- Short press (<1s): plays file 1, once.
- Long press (>1s): plays file 1 on an endless loop.
- Hold Play down when switching on: plays all the files in order, on an endless loop. A wire between the two screws of terminal "1" 7 does the same every time it is switched on, without touching the button.
Audio output
The output is chosen when ordering: the module is soldered for one or the other.
- Jack version 10: unamplified output, for headphones, an active speaker or an amplifier. The same mono sound goes to both ears. Up to 4 headphones with a splitter.
- Speaker or resonator version 11: both wires on the "+HP−" terminal, and nothing else. The output is bridged: neither wire must touch the − of the battery terminal, or any other ground.
In both cases, the volume is set with a screwdriver, on the potentiometer 9.
Connecting an amp: beware of hum
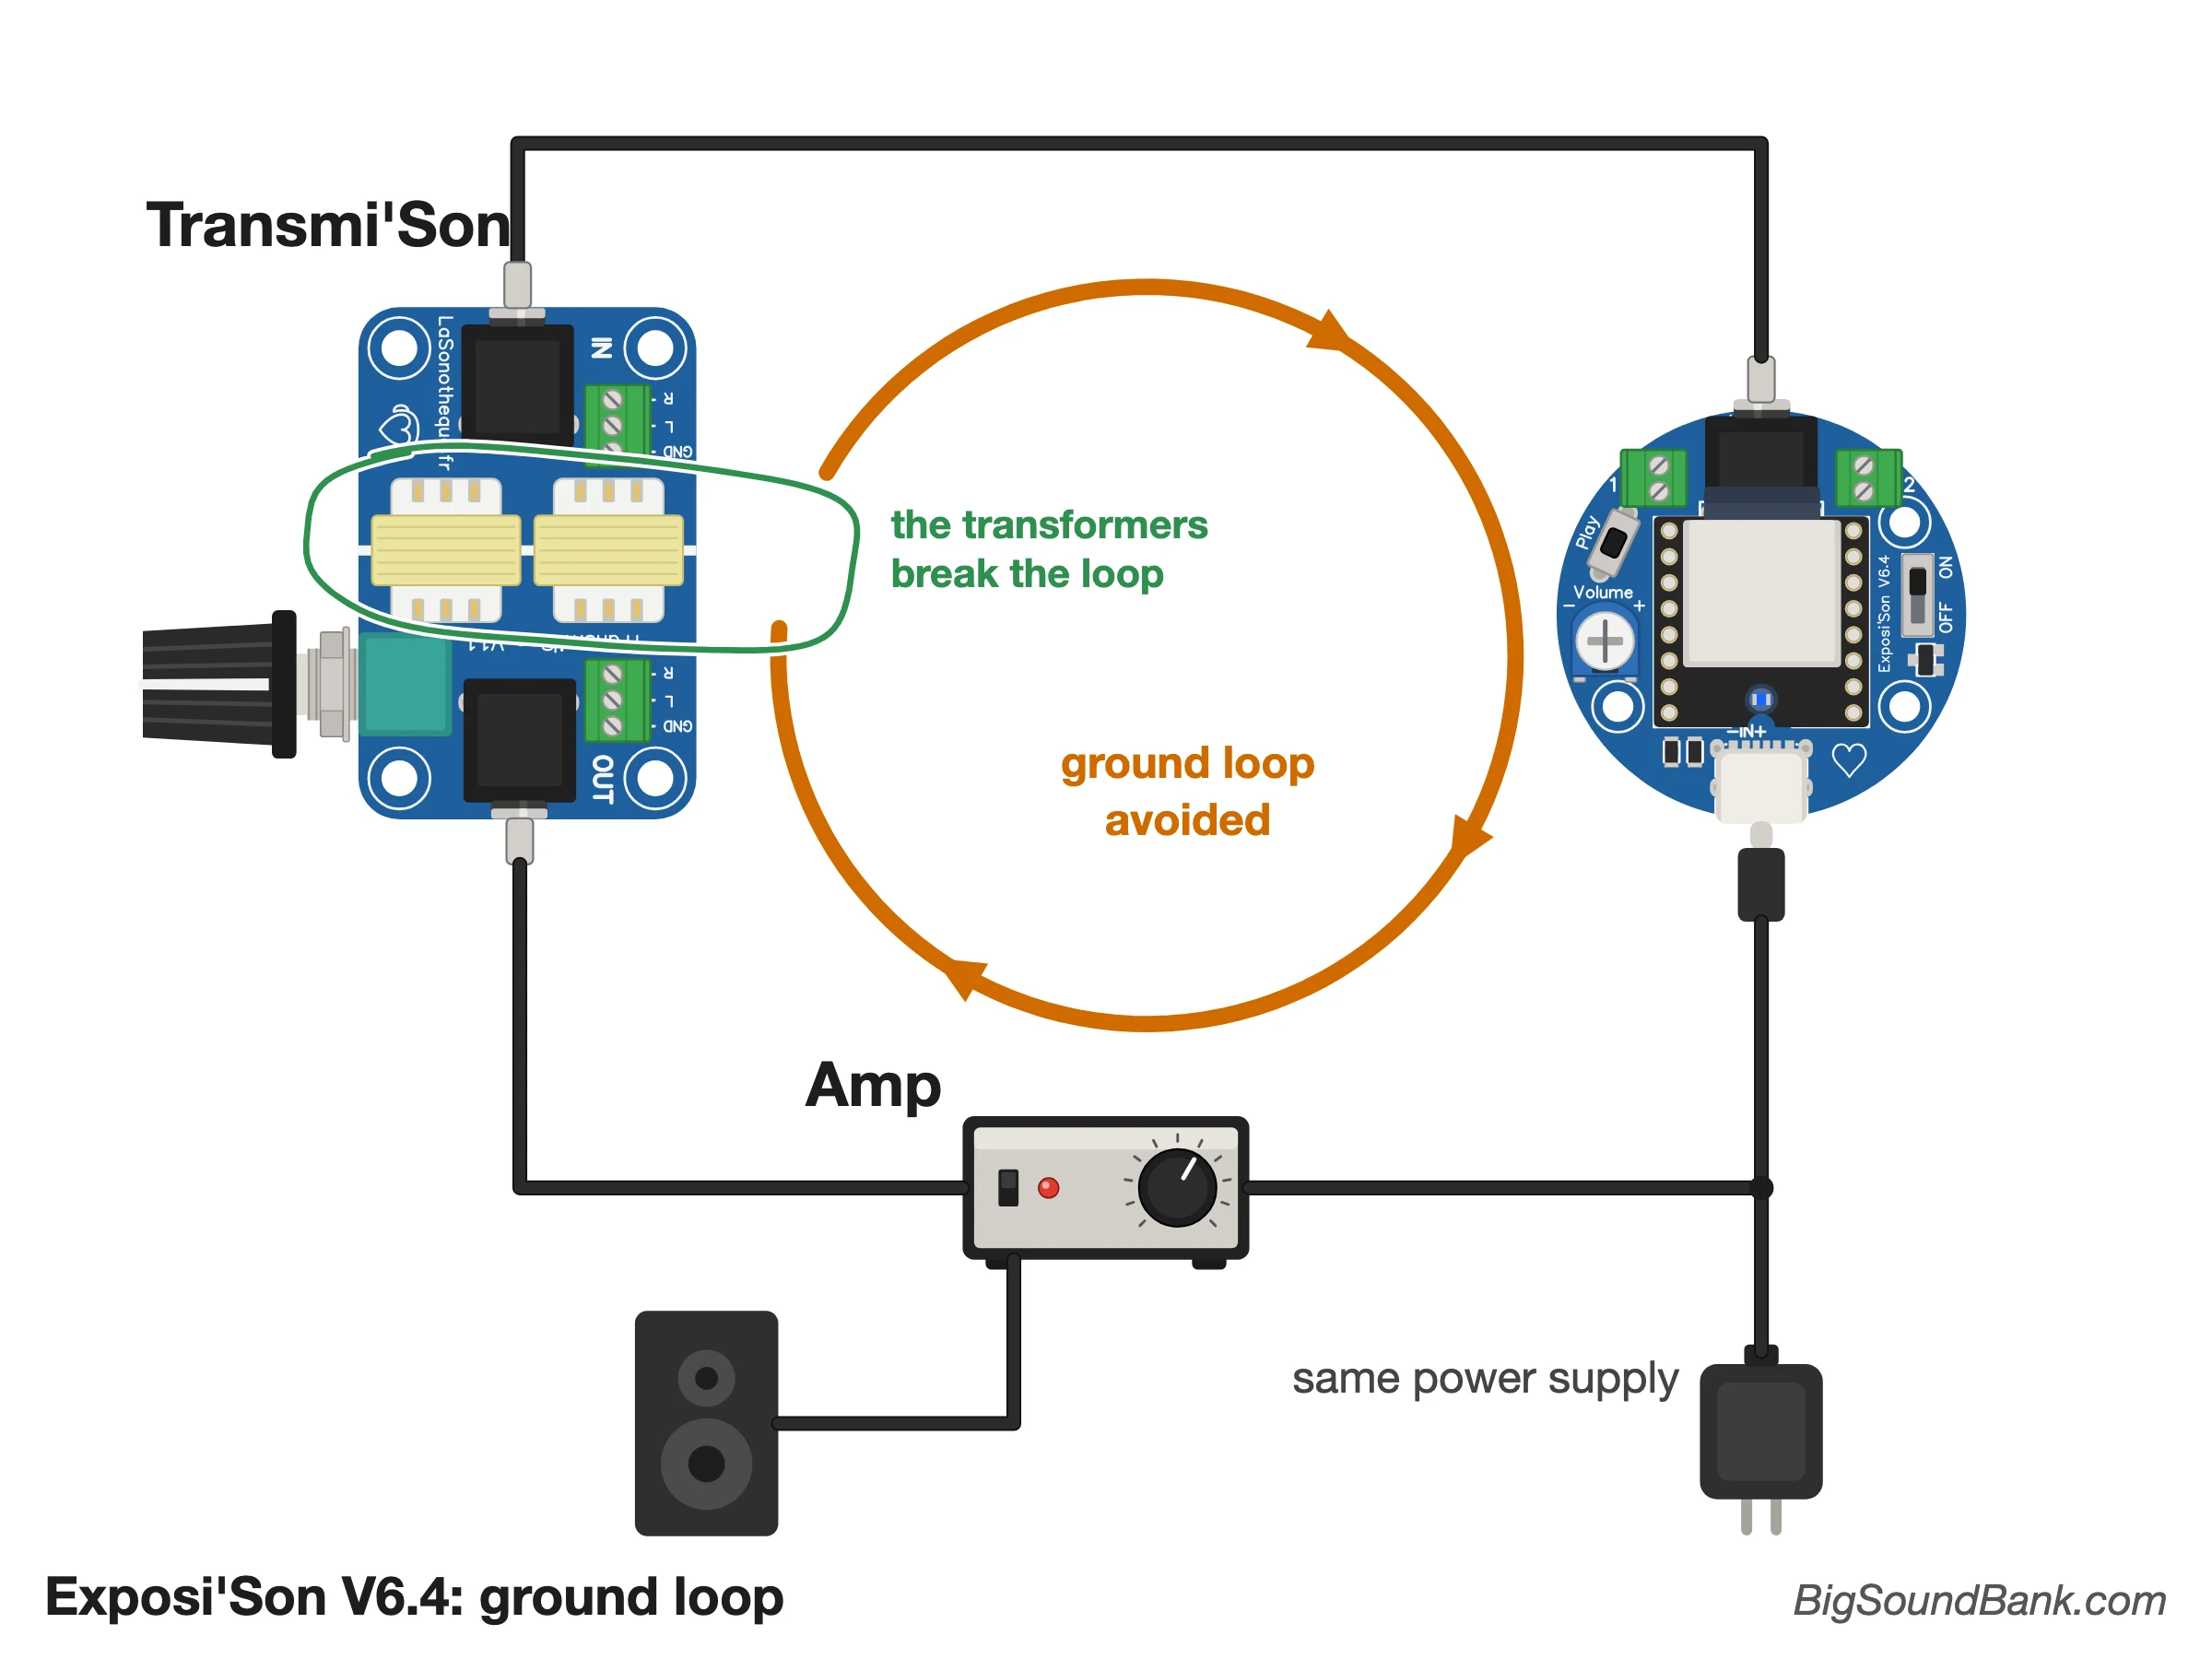
With the jack version, you can connect the Exposi'Son to an amplifier or an active speaker. If each one has its own power supply, the problem usually does not arise. But if a single power supply feeds both (the same mains adapter or the same USB charger for the module and the amp, or the amp connected to the module's power output 4), be careful.
Warning: a player and an amp on the same power supply almost always produce a hum, a low, continuous drone, even between two sounds. It is not a fault: it is a ground loop.
The two devices are then connected twice: through their shared power supply, and through the audio cable. Together, these two connections form a loop (in orange on the diagram), and that loop is what you hear.
To get rid of it, insert a Transmi'Son between the module's jack and the amp: its two transformers let the sound through, but not the ground, and so break the loop. What's more, its knob sets the amp's volume.
Extension
It comes with two screw terminals (7 and 8 on the diagram), to extend what it can do: push buttons with their resistors, or more simply an Exten'Son on each terminal. Detailed explanations below.
Dimensions
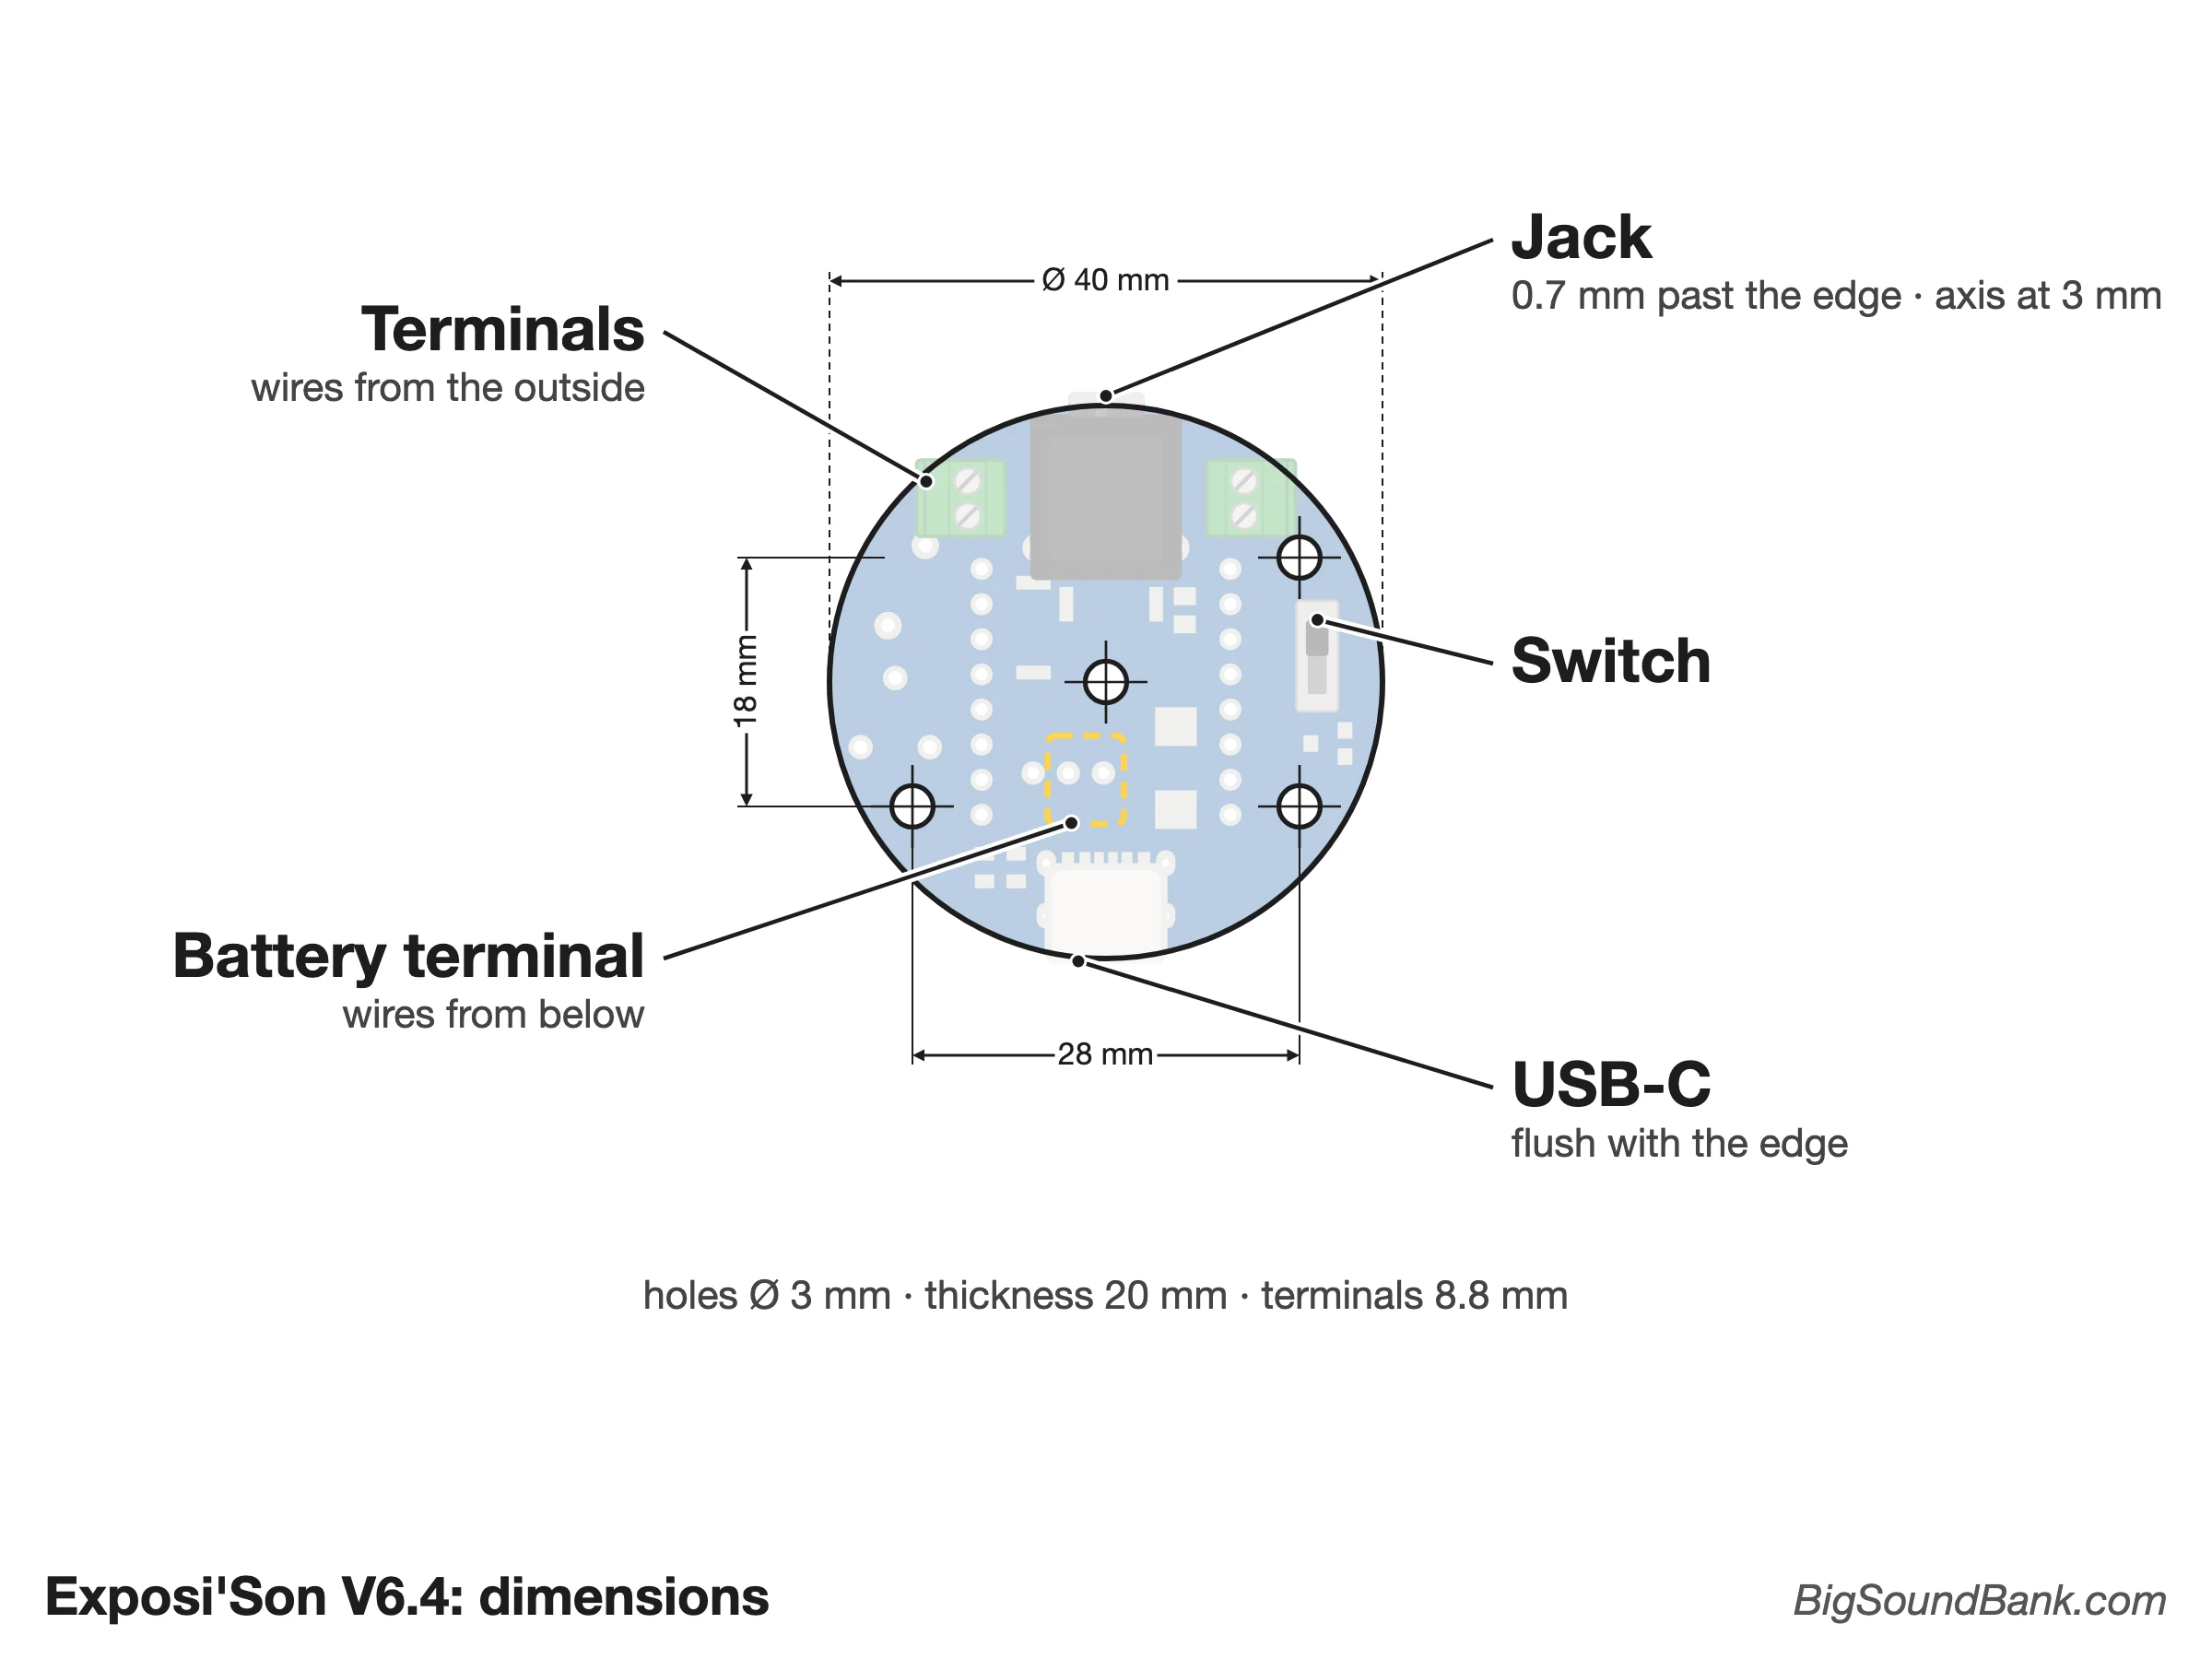
The board is round, 40 mm in diameter, and the assembled module is 20 mm thick. It has four 3 mm holes: one in the centre and three to mount it. The diagram below gives their spacing, and where things come out on the sides, so you can design a case.
Basic use
- Take a microSD card (32 GB maximum) and format it as FAT.
- On your computer, name one or more sounds in MP3 (recommended) or WAV format (48 kHz / 16 bits maximum), like this: 0001, 0002, etc.
- Copy your sounds one by one onto the card, from the first to the last. Then eject your microSD card.
- Insert it into the reader 5.
- Plug in headphones on the jack socket 10, if you have the jack version.
- Power it (USB-C 1 or batteries 2 depending on your version) and slide the switch 3 to ON.
- Press the "Play" button 6:
- A short press (< 1 second) plays the first file once.
- A long press (> 1 second) plays the first file on an endless loop.
- Hold the button down when switching on and all the files will play one after the other, on an endless loop.
- Set the volume on the potentiometer 9, with a small screwdriver.
Note that you can mix WAV and MP3 files on the microSD card. And in fact, the files do not need to be named with numbers: the module does not look at their names, but at the order in which they were copied. Naming them 0001, 0002, etc. simply helps you keep track, and copy them in the right order.
Advanced use
For better control of the module, you can add one or more push buttons (in series with a resistor) on terminals 7 and 8. It takes little knowledge of electronics, but a bit of patience.
Note that the "Play" button 6 already on the circuit board is an R1. In other words, its job is to start the first sound.
The simplest way: the Exten'Son
To save you soldering the resistors, I created the Exten'Son: a small round board, the same diameter as the Exposi'Son (40 mm), with the resistors already soldered on. It has ten screw terminals, B1 to B10, one per button, and an "AdKey" terminal to connect to terminal "1" 7 or "2" 8 of the Exposi'Son.
Connect one Exten'Son per terminal: just one, or two to reach 14 sounds. Then connect a push button to the two screws of each terminal B1 to B10 that you need, either way round. The Exten'Son is sold bare, with no wire or button.
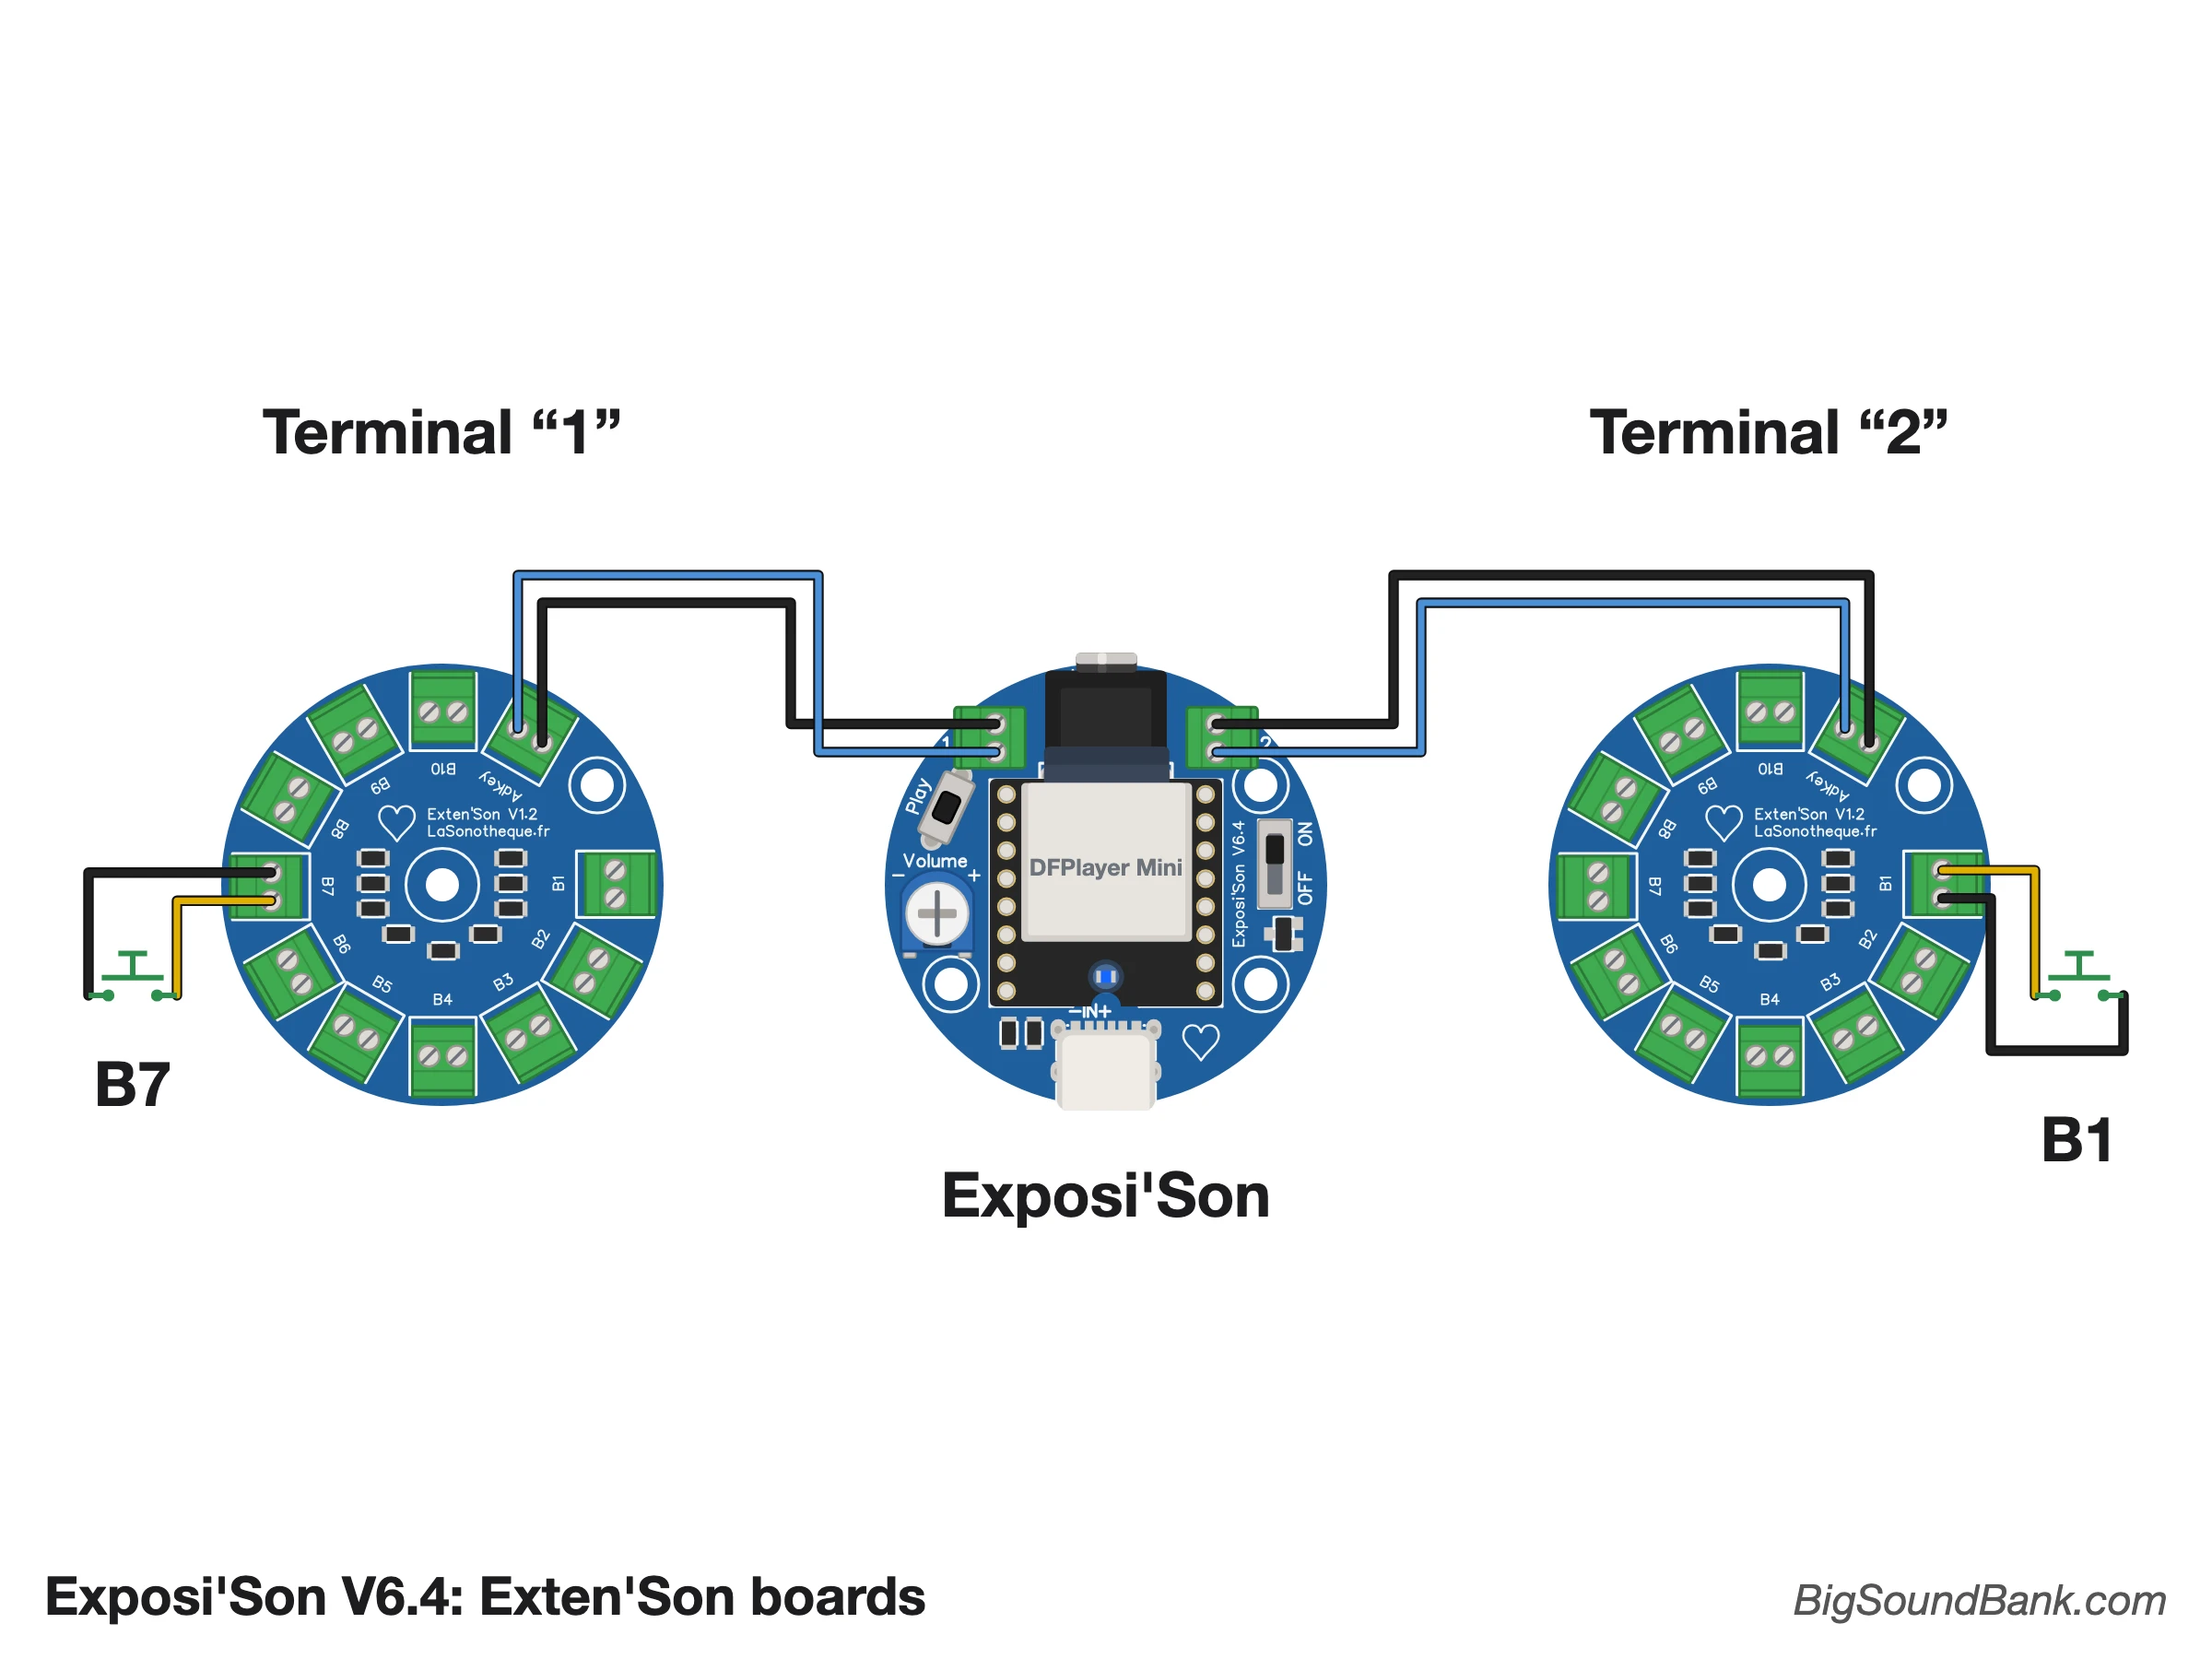
Each terminal of the Exten'Son works like one line of the lists below. On terminal 7, B1 works like R1 (file 1), B2 like R2 (file 2), and so on up to B10 (R10). On terminal 8, B1 works like R11 (file 5), up to B10 (R20, file 14).
Tip: for 5 to 10 sounds with a single Exten'Son, connect it to terminal 8 and first copy 4 unused files (silences, for example) onto the microSD card. B1 to B10 will then start your sounds, copied afterwards (and the "Play" button 6, the first unused file).
Or: your own buttons and resistors
If you would rather solder them yourself, here is how.
Demonstration

Diagram
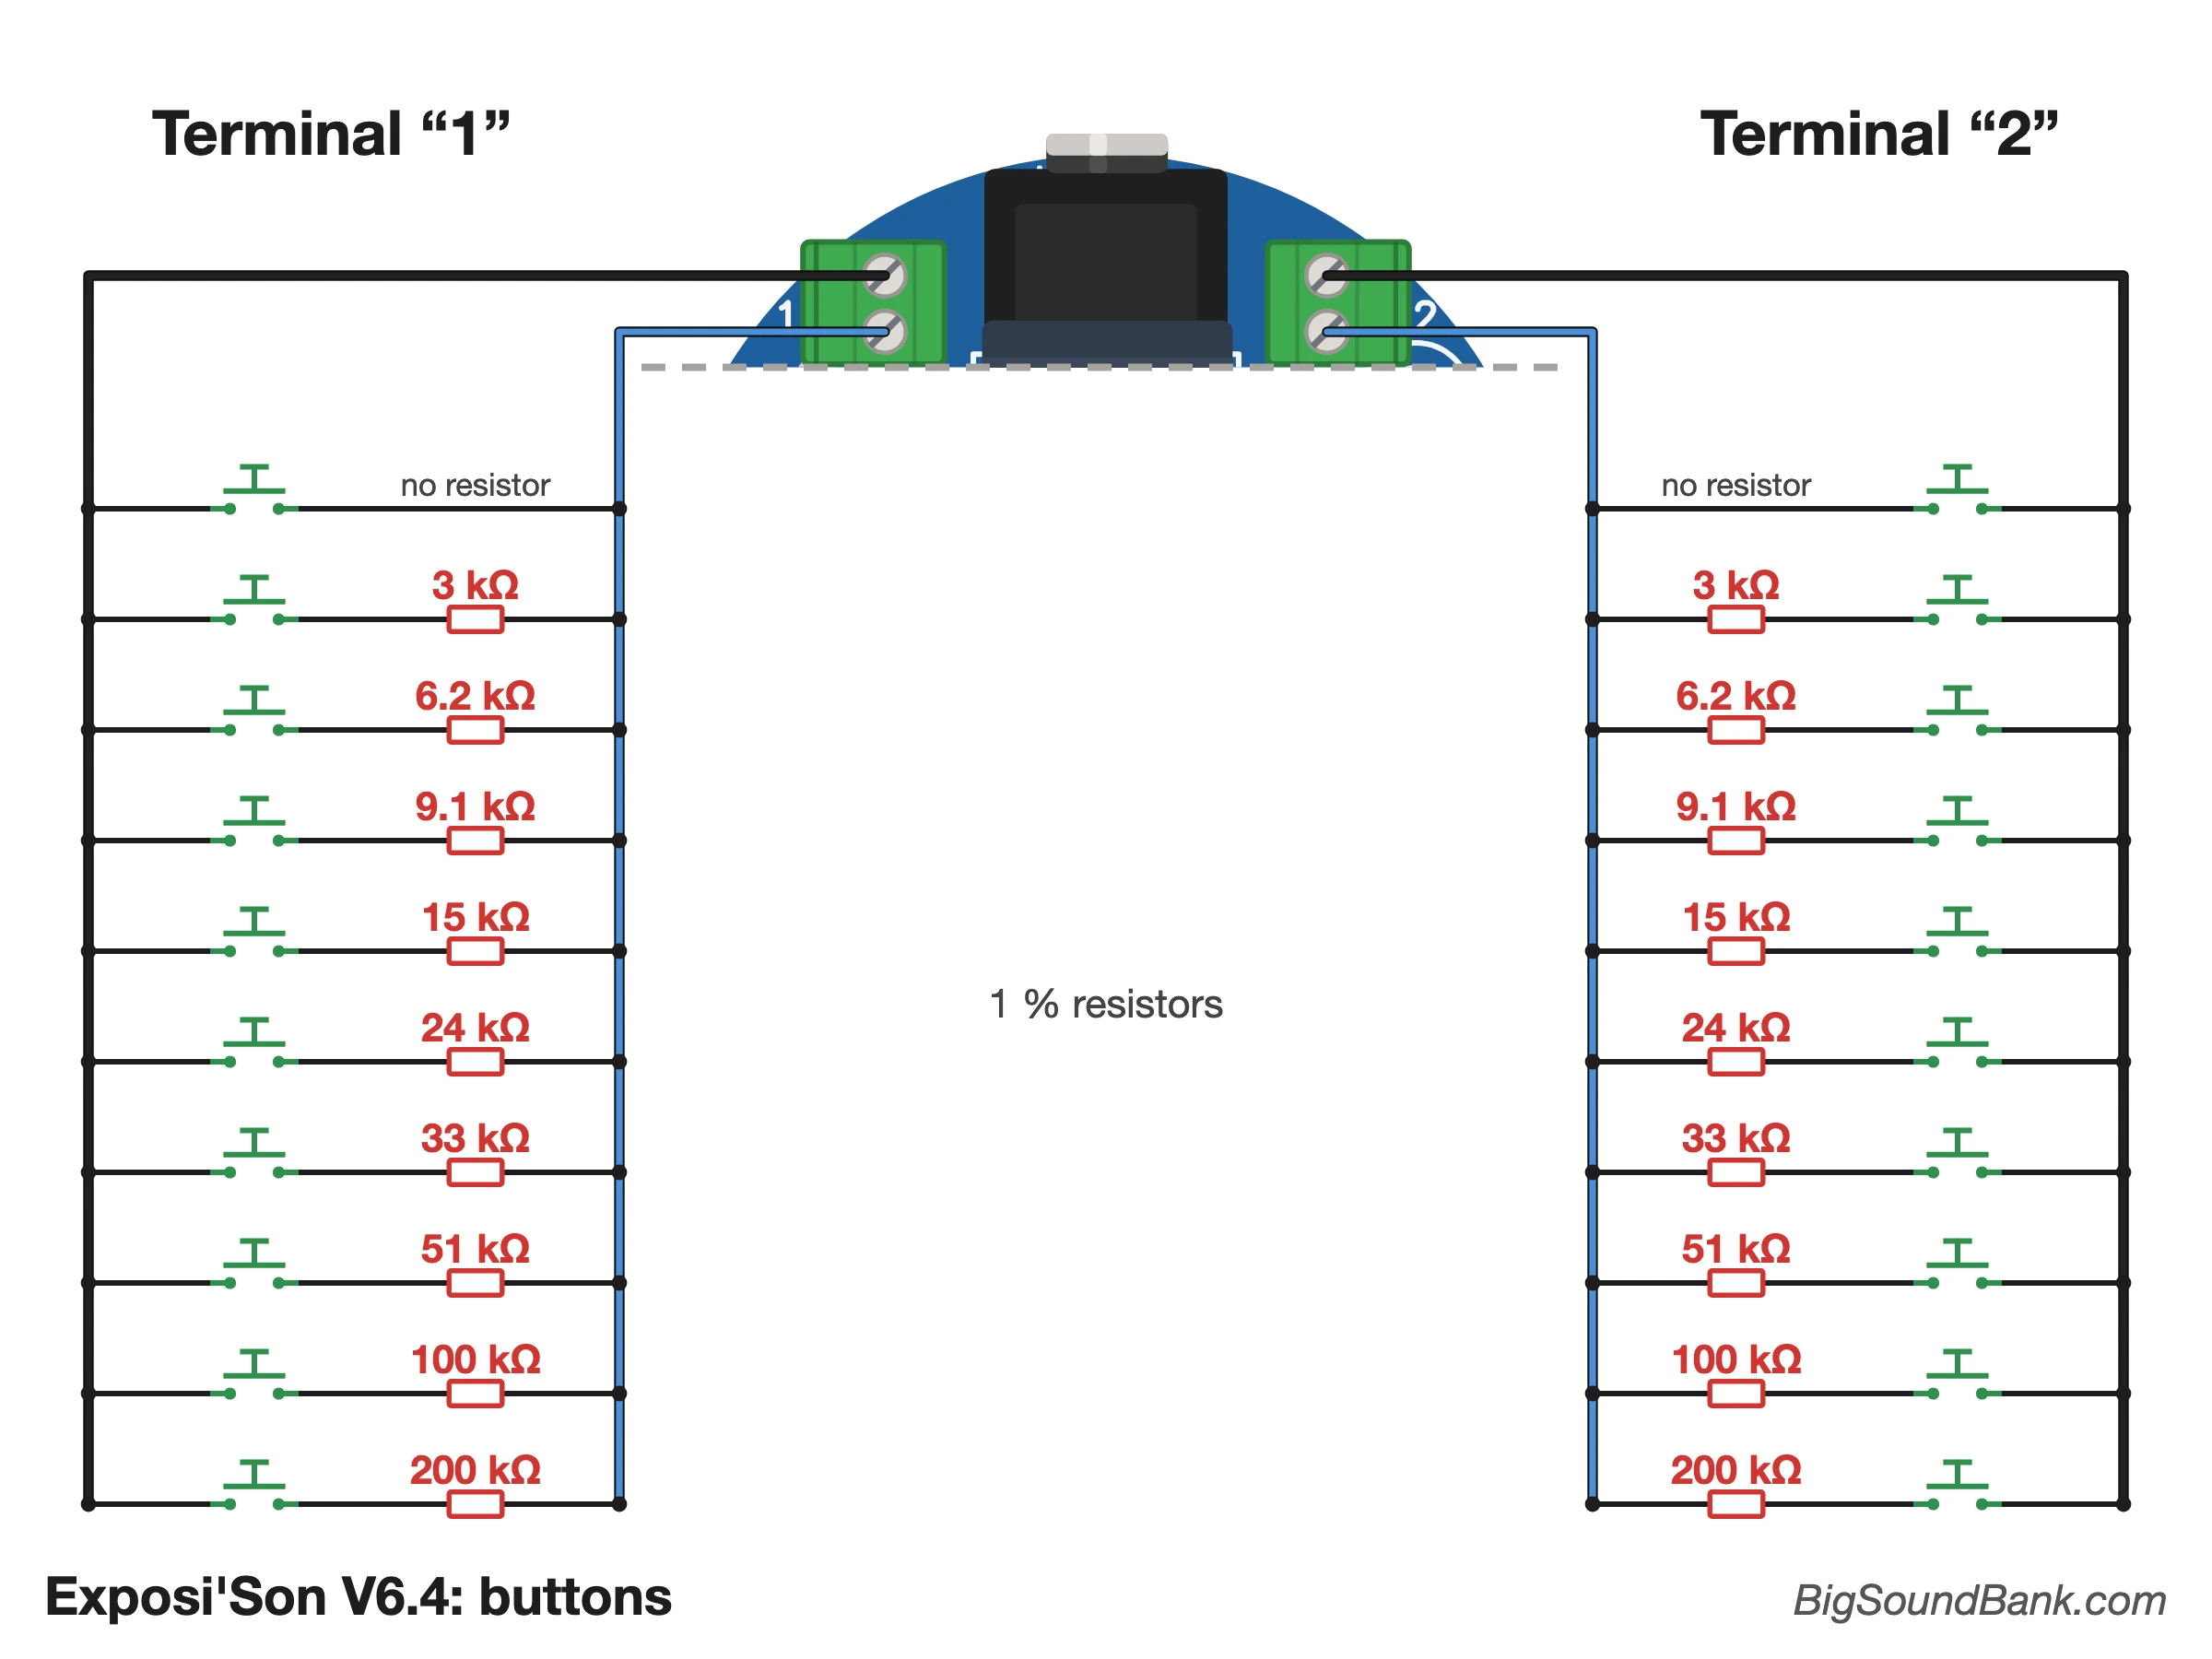
Key
In green, push buttons
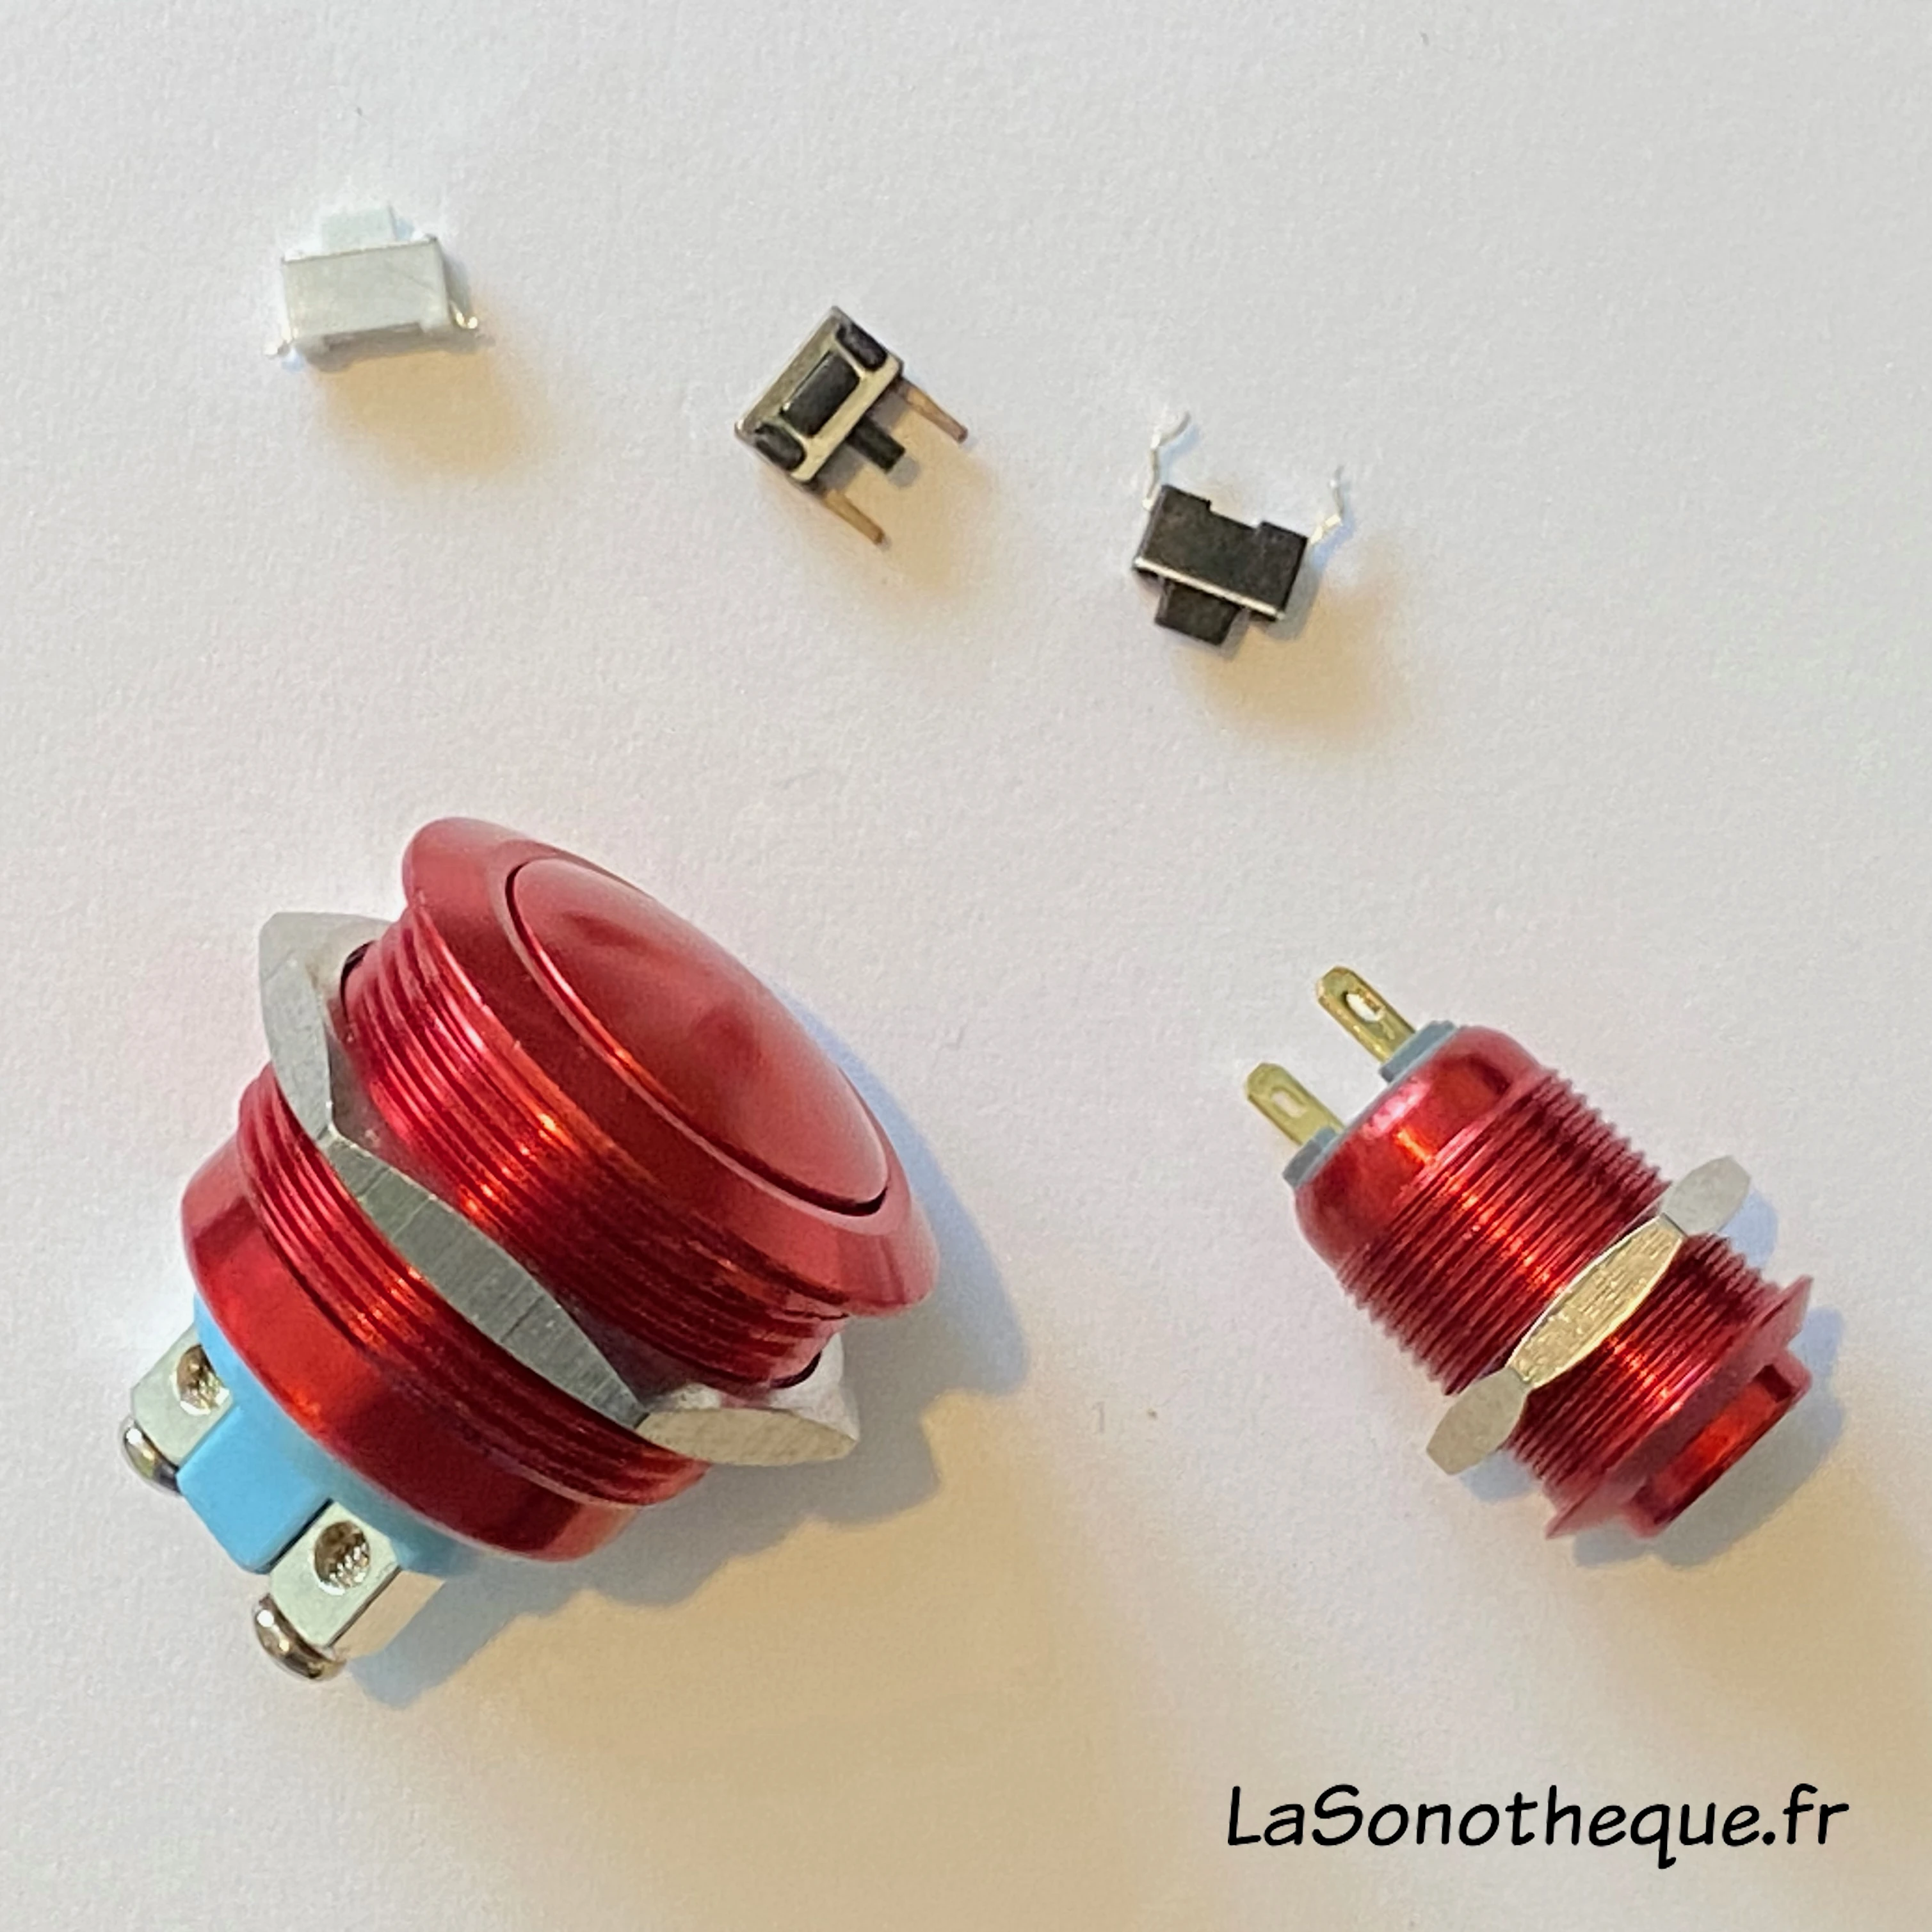
You can use any push buttons you like, and they will allow short or long presses, which do different things.
You can reuse old buttons, of any size, or those of the device you are fitting, or even household wall switches. Try it and see!
"On/Off" switches can also have their advantages, but I do not recommend them for beginners.
In red, resistors
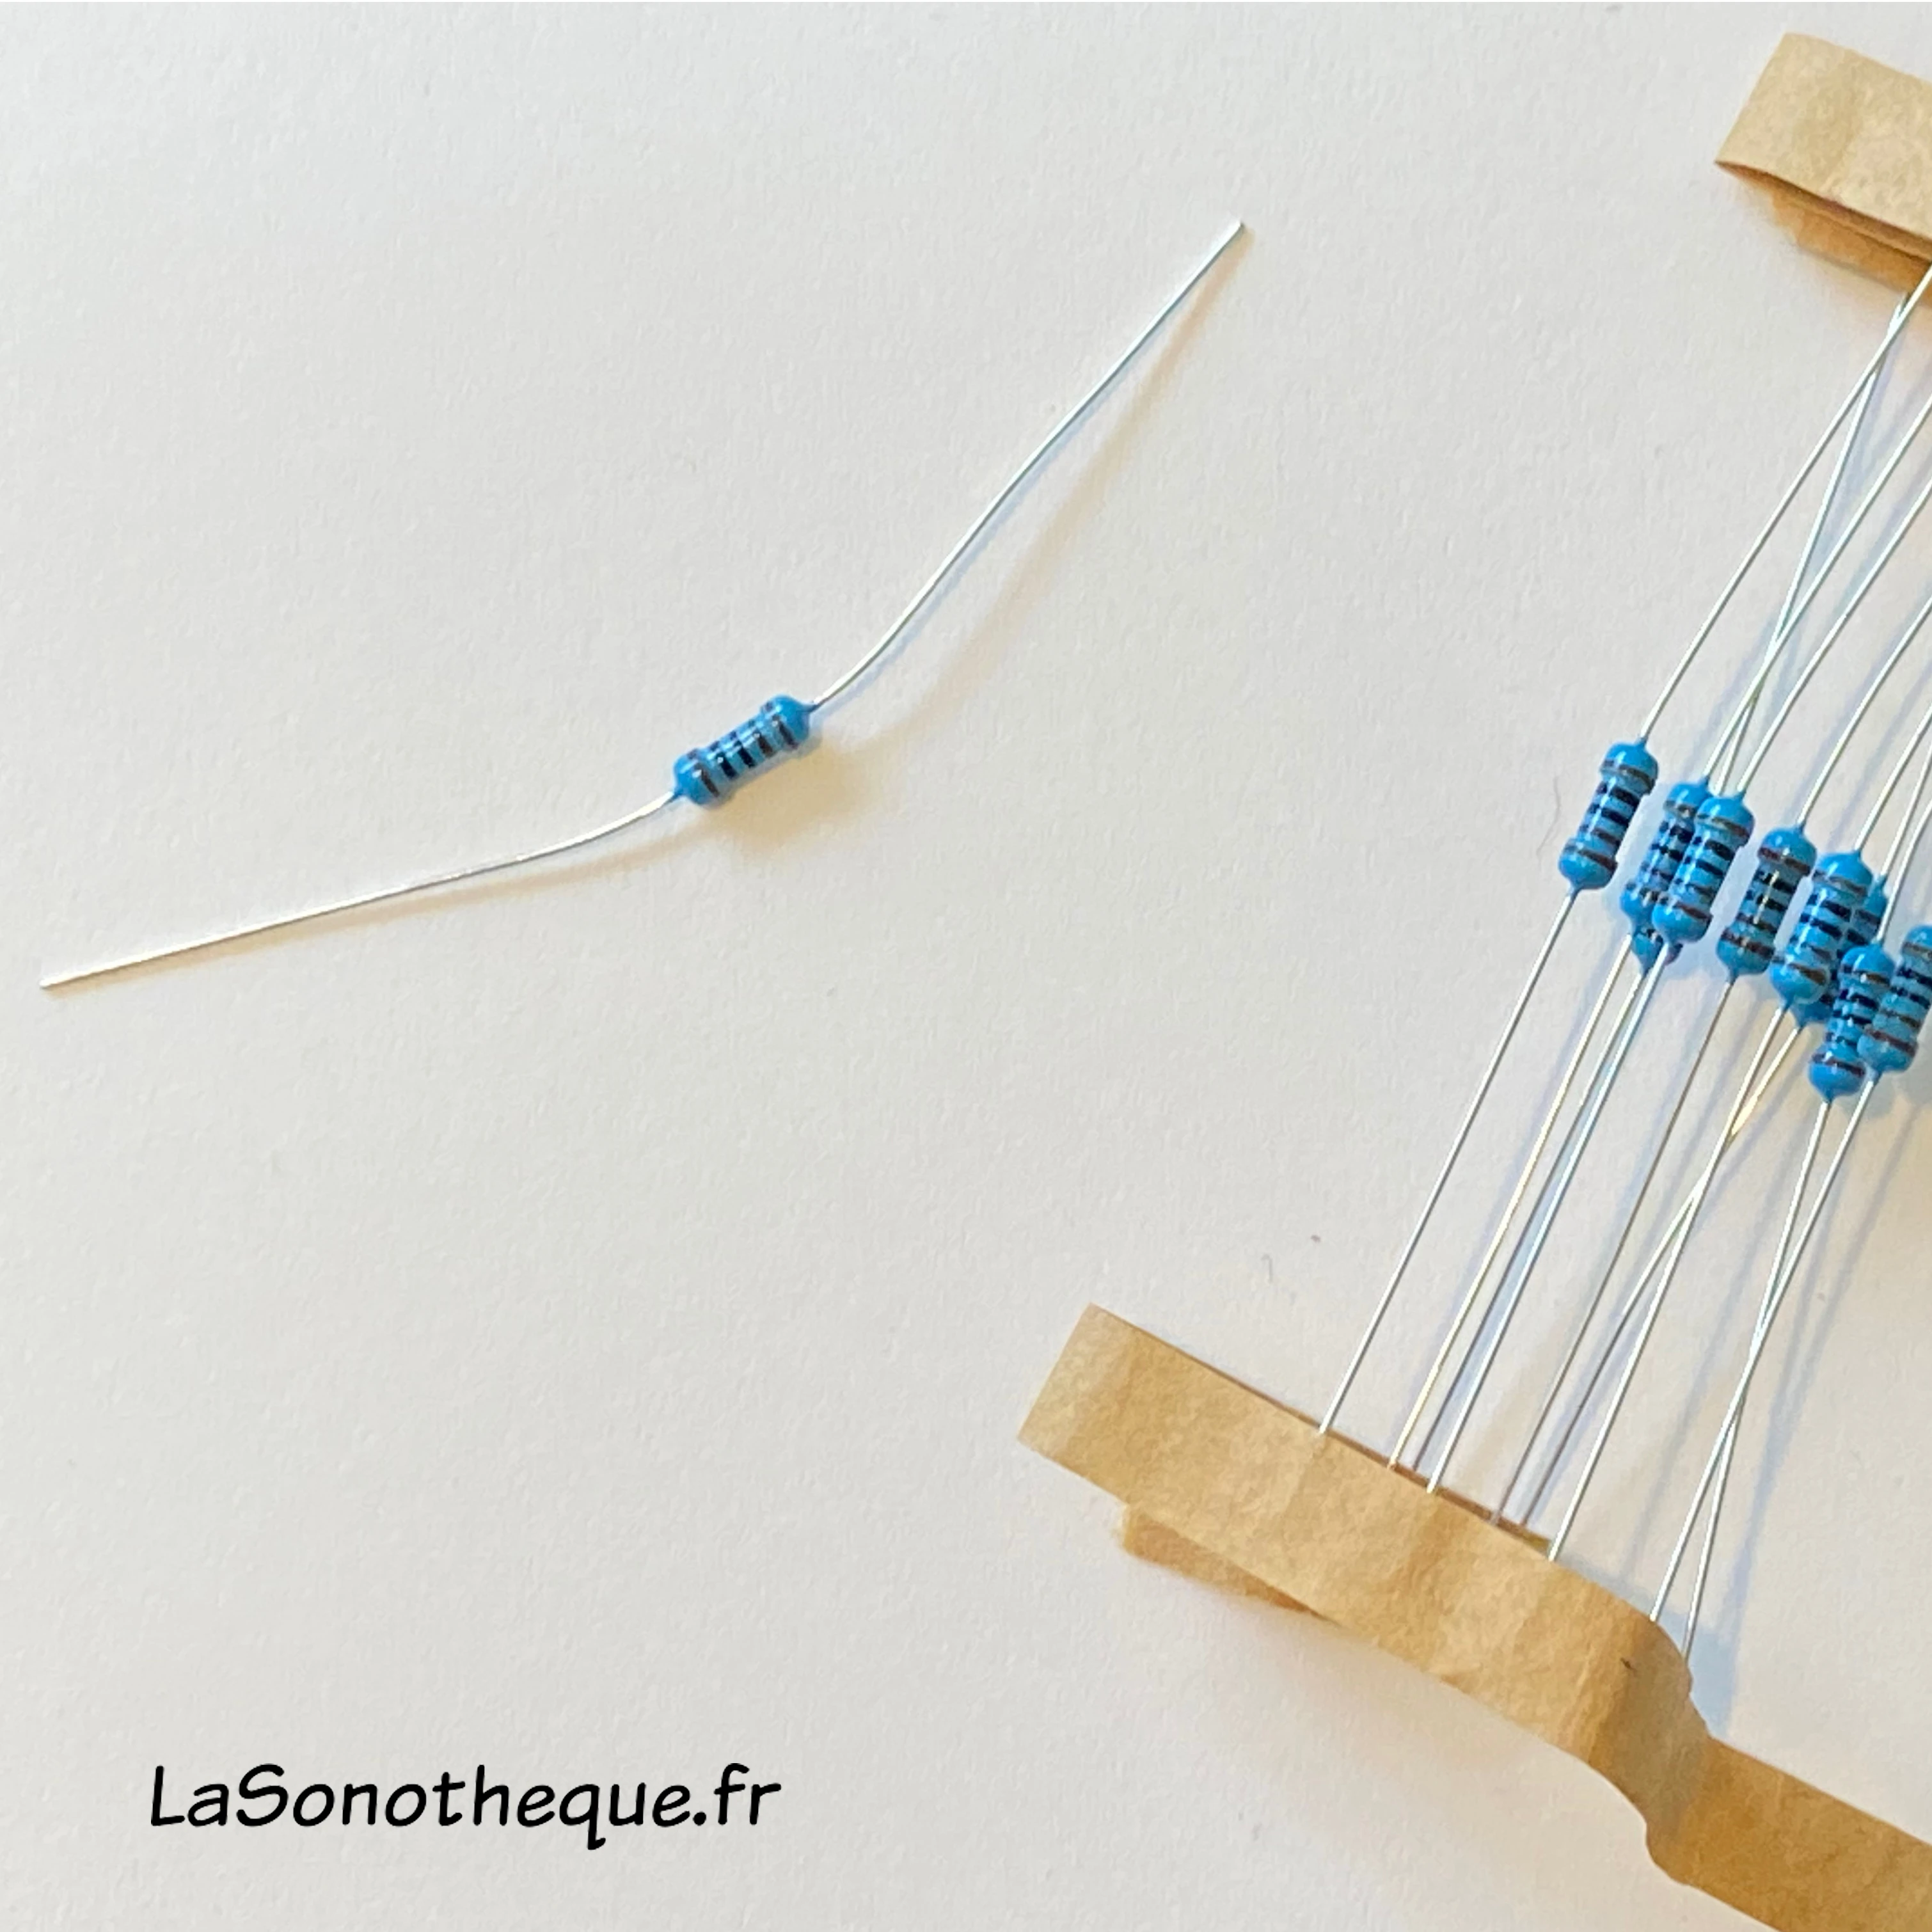
Small 1% resistors are perfect. They cost very little.
There are kits (here, for example), handy for making a prototype, or packs of 100 or 200 resistors of a single value, for less than €2 (here, for example).
If you do not have the right resistor value, you can try to get as close as possible (using 32 kΩ instead of 33 kΩ should be fine), or put several in series (20 kΩ + 10 kΩ + 3 kΩ = 33 kΩ)
Values
You can fit whichever "Button + Resistor" pairs you want.
Example 1: if you ONLY want the "play file 4" function, you only need to fit resistor R4 and its button in series on terminal 7.
Example 2: if you only want the "play file 9" and "play file 13" functions, you need to fit resistor R15 and its button as well as resistor R19 and its button, both pairs in parallel on terminal 8.
Connected to terminal 7
- R1: "File 1", a 0 resistor (so no resistor) + 1 button. Note that the "Play" button 6 already on the circuit board is an R1. In other words, its job is to start the first sound.
- R2: "File 2", a 3 kΩ resistor + 1 button
- R3: "File 3", a 6.2 kΩ resistor + 1 button
- R4: "File 4", a 9.1 kΩ resistor + 1 button
- R5: "Previous file" on a short press (<1s), "Volume -" on a long press (>1s), a 15 kΩ resistor + 1 button
- R6: "Next file" on a short press (<1s), "Volume +" on a long press (>1s), a 24 kΩ resistor + 1 button
- R7: "Play / Pause", a 33 kΩ resistor + 1 button
- R8: "Play all files on a loop / Pause", a 51 kΩ resistor + 1 button
- R9: Not usable on this module
- R10: "Playback mode: interruptible or non-interruptible", a 200 kΩ resistor + 1 button
Connected to terminal 8
- R11: "File 5", a 0 resistor (so no resistor) + 1 button
- R12: "File 6", a 3 kΩ resistor + 1 button
- R13: "File 7", a 6.2 kΩ resistor + 1 button
- R14: "File 8", a 9.1 kΩ resistor + 1 button
- R15: "File 9", a 15 kΩ resistor + 1 button
- R16: "File 10", a 24 kΩ resistor + 1 button
- R17: "File 11", a 33 kΩ resistor + 1 button
- R18: "File 12", a 51 kΩ resistor + 1 button
- R19: "File 13", a 100 kΩ resistor + 1 button
- R20: "File 14", a 200 kΩ resistor + 1 button
Examples of use
Fruit'Sons
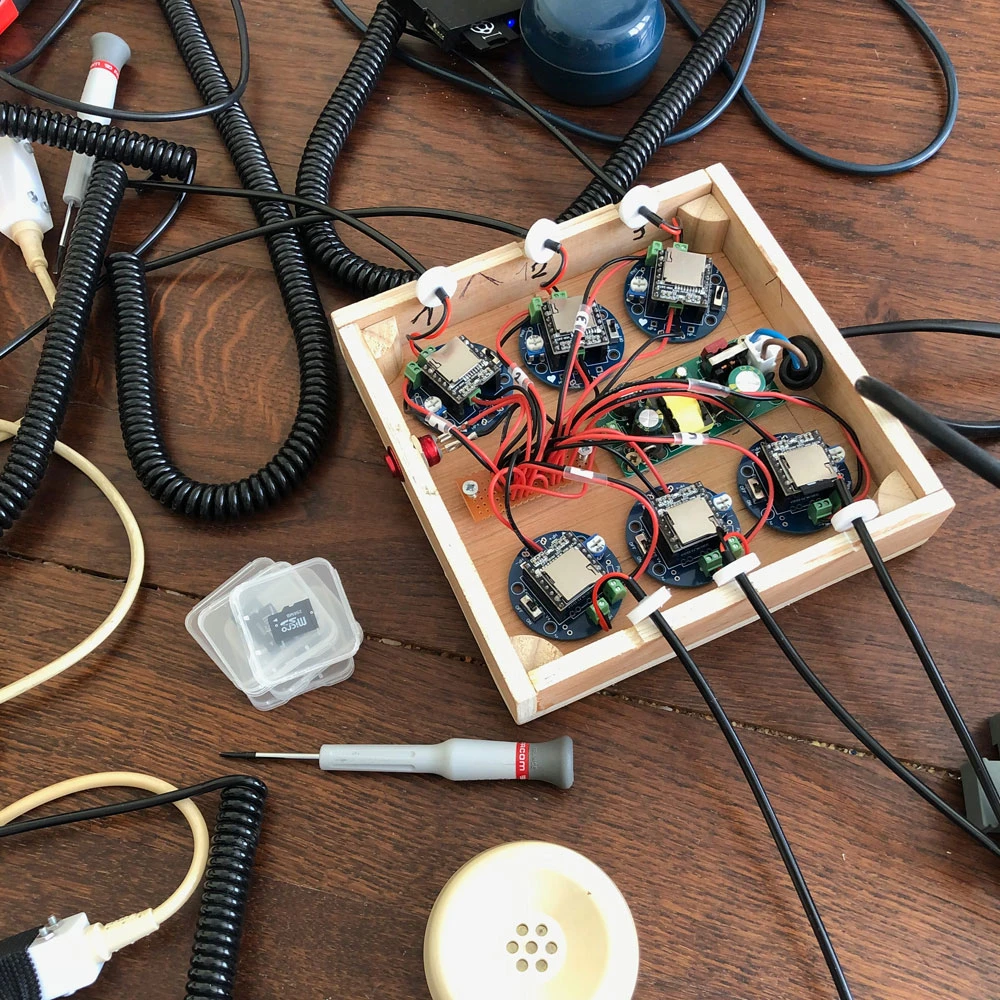
This is one of my own sound installations: 6 earpieces from old telephones, hanging in a tree, offering sound fruits to taste to those who dare to pick them. Visitors have nothing to do but hold the earpiece to their ear.
A single 5 volt power supply for all 6 modules. The 6 terminals 7 are "short-circuited" so that all the files play, on a loop, as soon as the installation is powered.
Matthieu C.'s old telephone
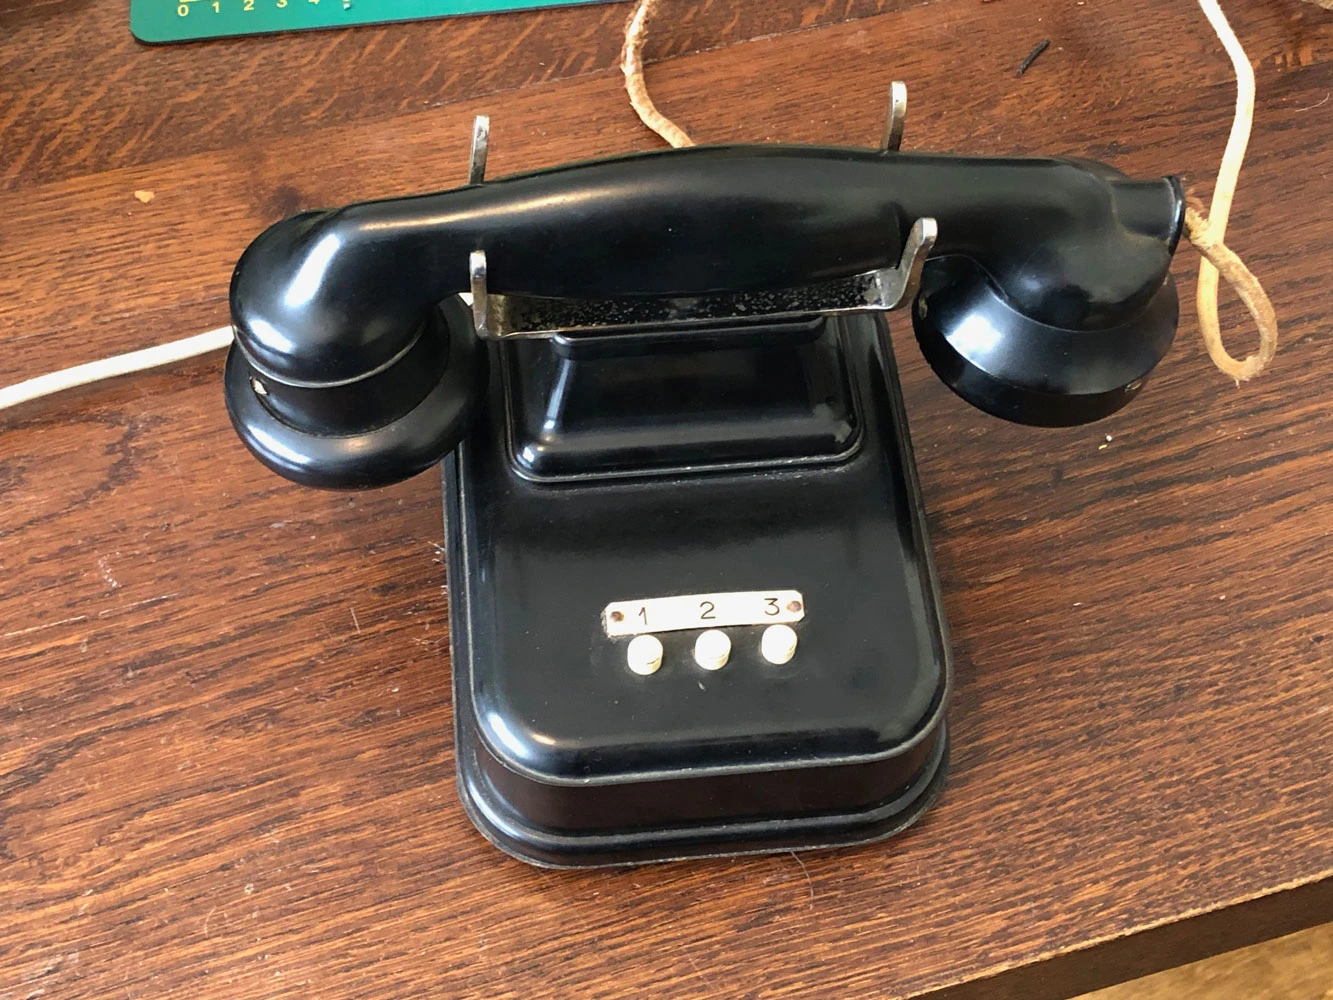
Here is a piece of equipment I made with Matthieu C., a LaSonotheque user who came for "audio electronics" training at my place, at his request.
Inside the telephone, an Exposi'Son whose terminal 7 is connected to the 3 buttons in parallel. The first with no resistor in series, the second with a 3 kΩ resistor (R2) in series and the third with a 6.2 kΩ resistor (R3) in series.
On the microSD card, 3 files: "0001.wav", "0002.wav" and "0003.wav".
And that's it!
To prevent the files from looping if the user presses for a long time (> 1 second), each of the 3 files is made up of the sound followed by more than an hour of silence.
La Boîte à Outils radio
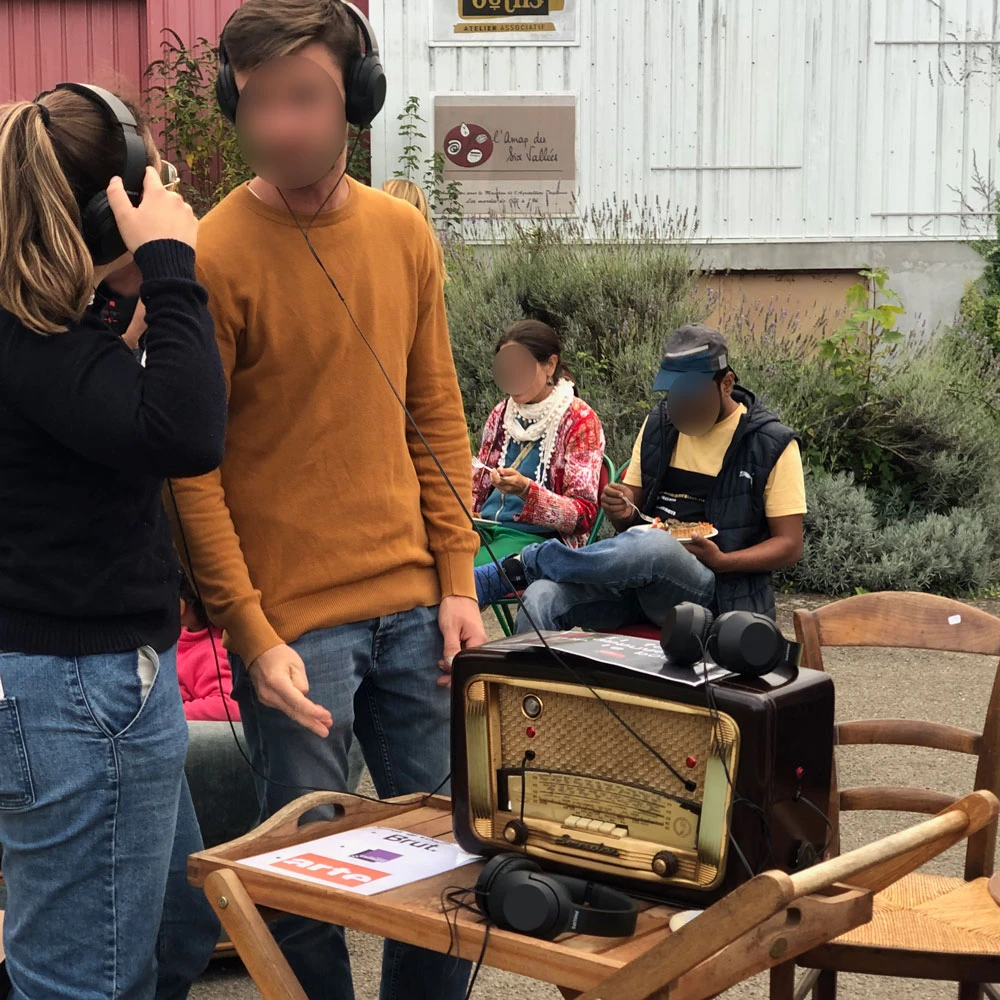
An old radio I fitted with and for La Boîte à Outils in Nogent-le-Rotrou (France). One power supply, 4 modules, connected to 4 headphones, and 4 buttons to play the next file.
Etc.
Have an idea and want to know whether it can be done, and how? Feel free to contact me.
Problems, Solutions & Ideas
The DF Player is a great little player found in many of my creations, including this one, but it has quite a few small flaws, which are easy to work around. So here is an article dedicated to solving all the DF Player Mini's problems.
Versions
Every time I launch a new production run, I make a few changes to the circuit board design. Sometimes I make a mistake (see V2), but I try to respond to what users ask for. So feel free to contact me!
- September 2021 - V1: A simple DF Player with an ON/OFF switch and a volume control. Simply plays file 1 on a loop on a 3 Watt speaker. USB power or AAA batteries.
- December 2022 - V2: Optional jack socket added. Oops, I made a design mistake on the volume potentiometer!
- December 2022 - V3: AdKey 1 added, along with the option of a power output after the switch.
- December 2023 - V4: AdKey 2 and a play button added.
- January 2025 - V5: Optional USB-C connector, reverse polarity protection and short-circuit protection on the jack.
- June 2025 - V6: The jack is connected to the "Line" output.
- June 2025 - V6.1: Small touch-ups to the board design.
- December 2025 - V6.2: A large capacitor added, an energy reserve for loud sounds.
- January 2026 - V6.3: A small capacitor added to filter interference from the power supply.
- April 2026 - V6.4: Component placement touch-ups.
Conclusion
Using this module is really simple but, at the risk of repeating myself: feel free to contact me if you have any questions at all!