Since its inception in 1997, the developers of FL Studio have continued to add the latest features that have increased the efficiency of the music production process. If you spend quite some time on FL Studio, you should know how to change the FL Studio background, which is what the focus of this blog is.
How To Change FL Studio Background
Changing the FL Studio background is a fairly straightforward process and wouldn’t take more than a couple of minutes to implement if you follow the steps mentioned below properly.
Step 1: Launch FL Studio
As obvious as it can get, you begin by firing up FL Studio on your windows or macOS devices.
Step 2: Open The View Menu
Click on the “View” menu from the toolbar on the top of the FL Studio screen.

Step 3: Select “Background”
Once you click on the view menu, you will see a dropdown menu. In the dropdown menu and from the “Layout” section, you have to click on the “Background” option and then click on “Set Image Wallpaper”.
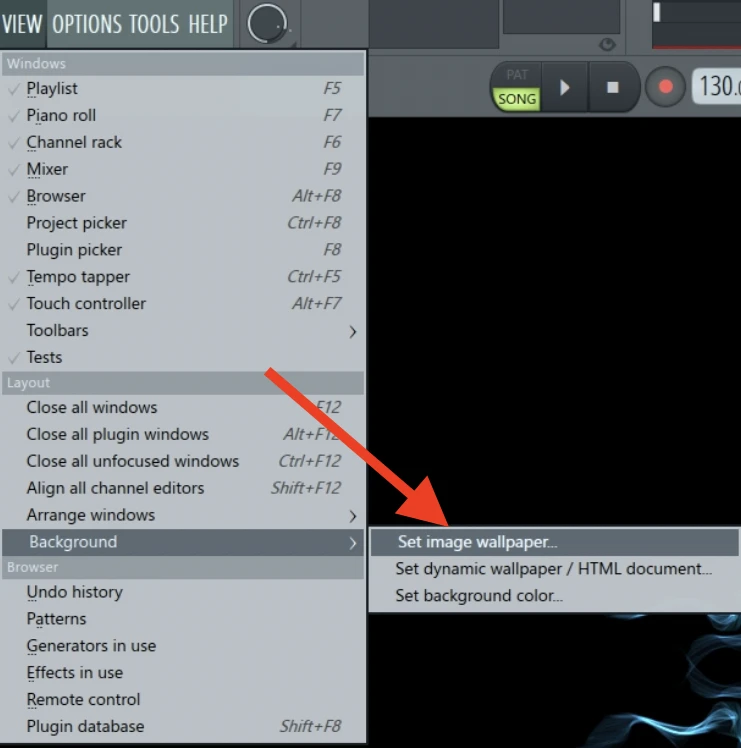
Step 4: Select The Desired Image
A browser window will open when you click the “Set Image Wallpaper” option. From this window, you must browse where your desired image is saved. Select the image and click on “Ok”.
And you are done. You will see that your preferred image is now set as the background image in FL Studio.
Related Article: How to Copy and Paste in FL Studio?
How To Change Background in FL Studio: Dynamic Background
Now that you have successfully learned how to change the background in FL Studio using still images, it is time to level up and learn how to change the background in FL Studio with Dynamic Background. Unlike a still image, a dynamic background changes with time, whether in animation or a simple looped video.
With a dynamic background in FL Studio, it is sure shot that you will enhance the look and feel of your entire workspace. With a dynamic wallpaper on FL Studio, your workspace will look more creative, an important source of inspiration in professions like music production. So, let us get going. Follow the steps below to learn how to change the background in FL Studio.
Step 1: Choose Your Dynamic Background
To set a dynamic background on FL Studio, the first step is to have a dynamic background with you in place. There are tons of websites available on the internet from where you can download the dynamic background of your choice.
Suppose you want to step ahead and put your creativity to work. You can also use video editing software like Adobe Premiere Pro, Final Cut Pro, Adobe Rush, and DaVinci Resolve to create your video.
PS- Ensure your dynamic background is in a format that FL Studio supports. Otherwise, FL Studio might not able to run and display your dynamic background properly. If unsure, a safe option is to convert your video file to a format like MP4 or AVI.
If you use video editing software to create your dynamic wallpaper, you can simply export it in the MP4 or AVI format. And if you already have a video, there are a lot of free video converters available on the internet which you can use to convert your video to MP4 or AVI formats.
Related Article: How to Record Vocals in FL Studio
Step 2: Put Dynamic Wallpaper In FL Studio Installation Folder
Now that you have your dynamic wallpaper file, it is important to put it in the right folder so that FL Studio can access it without any restrictions.
By default, the right location is- C Drive
Make sure that you copy the video file in the above-mentioned location.
Now that you are ready with the dynamic background file and have copied it to the right folder. Only two steps remain, and you will have successfully learned how to change your FL studio background to a dynamic one.
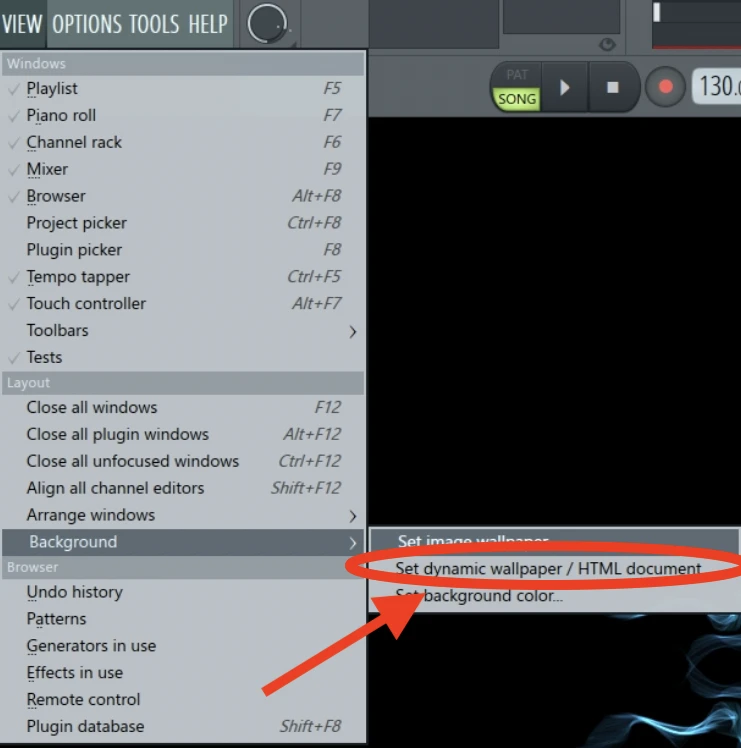
From the menu bar, click on the “View” menu.
Once you click, a drop-down menu will appear. Take your mouse to the “Background” option and then select “Select Dynamic Wallpaper/ HTML Document”
From the browser window that has appeared after the last step, browse to the location where you have saved your dynamic wallpaper, which in this case is “ C Drive
As you finish the last step, you will notice that your background wallpaper is now a moving video file! Amazing, isn’t it?
Even though learning how to change your background in FL Studio isn’t a hard task, if you still need some motivation, we have mentioned some benefits of changing your background in FL Studio.
If you have an item to sell, any other man can sell it for a higher price in the name of personalization. Why? The reason is simple: we all like things customized according to our liking.
You are technically doing the same thing by setting a background image in FL Studio. A background can make your workspace feel more like your own and lively. It is a game changer for people like music producers who spend more than half of their lives on FL Studio.
The default background color in FL Studio is white, which can be a little too bright, especially if you are a music producer who works late at night.
Working continuously with bright light in your eyes is one of the major reasons for eye problems.
Changing your background to something subtle and more comfortable to your eye will help you reduce your eye strain even if you continue working for long hours in FL Studio and will help you retain your focus.
Related Article: How To Export Stems in FL Studio
While many of you will dismiss this point without giving it a second thought. Believe us for once and try going through the steps on how to change background in FL Studio.
An inspiring background image can do wonders when you are at work. We have seen so many people putting up quotes and images of their idols because it does really help boost your morale and motivation from time to time.
While this might only be a motivating factor for some of you. But, we can bet that it is a great idea for those music producers who create content for social media platforms like YouTube, Instagram, or FaceBook.
Setting a brand image as the FL Studio background helps you promote a brand without adding ad breaks in your video and putting it on your viewer’s face (which, honestly, is very annoying).
Now that you know almost everything there is to know about how to change your background in FL Studio, we want you to read this last section, which will help you make the right selection for your background.
While changing your background, select wallpapers that do not make it hard to see important buttons. Background images that are too vibrant will make it very difficult even for a veteran music producer.
That is why we suggest keeping your background as basic as possible.
Selecting the image with the right resolution is extremely important if you don’t want your background to blur out or stretch in FL Studio.
A standard recommendation is to select images of resolution 1920x1080. You will get plenty of image options in this resolution on the internet.
Changing the background in FL Studio is a very straightforward process. Learning how to change the background in FL Studio helps music producers personalise their workspace, making it look more appealing and reducing eye strain.
With the help of a few buttons, you can change the background in FL Studio in less than two minutes.
Step 3: Open The View Menu
Step 4: Selecting Your Dynamic Wallpaper
Benefits Of Changing Background in FL Studio
Personalization
Reduced Eye Strain
Inspiration
Branding
Things To Keep In Mind
Visibility
Resolution
Conclusion