Sidechaining is a technique popular for adding a new dynamic to any music producer’s work. Sidechain is exactly what its name suggests. The volume of one track is chained and hence is used to control the volume of one or more tracks chained to the first track. Music producers can learn how to sidechain in FL Studio for multiple reasons as it is one of the most efficient techniques that can add a kick to their tracks.
How To Sidechain in FL Studio
Now that we have motivated you enough with all the reasons to use sidechaining. Let us take you to the meat of this blog, a detailed guide on how to sidechain in FL Studio.
While we are mentioning multiple ways to learn how to sidechain in FL Studio. Once you select your preferred method, ensure you don’t miss the steps and follow every step mentioned in the section to achieve the desired effects.
How To Sidechain In FL Studio Using The Fruity Limiter
Previously known as the FruityLoops, the Fruity Limiter is a plugin in FL Studio that triggers a sidechain compression simply by generating an audio signal that controls the volume of other target tracks.
The best thing about learning how to sidechain in FL Studio using the Fruity Limiter is that it can use several settings for adjusting the compression and limiting behavior, including threshold, ratio, attack, and release.
Note- If you are trying sidechaining in FL studio for the first time, we recommend you make a backup copy of your FL studio project. Even a simple step gone wrong can turn into havoc, and it is always better to keep a copy before making any major changes to your project.
Step 1: Add The Fruity Limiter
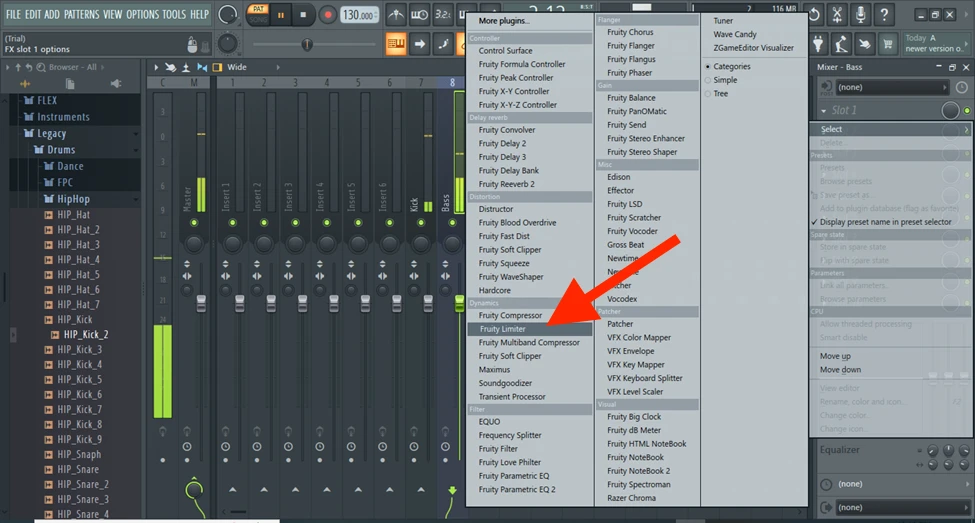
You will first have to place the Fruity Limiter on the audio track if you want to apply sidechain compression to. Make sure you select the right track. Otherwise, everything will go haywire for you. This can be a bit tricky like adding the drum kits so make sure you do it right.
Step 2: Link Your Tracks
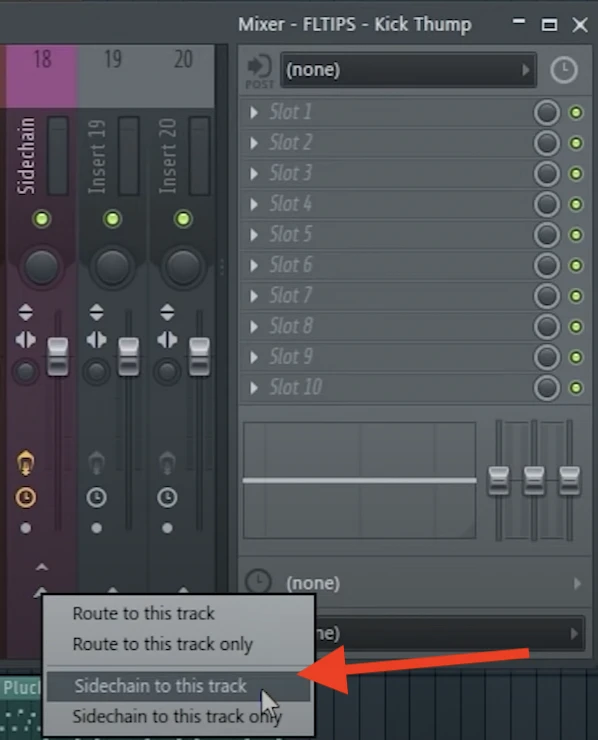
To link your desired track to the target track, select the track first, and then right-click on the small arrow on the target track, and click on the ‘Sidechain to this track’ option from the drop-down menu.
PS- If you don’t want your track to be heard in the master track, you simply need to click on the “Sidechain to this track only” option from the drop-down menu.
Step 3: Open Fruity Limiter
From the “Plugin” menu on the menu bar, click on Fruity Limiter to open the plugin.
Step 4: Tweak Settings
Now that we have the first track and the target track linked together, all we have to do is start tweaking the settings according to the desired output we want. This can also be done for the recorded vocals.
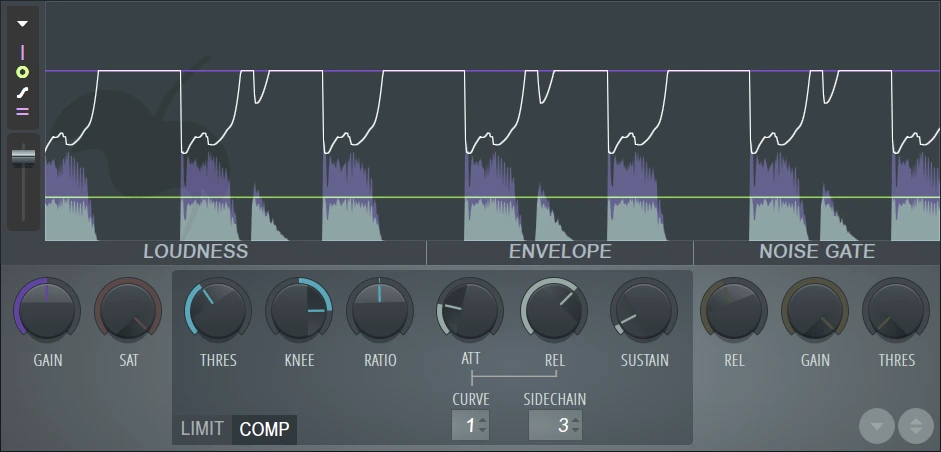
The first thing you have to do when the fruity limiter dialog box opens is to change the mode from LIMIT to COMP.
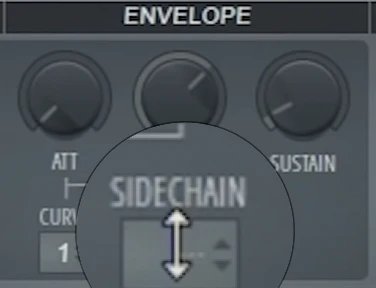
Using the up and down button on the “Sidechain” option, select “1” on the counter.
Turn down the THRESHOLD option till you find the desired effect in your tracks. Adjust the KNEE and increase the RATIO till you find your sweet spot.
The Threshold and Ratio settings basically control the amount of sidechain compression you desire. A lower threshold results in more frequent compression and vice versa.
The ATTACK and RELEASE options are used to change the overall rhythmic feeling of the tracks. A fast attack time will ask the fruity limiter to apply the compression swiftly and vice versa. While a slower release will make the volume gradually return to the original setting.
How To Sidechain in FL Studio Using Automation
While many people on the internet (and in the real world) dismiss using automation technology as a sidechaining method in FL studio, we, on the other hand, in fact, advocate it as one of the simplest ways if you want to learn how to sidechain in FL studio.
Suppose you go back to the core concept of sidechaining. In that case, you can see that it is the process of using any external signal to control the volume of another signal which can be acquired using automation and moreover provides a higher degree of flexibility and control than other methods. So, why not!
Step 1: Open Fruity Balance Plugin
Select your desired track, and then from the plugin menu on the menubar, open the “Fruity Balance”. This will open a small fruity balance dialogue box.
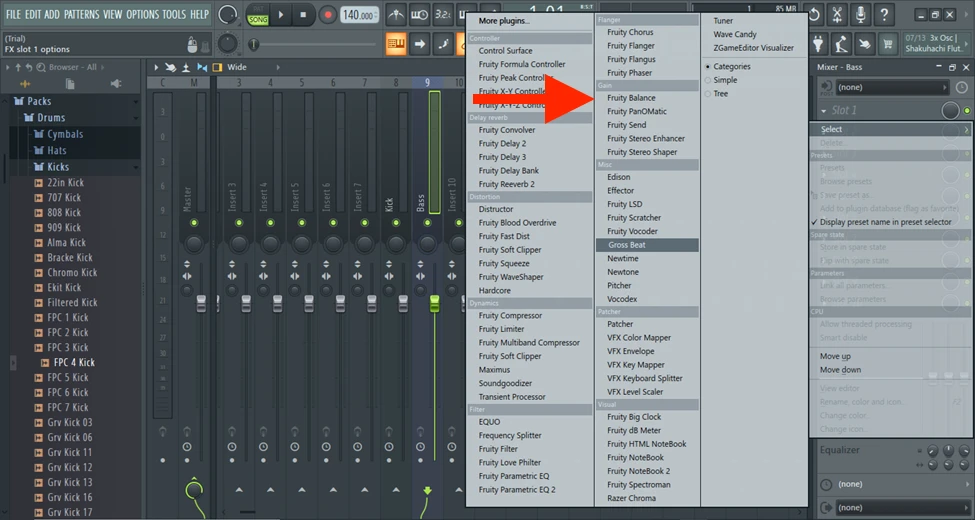
Step 2: Create Automation Clip
On the Fruity Balance box, right-click on the “Volume” knob, and click on the “Create Automation Clip” option from the dialogue box. This will create an automation clip which you will find on the playlist of your FL studio project.
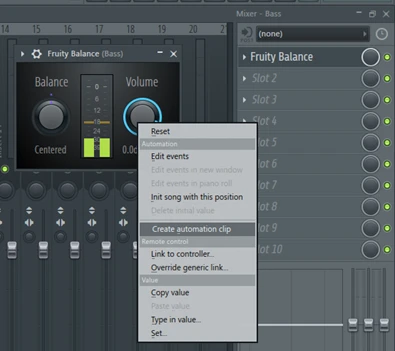
Step 3: Tweak The Automation Clip
This is the step that will help you produce the desired sidechaining effect in FL studio. Using the Automation Clip, shape the track to create a volume envelope for the sidechain trigger track such that your preferred track ducks when the target track hits.
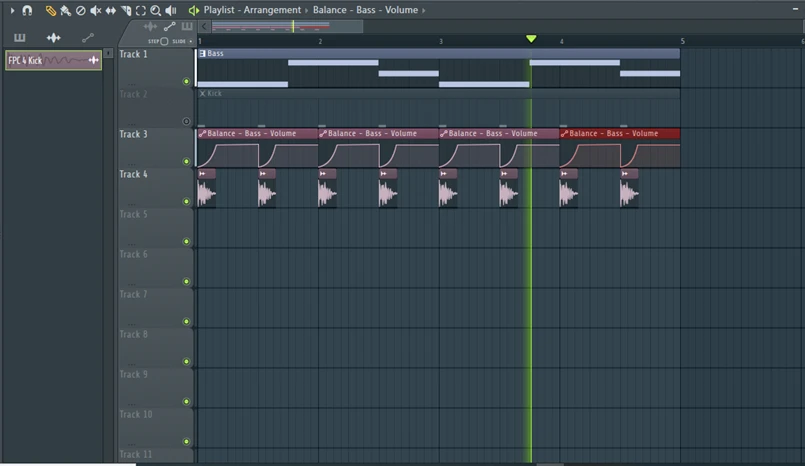
Step 4: Copy The Automation Clip
You have to copy the automation pattern you have created on a specific part to the rest of your track wherever you want the desired effect.
If you have followed the above mentioned steps, you shall have learned how to sidechain in FL studio using automation!
Reasons To Use Sidechaining In FL Studio
Improved Clarity
If you understand the term Sidechaining, you must have realized that it is mainly used to reduce the volume of certain tracks' volume when a particular track's volume is increased. This is why sidechaining can help enhance your sound's clarity by making it sound clearer and overall balanced.
Sidechaining in FL studio is mainly used when multiple sounds occupy similar frequency ranges as it gives each of these sounds its space.
Creates Space
Similarly, sidechains can help music producers create more space in an existing mix by decreasing the volume of certain elements when other elements are overpowered.
Adds Energy
As a music producer, you need to understand that all elements should rarely be played on the same volume as it deadens the rhythmic pumping of your music. This is one of the most important reasons one should learn how to sidechain in FL studio, as it will add energy to your mix, creating new energetic beats and taking it up a notch!
Better Mix Compression
When you perform a sidechain on your tracks in FL studio, the compressor will trigger the compression on your targeted track whenever its signal exceeds a threshold.
For example- This will reduce the volume of a certain track whenever a drum is playing, eventually preventing it from masking the drum. This in turn helps a music producer to create a better mixing compression even in the presence of peaks of multiple elements throughout the track by avoiding any form of chipping and distortion.
Improves Track Transitions
Once you have learnt how to sidechain in FL Studio and apply it to your mixes, you will realize that its ability to control the volume of different elements in your mix has created smooth transitions between different sections of your track.Improving the track transitions not only helps the track sound better, but if you are a DJ, you will be able to create a better music flow while performing your sets and cohesiveness, eventually leading to the listener feeling some sort of progression.
Increases Professionalism
While this might not technically qualify as one of the reasons to learn how to sidechain in FL studio, it surely helps. Sidechain is a technique common between professional music producers and sound engineers. And if you are a beginner and start inculcating in your work, your peers will have a certain respect towards you which is an important element if you want to get bigger in the industry.
Conclusion
Concluding this blog on “How To Sidechain in FL Studio, we can say (probably you too) that sidechaining is an important yet easy technique that music producers should know how to do especially when working in DAWs like FL Studio.
With the knowledge of how to sidechain in FL studio, any music producer, regardless of their skill level, can enhance the elements in their mixes, making them stand out with a refined and professional sound.
