
The "Ambi'Son" is a standalone audio player, simple and easy to use, ideal for building a sound installation or for fitting into a work of art. It is sold in the BigSoundBank shop. An even simpler version exists: my "Exposi'Son" module.
Whether you are a beginner or a tinkerer, a customer of my module or not, feel free to contact me, free of charge!

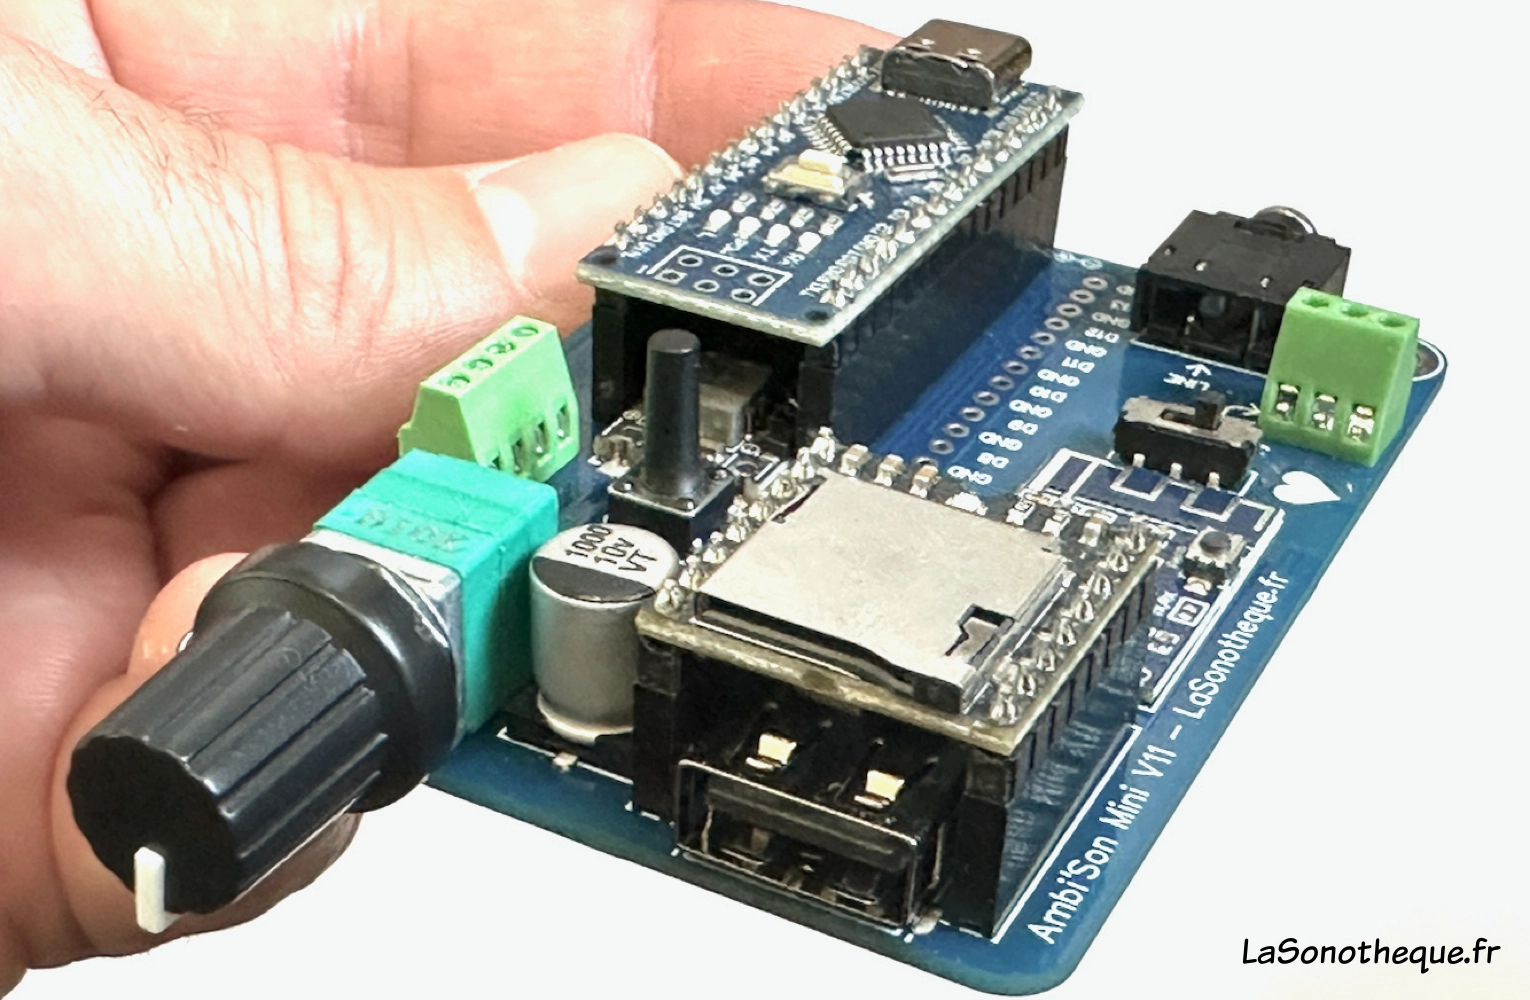
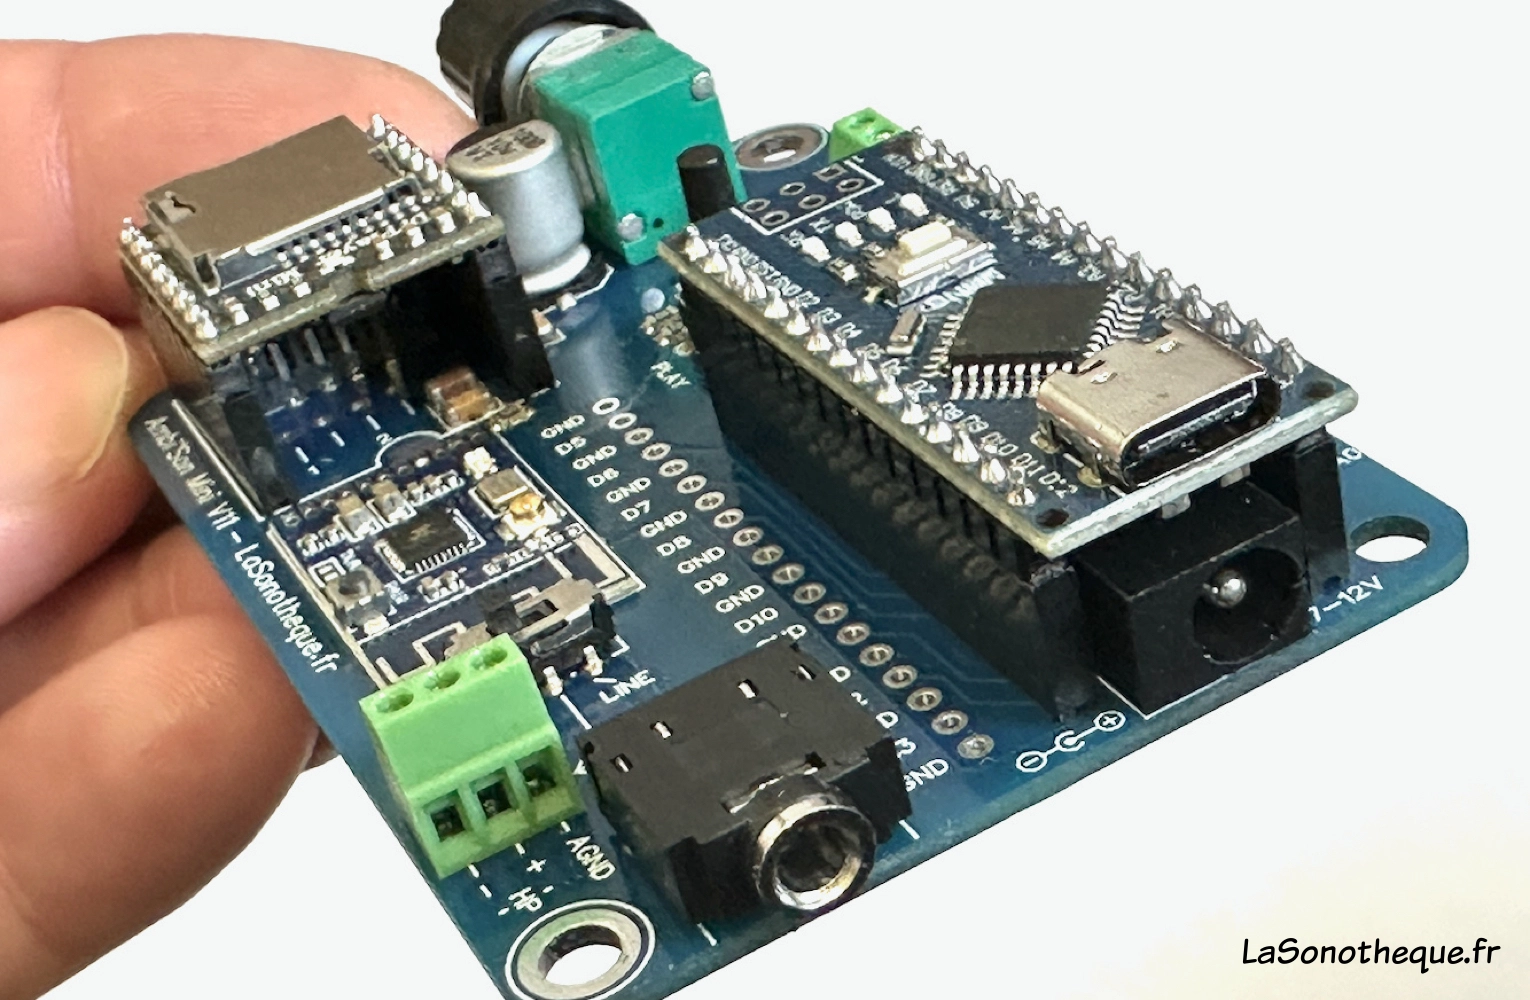

Overview
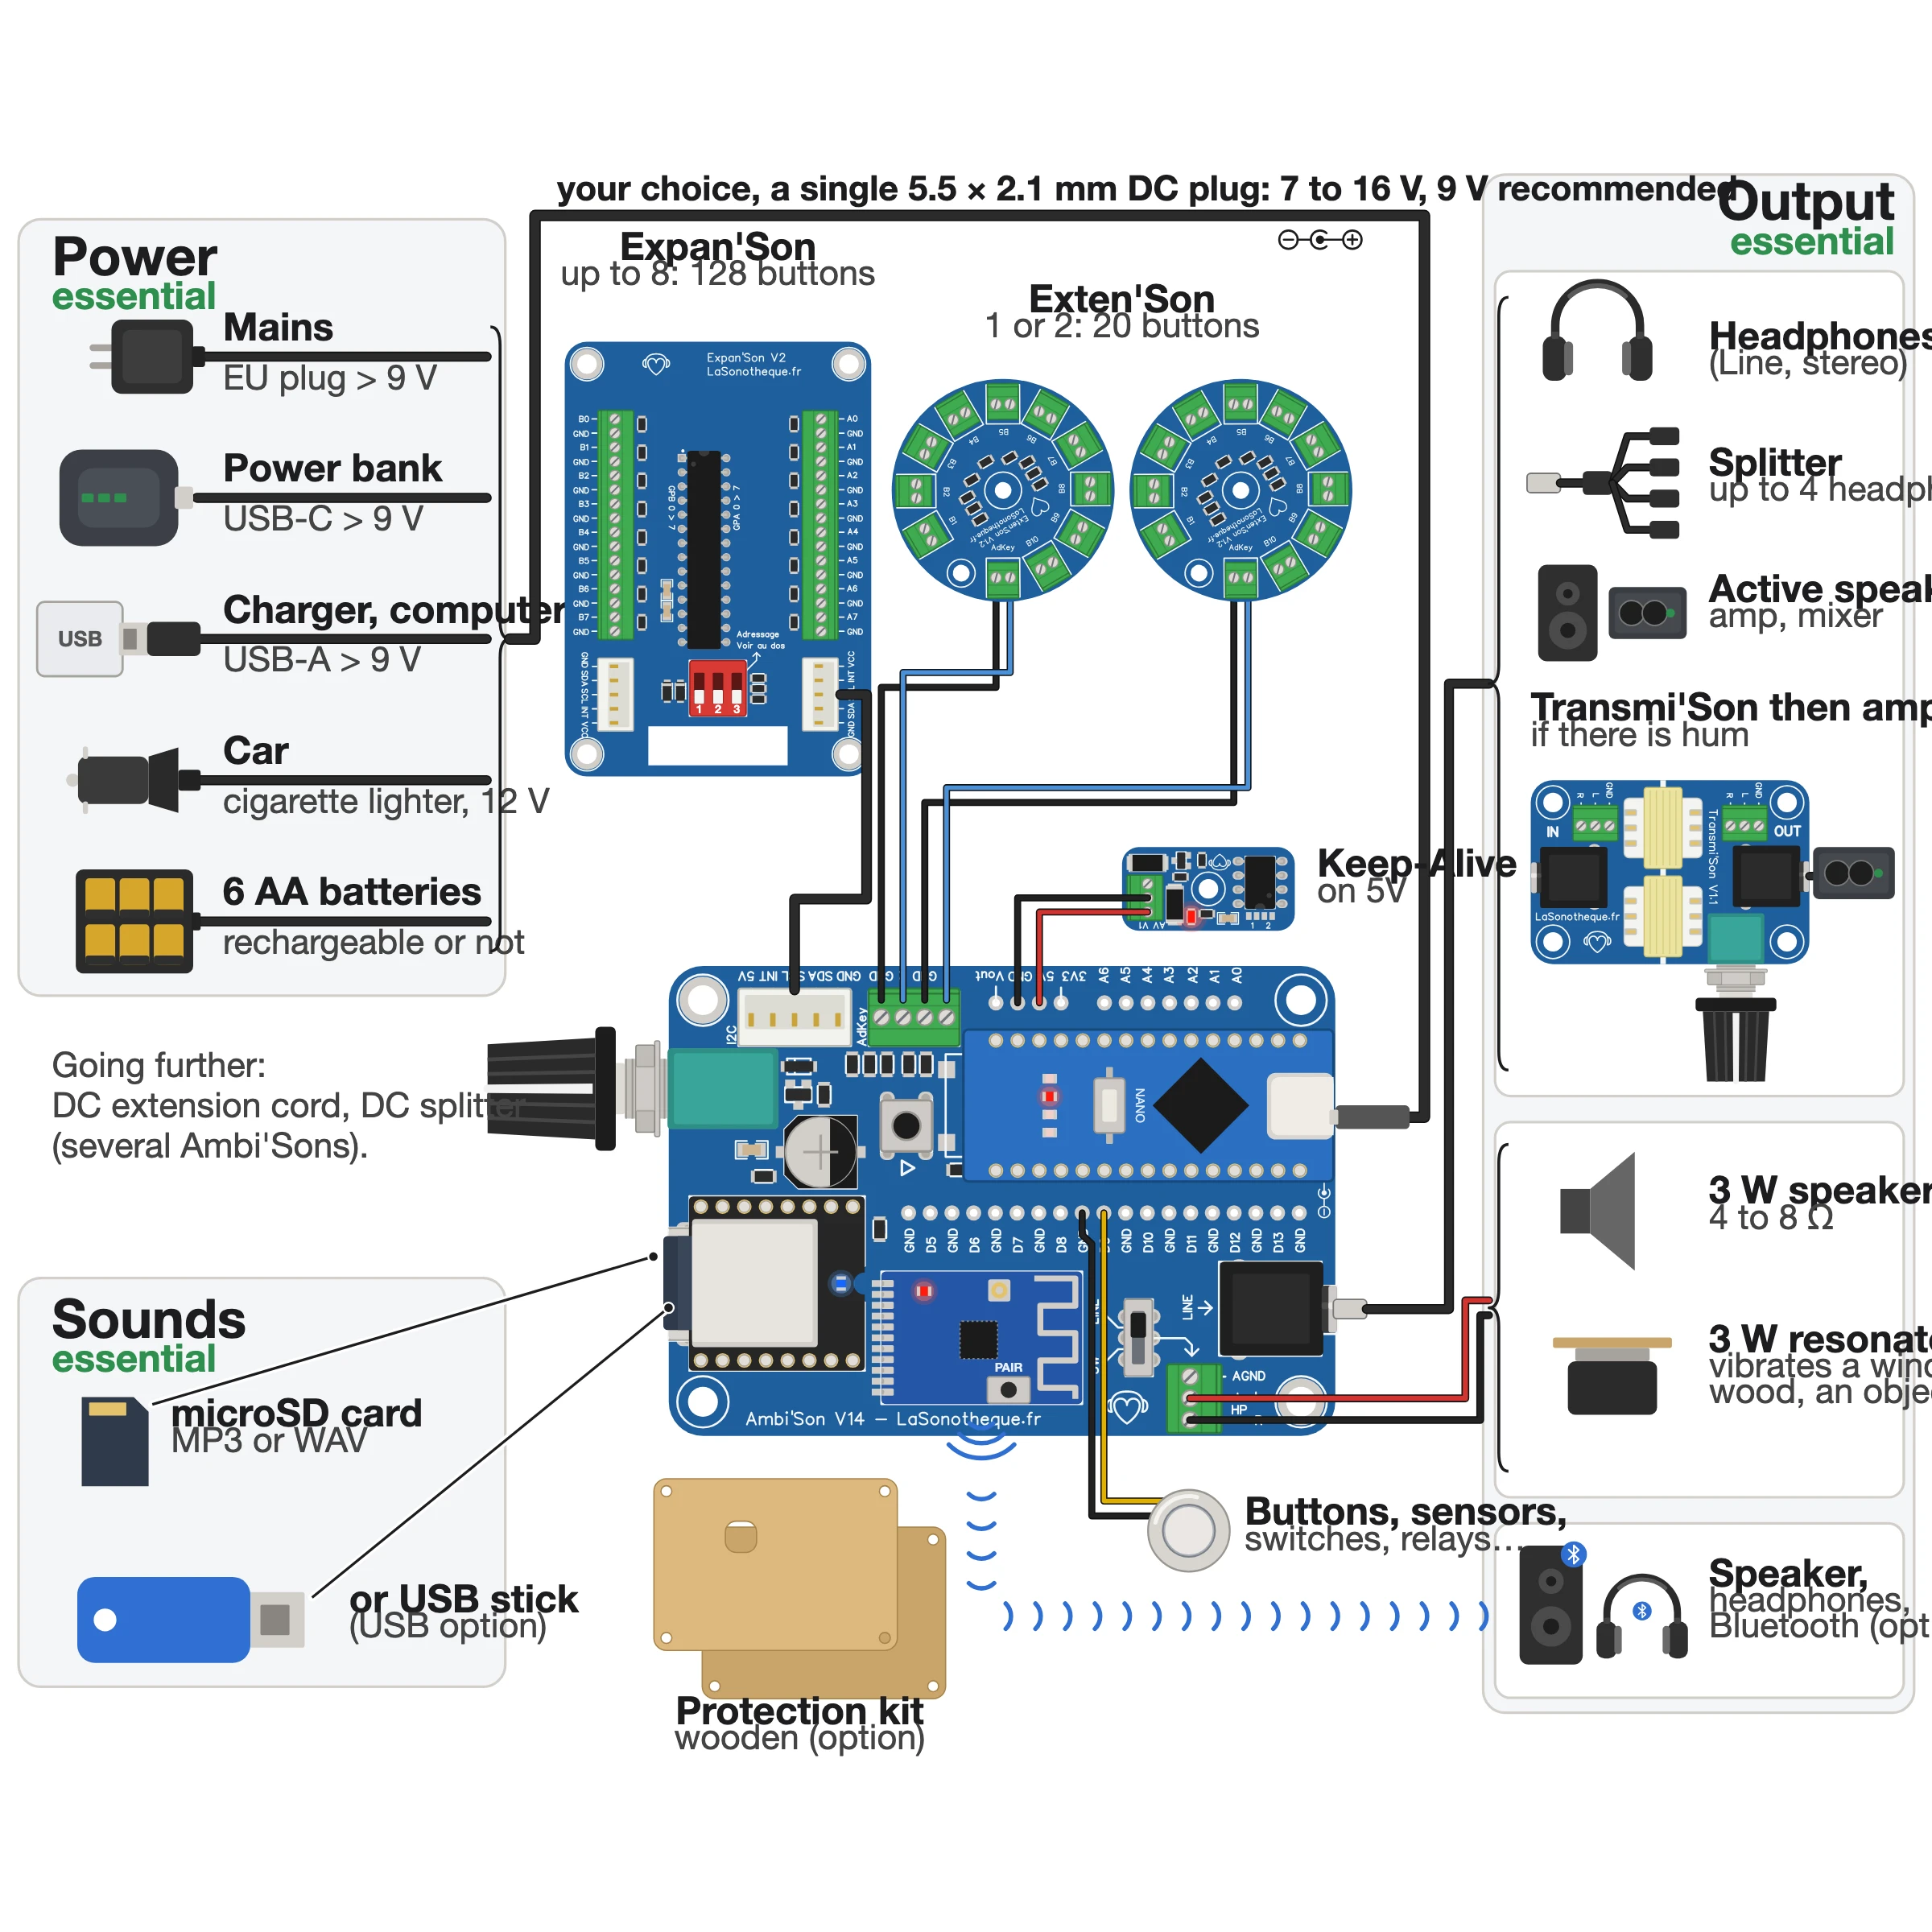
Here, at a glance, is everything you can connect to the Ambi'Son: for power, a single DC plug (DC power supply), from the mains, a power bank (with a keep-alive if needed), a charger, a car or a holder for 6 AA rechargeable batteries (recommended) or 6 AA batteries; for the sounds, a microSD card or a USB stick; to trigger them, buttons, sensors, Exten'Son and Expan'Son; to listen, headphones, an active speaker or an amp (through a Transmi'Son if it hums), a 3 W speaker or resonator, or a Bluetooth speaker or headphones. To protect it, a wooden kit is available as an option.
This small device plays the audio file(s) stored on your microSD card (or your USB stick, depending on the version). It plays, in stereo or in mono, the WAV and MP3 files on it. The intelligence of this module lies in the Nano (an Arduino Nano clone) that controls it.
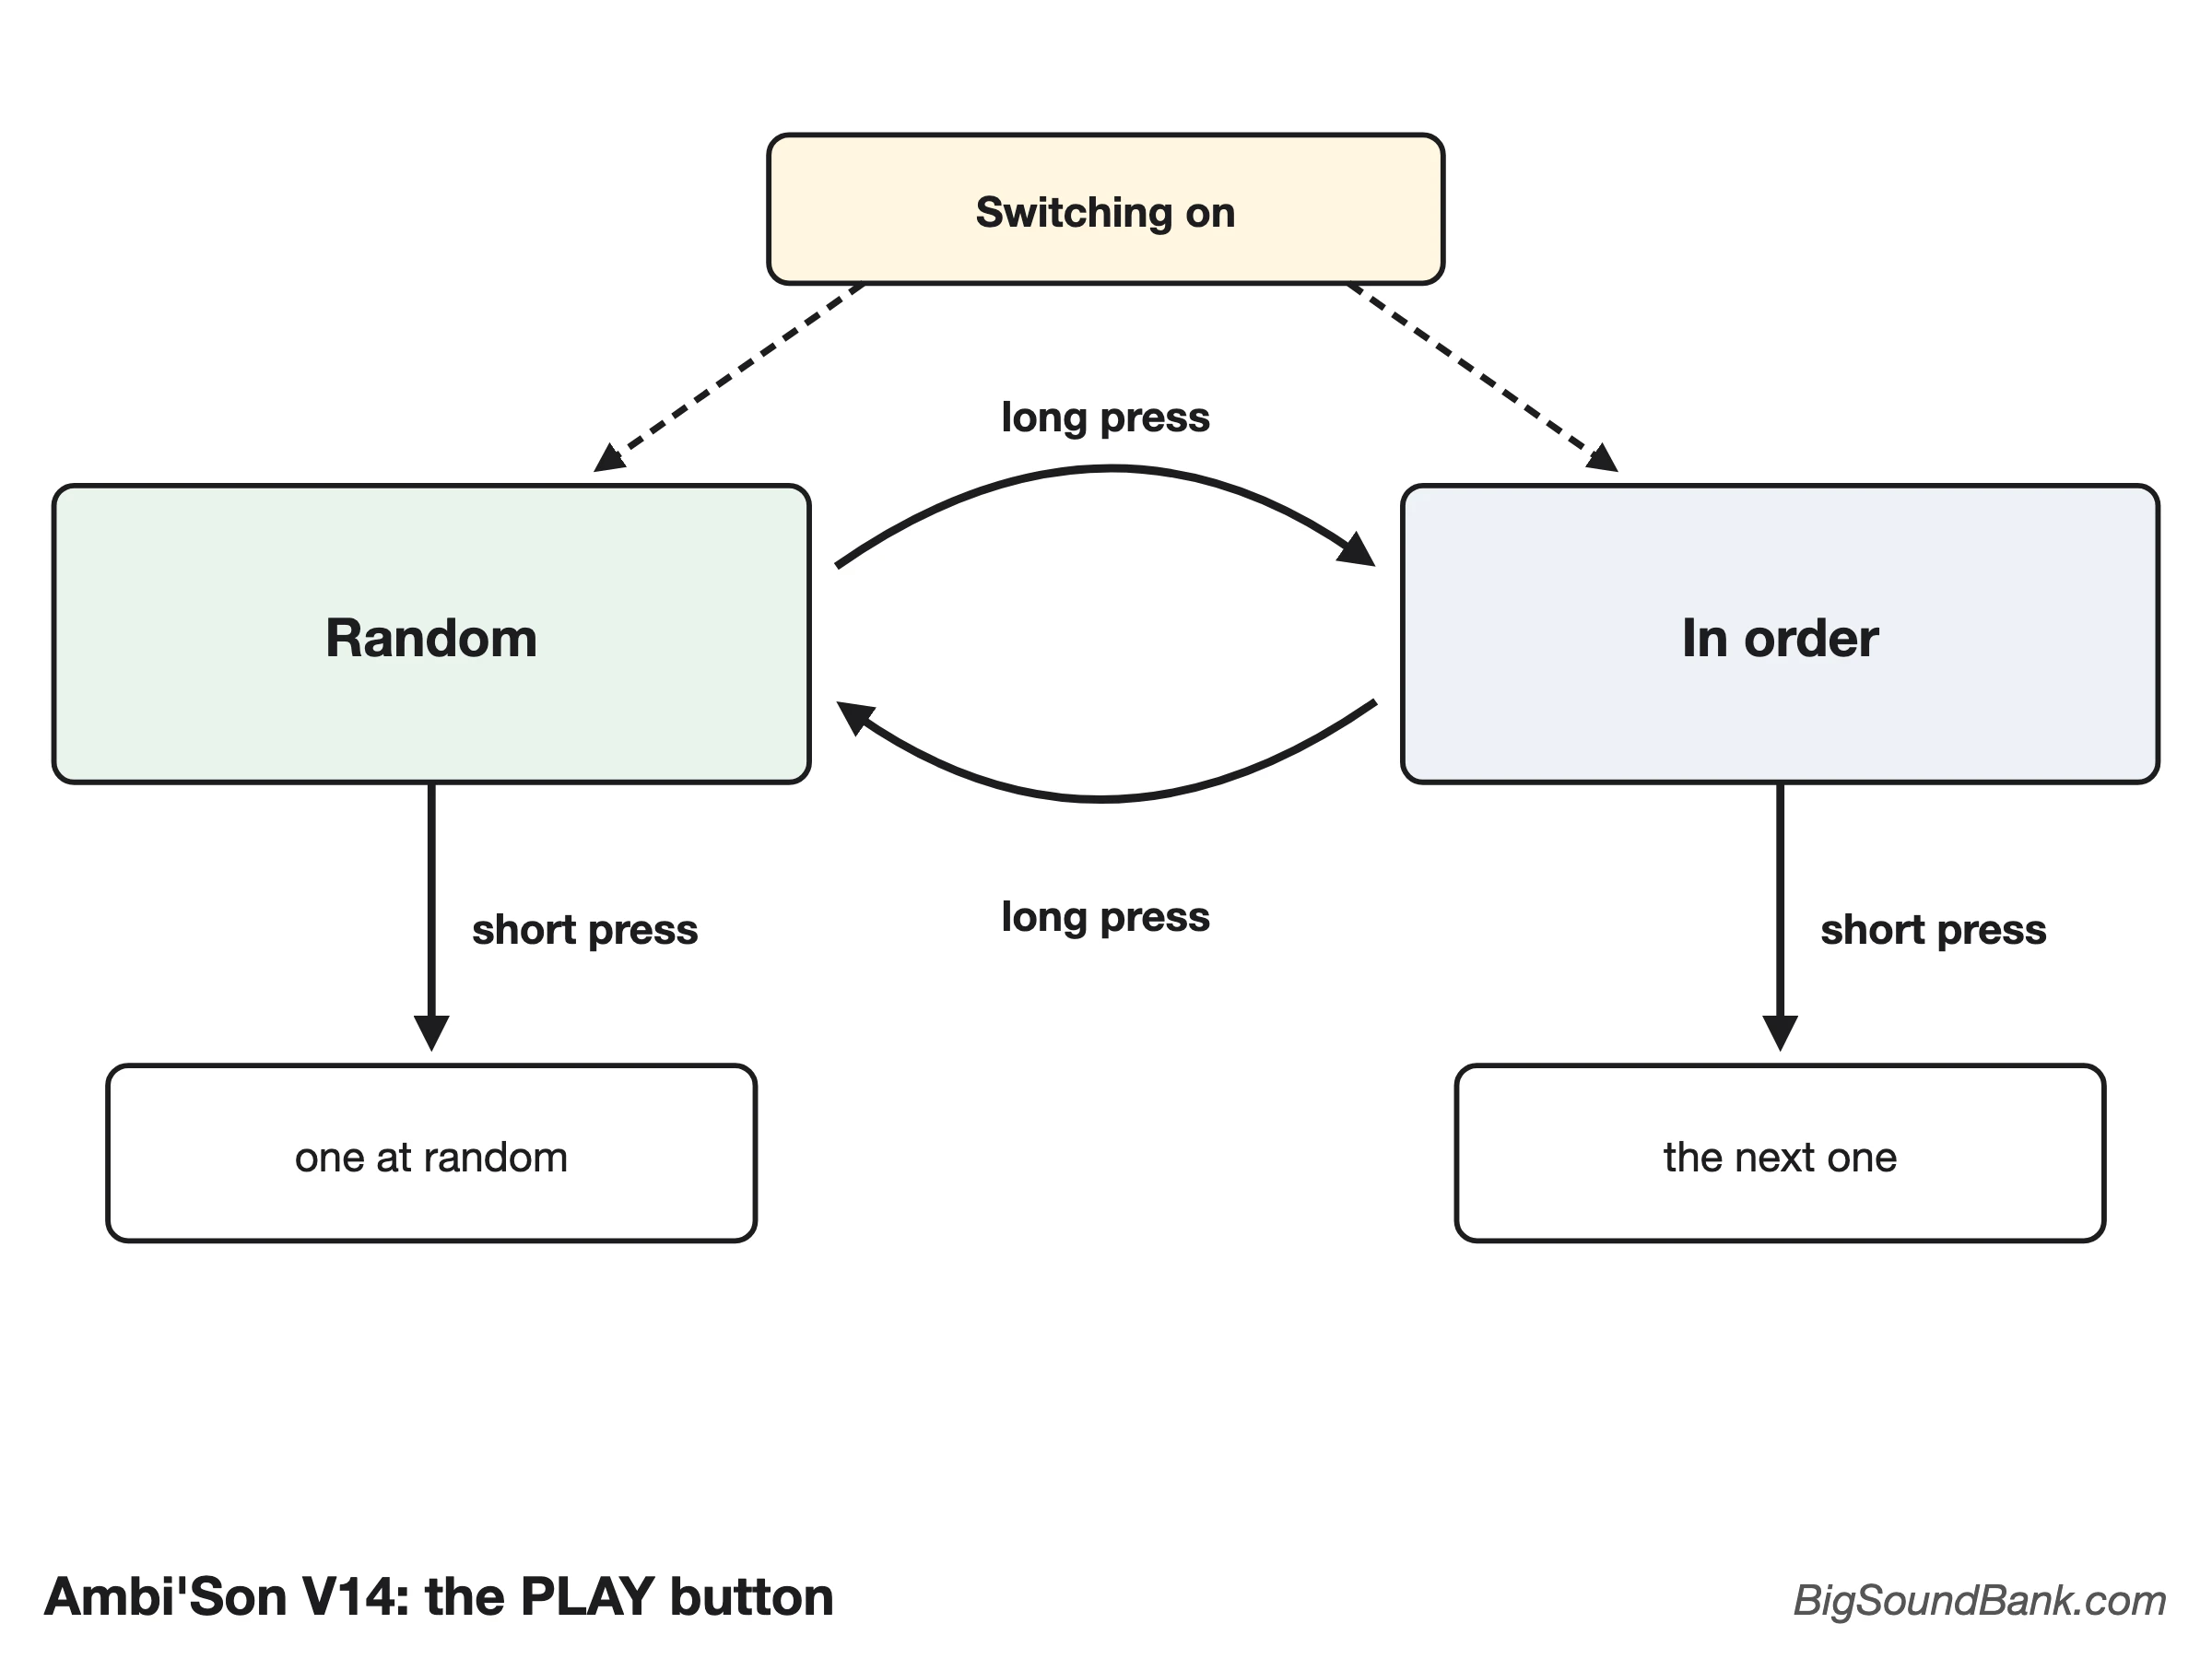
With a push button, the module offers two playback modes, which you switch between with a long press (≥ 10 s). Random mode plays the files at random, on a loop (without repeats until all have been played); a short press there plays one file at random, then silence. Order mode plays the files in order, on a loop; a short press there moves on to the next file. The last mode chosen is remembered: the module goes back to it every time it starts, even after a power cut (by default, the very first time: random).
It can also be triggered by buttons, sensors or Exten'Son: up to 20 buttons directly on the board, and up to 128 with my "Expan'Son" expansion boards (see Advanced use).
The audio output can be LINE (stereo) or amplified 3W (mono), on a jack or a screw terminal. A Bluetooth (stereo) version exists.
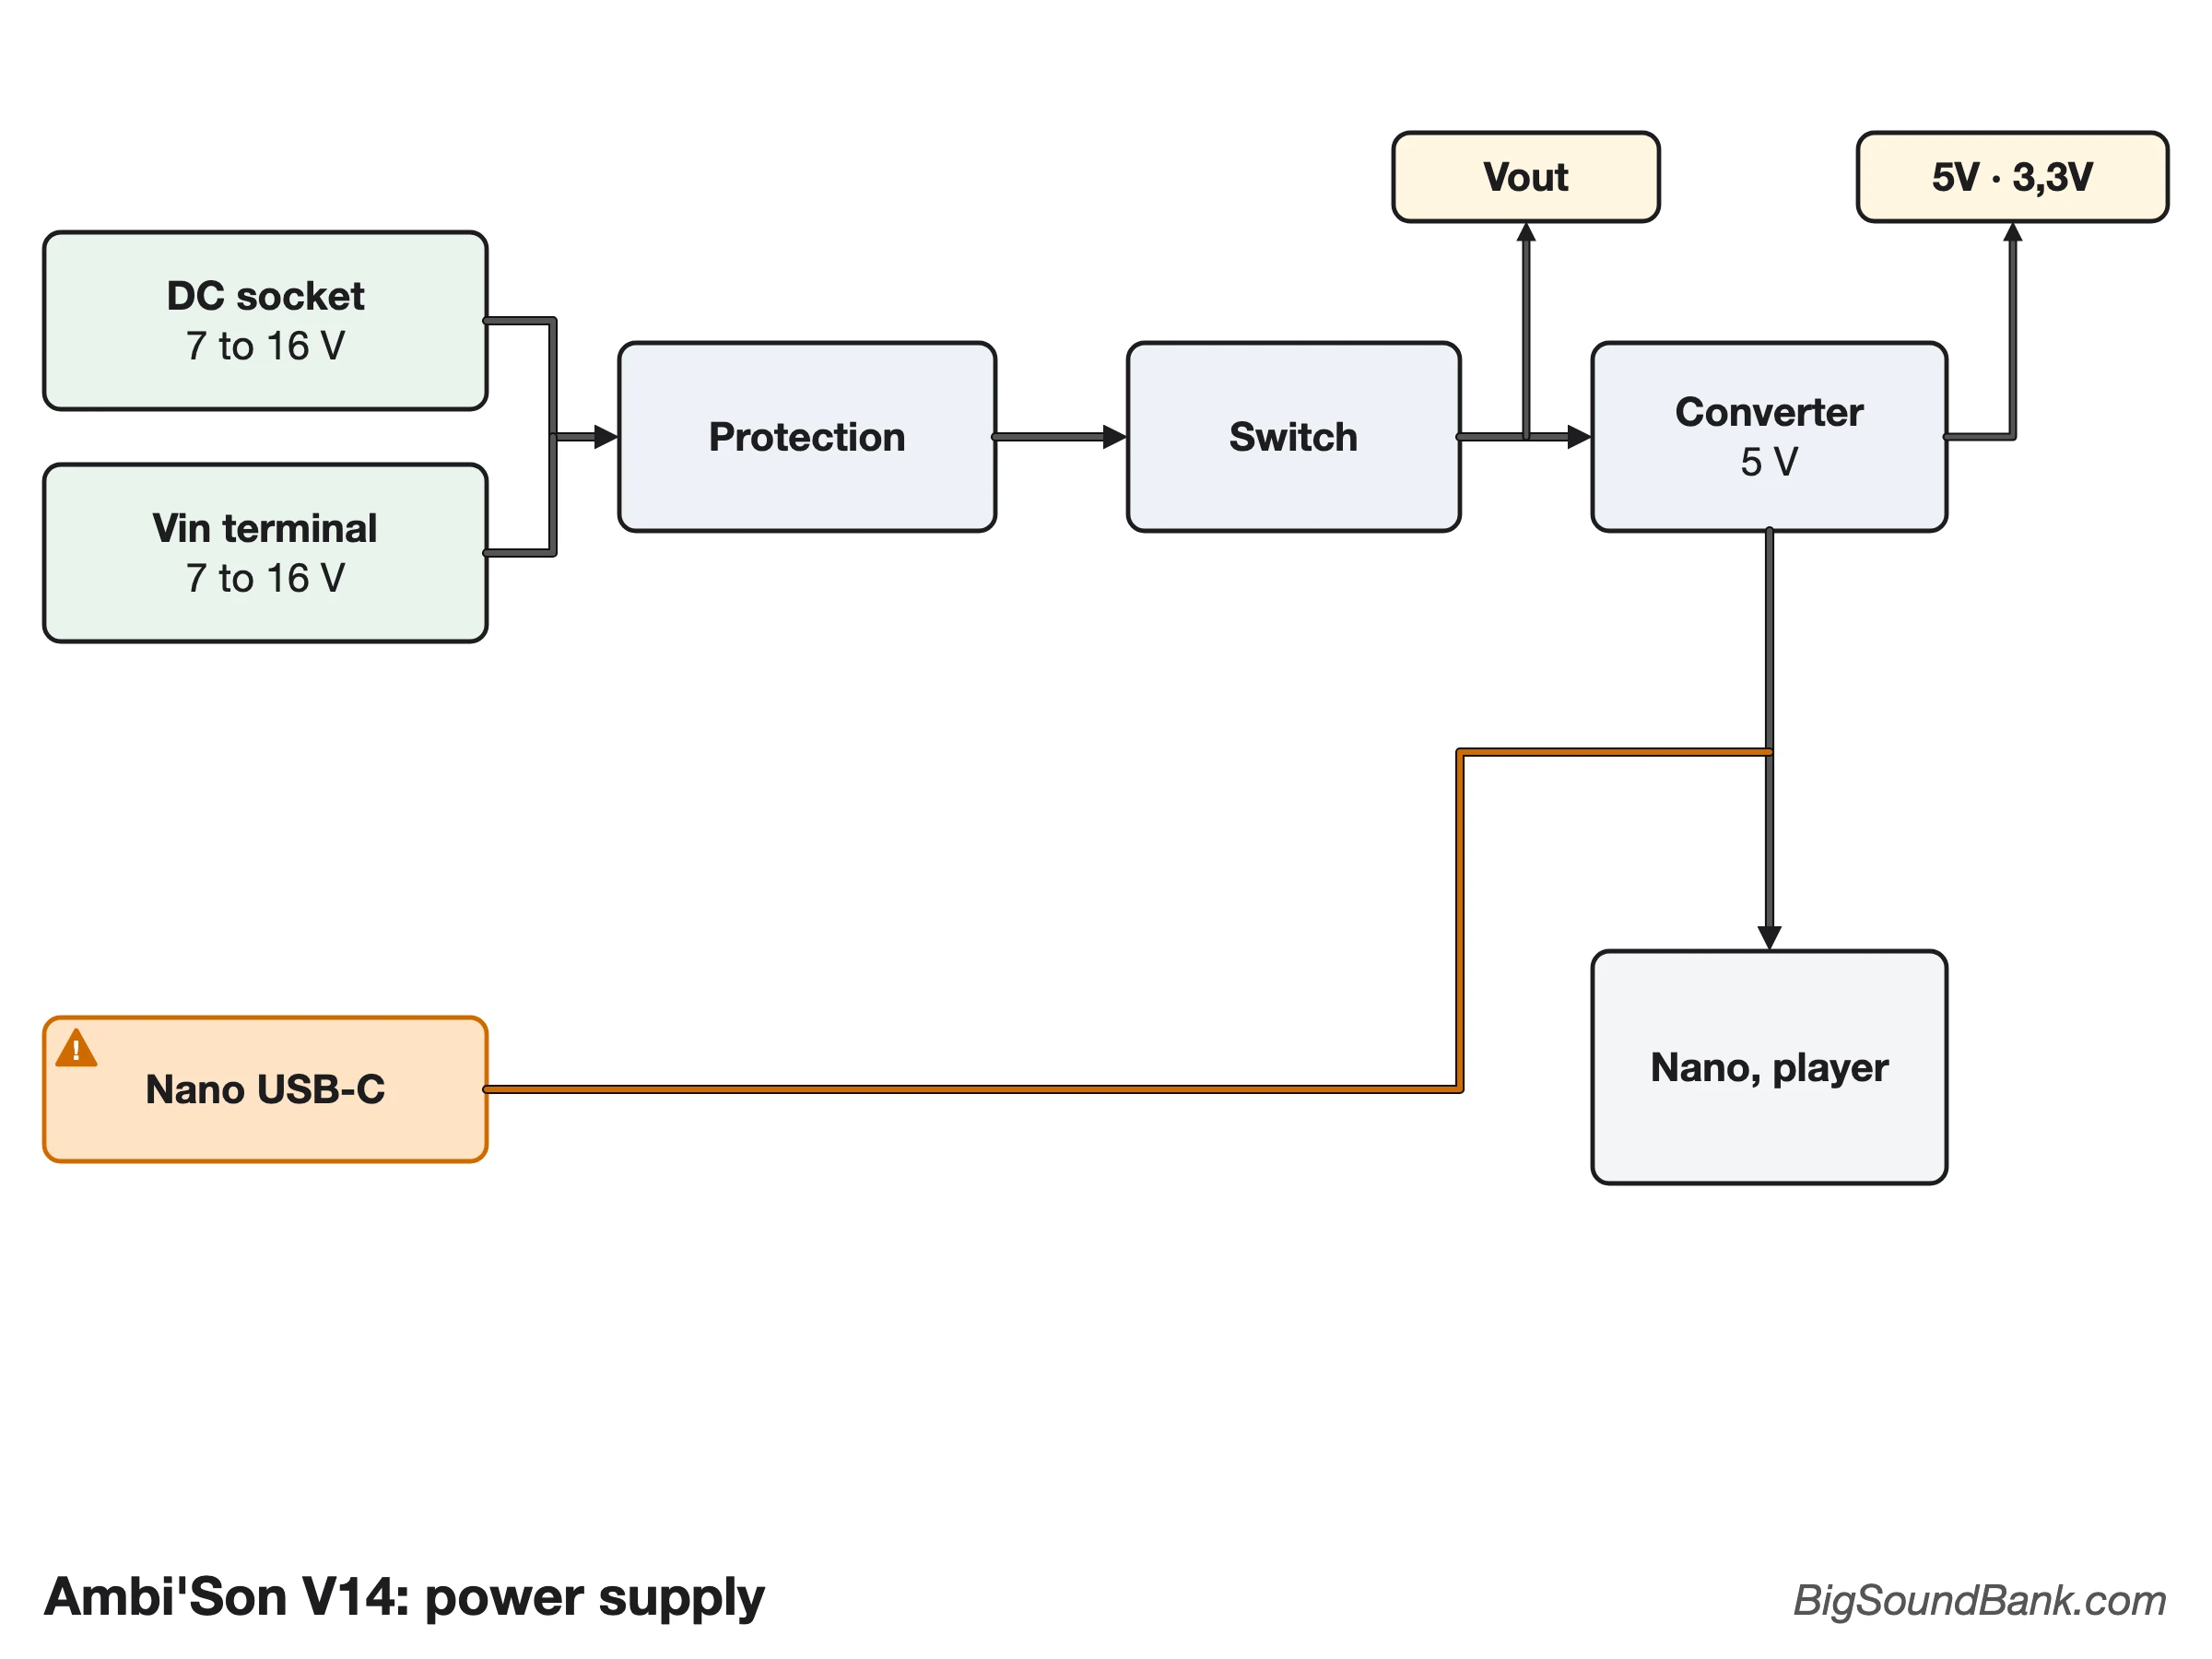
It can be powered with 7 to 16 V through the DC socket or the terminal, or with 5 V through the Nano's USB.
I designed this module myself (originally for my own use). Research & development, drawing the circuit board, all the way to soldering the components: it is made by my own hands.
Here are a few examples of what you can do with it:
- A museum player.
- The "Quiz'O'Phone", single question or multiple questions, Christmas special.
- A sound box.
- A meditation box, my "Médita'Son".
- A sound die.
- An old poetic hotel telephone.
- A music box for a theatre company.
- Theatrum Mundi (at 2:33), a work by Camille SAUER, fitted with Ambi'Son.
- Etc.
Warning
CAUTION: nothing conductive must touch the circuit board. Risk of a fatal short circuit for the module! Like any commercial electronic device, it needs a case to insulate it, and without one, disaster strikes. In our case, it is up to you to make the case for this module.
Description of the module
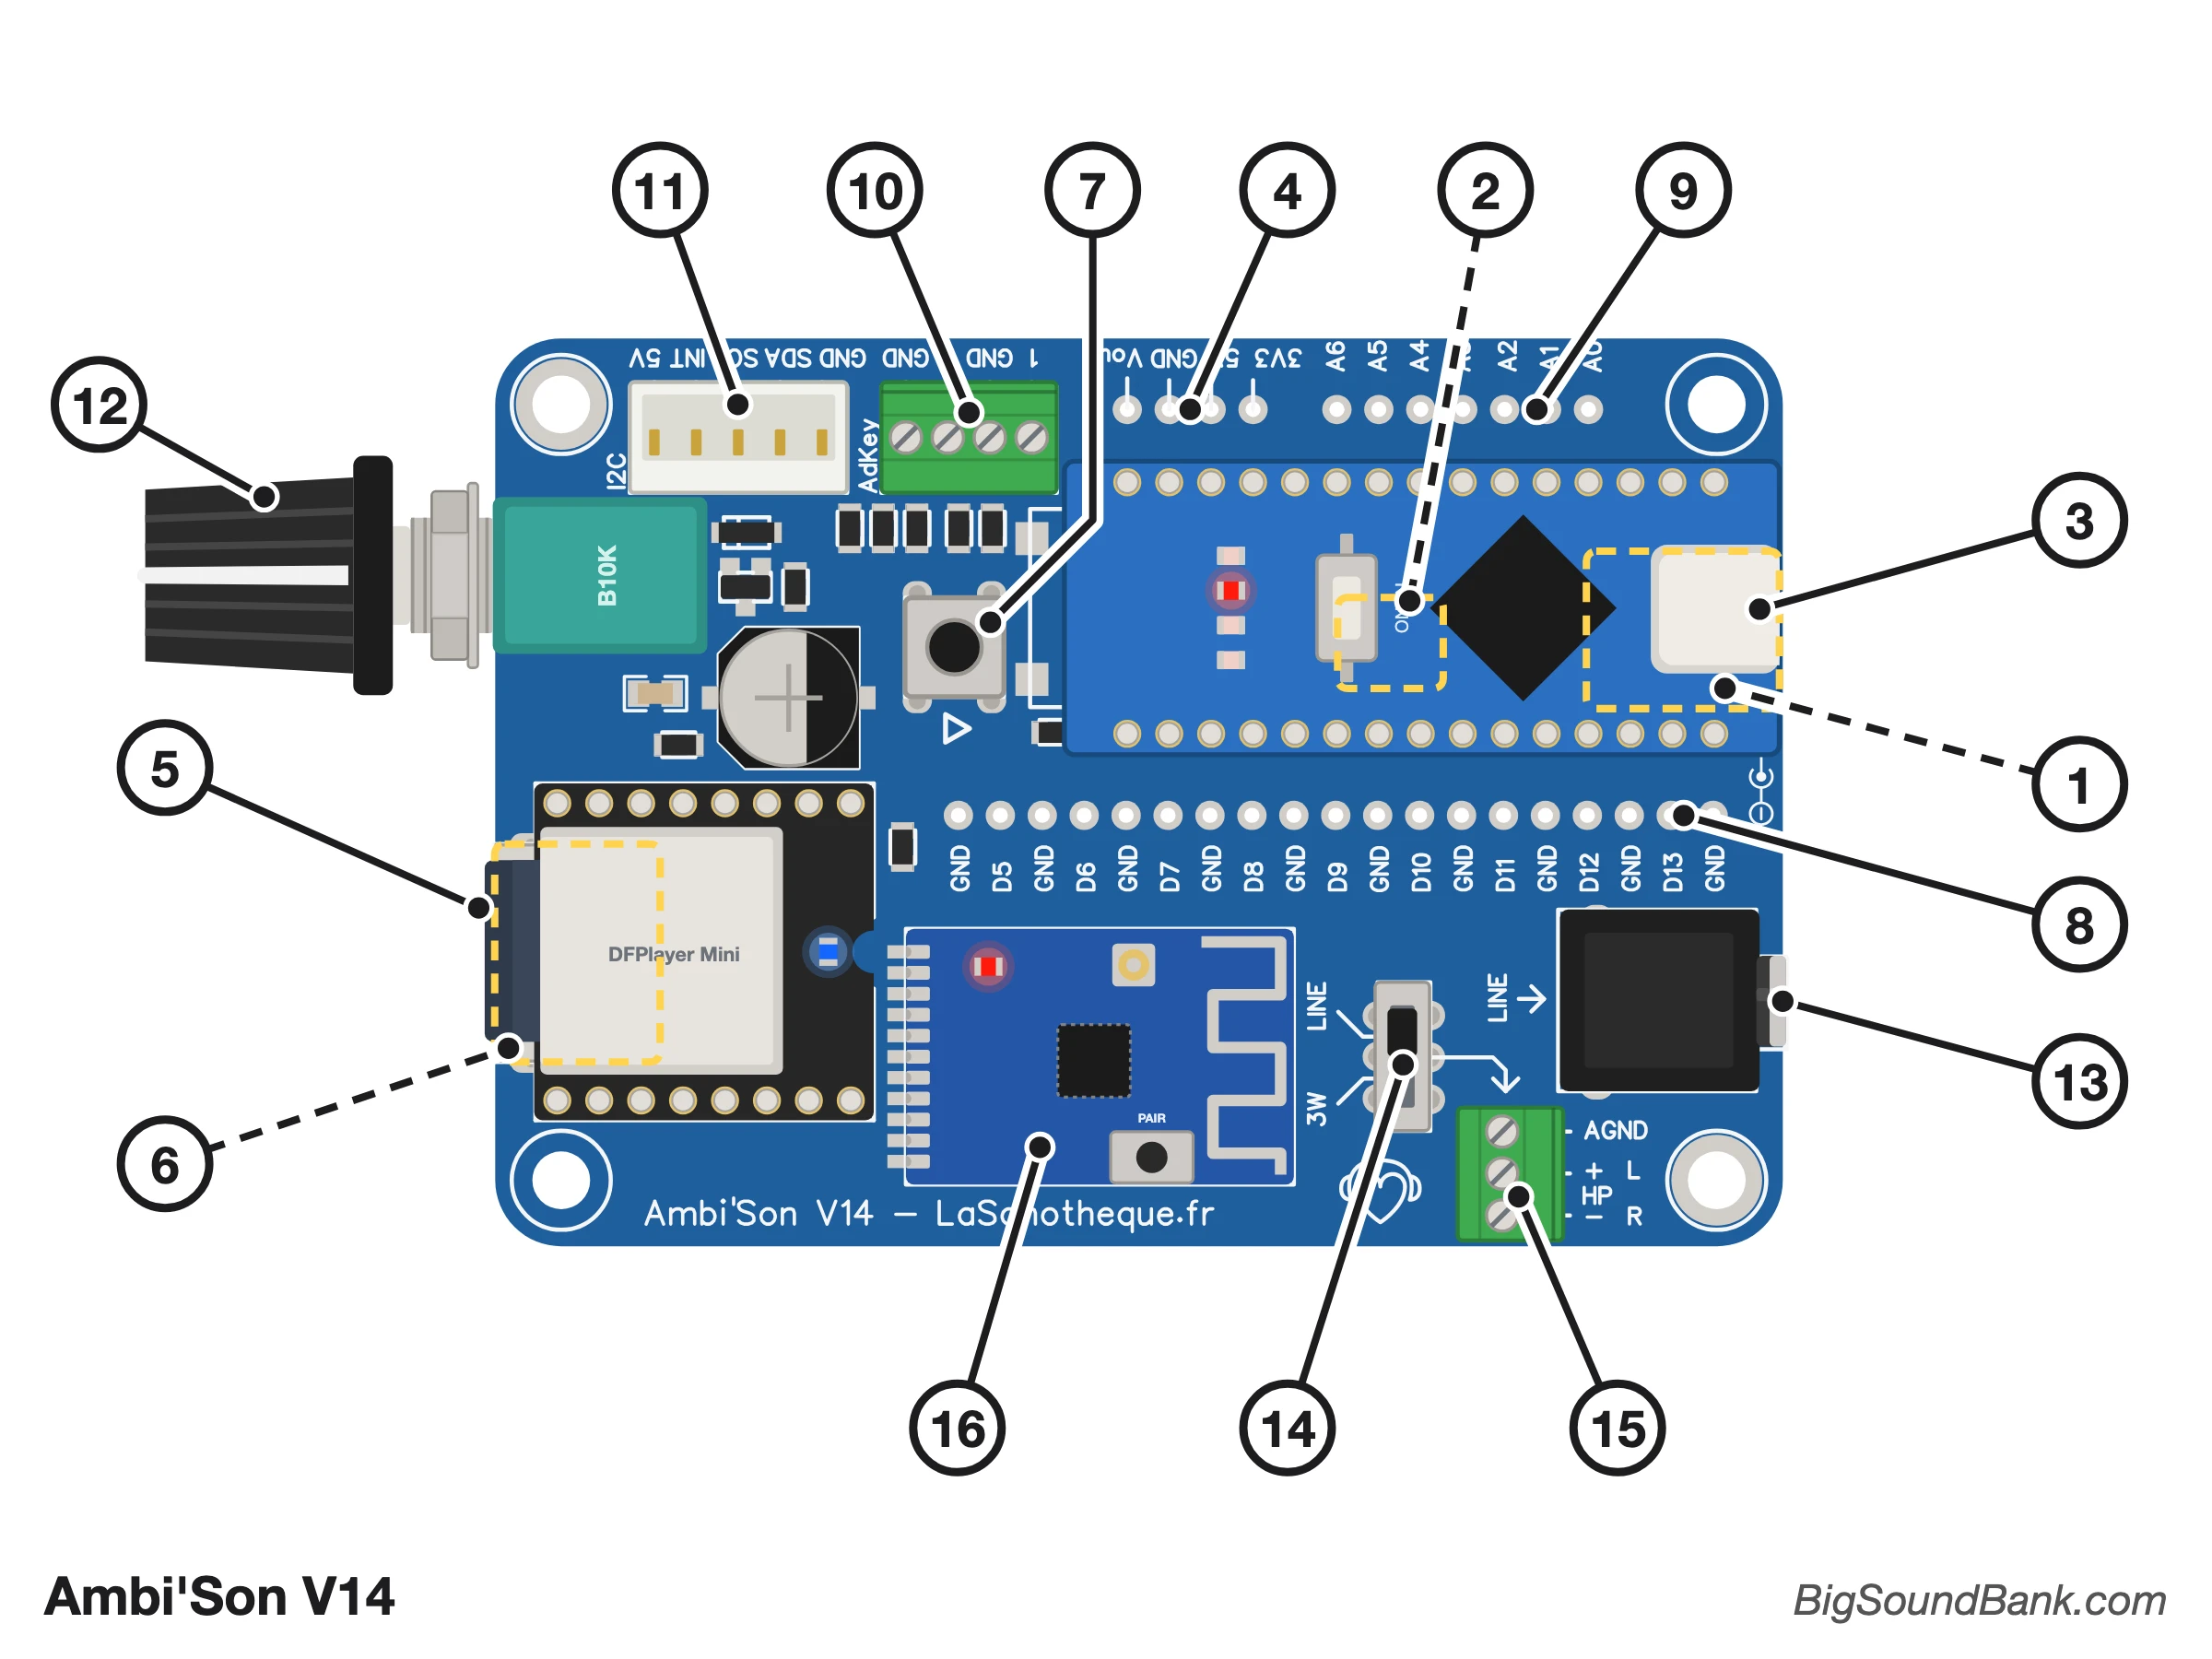
Key
- 1: Primary DC power, 7-16 Volts, through a 5.5 x 2.1 mm plug (known as "DC5521"), hidden under the Nano, hence the dotted lines.
- 2: Secondary power through a screw terminal, under the Nano, easy to remove.
- 3: USB-C port for reprogramming the Nano (tertiary power possible but not recommended).
- 4: Power network: Vout, GND, 5V and 3.3V (see below).
- 5: microSD card reader (32 GB max).
- 6: USB-A socket for a USB stick (if the option is chosen), under the player.
- 7: PLAY push button.
- 8: Terminal for inputs D5 to D13, each with its GND, for your buttons and sensors (soldered on request).
- 9: Analog inputs A0 to A6 of the Nano, for sensors (potentiometer, light, temperature…). A0 and A1 are used for the Exten'Son (AdKey inputs) 10, A4 and A5 for the Expan'Son 11; A2, A3 and A6 remain free. A0 to A5 can also be used as digital inputs or outputs (LEDs, relays…); A6 is an analog input only.
- 10: AdKey 1 and 2 terminal, to connect up to two Exten'Son (if the option is chosen).
- 11: 5-pin "I2C Option" connector (5V, INT, SCL, SDA, GND), to connect Expan'Son (since V14, if the option is chosen).
- 12: Volume potentiometer, with ON/OFF switch.
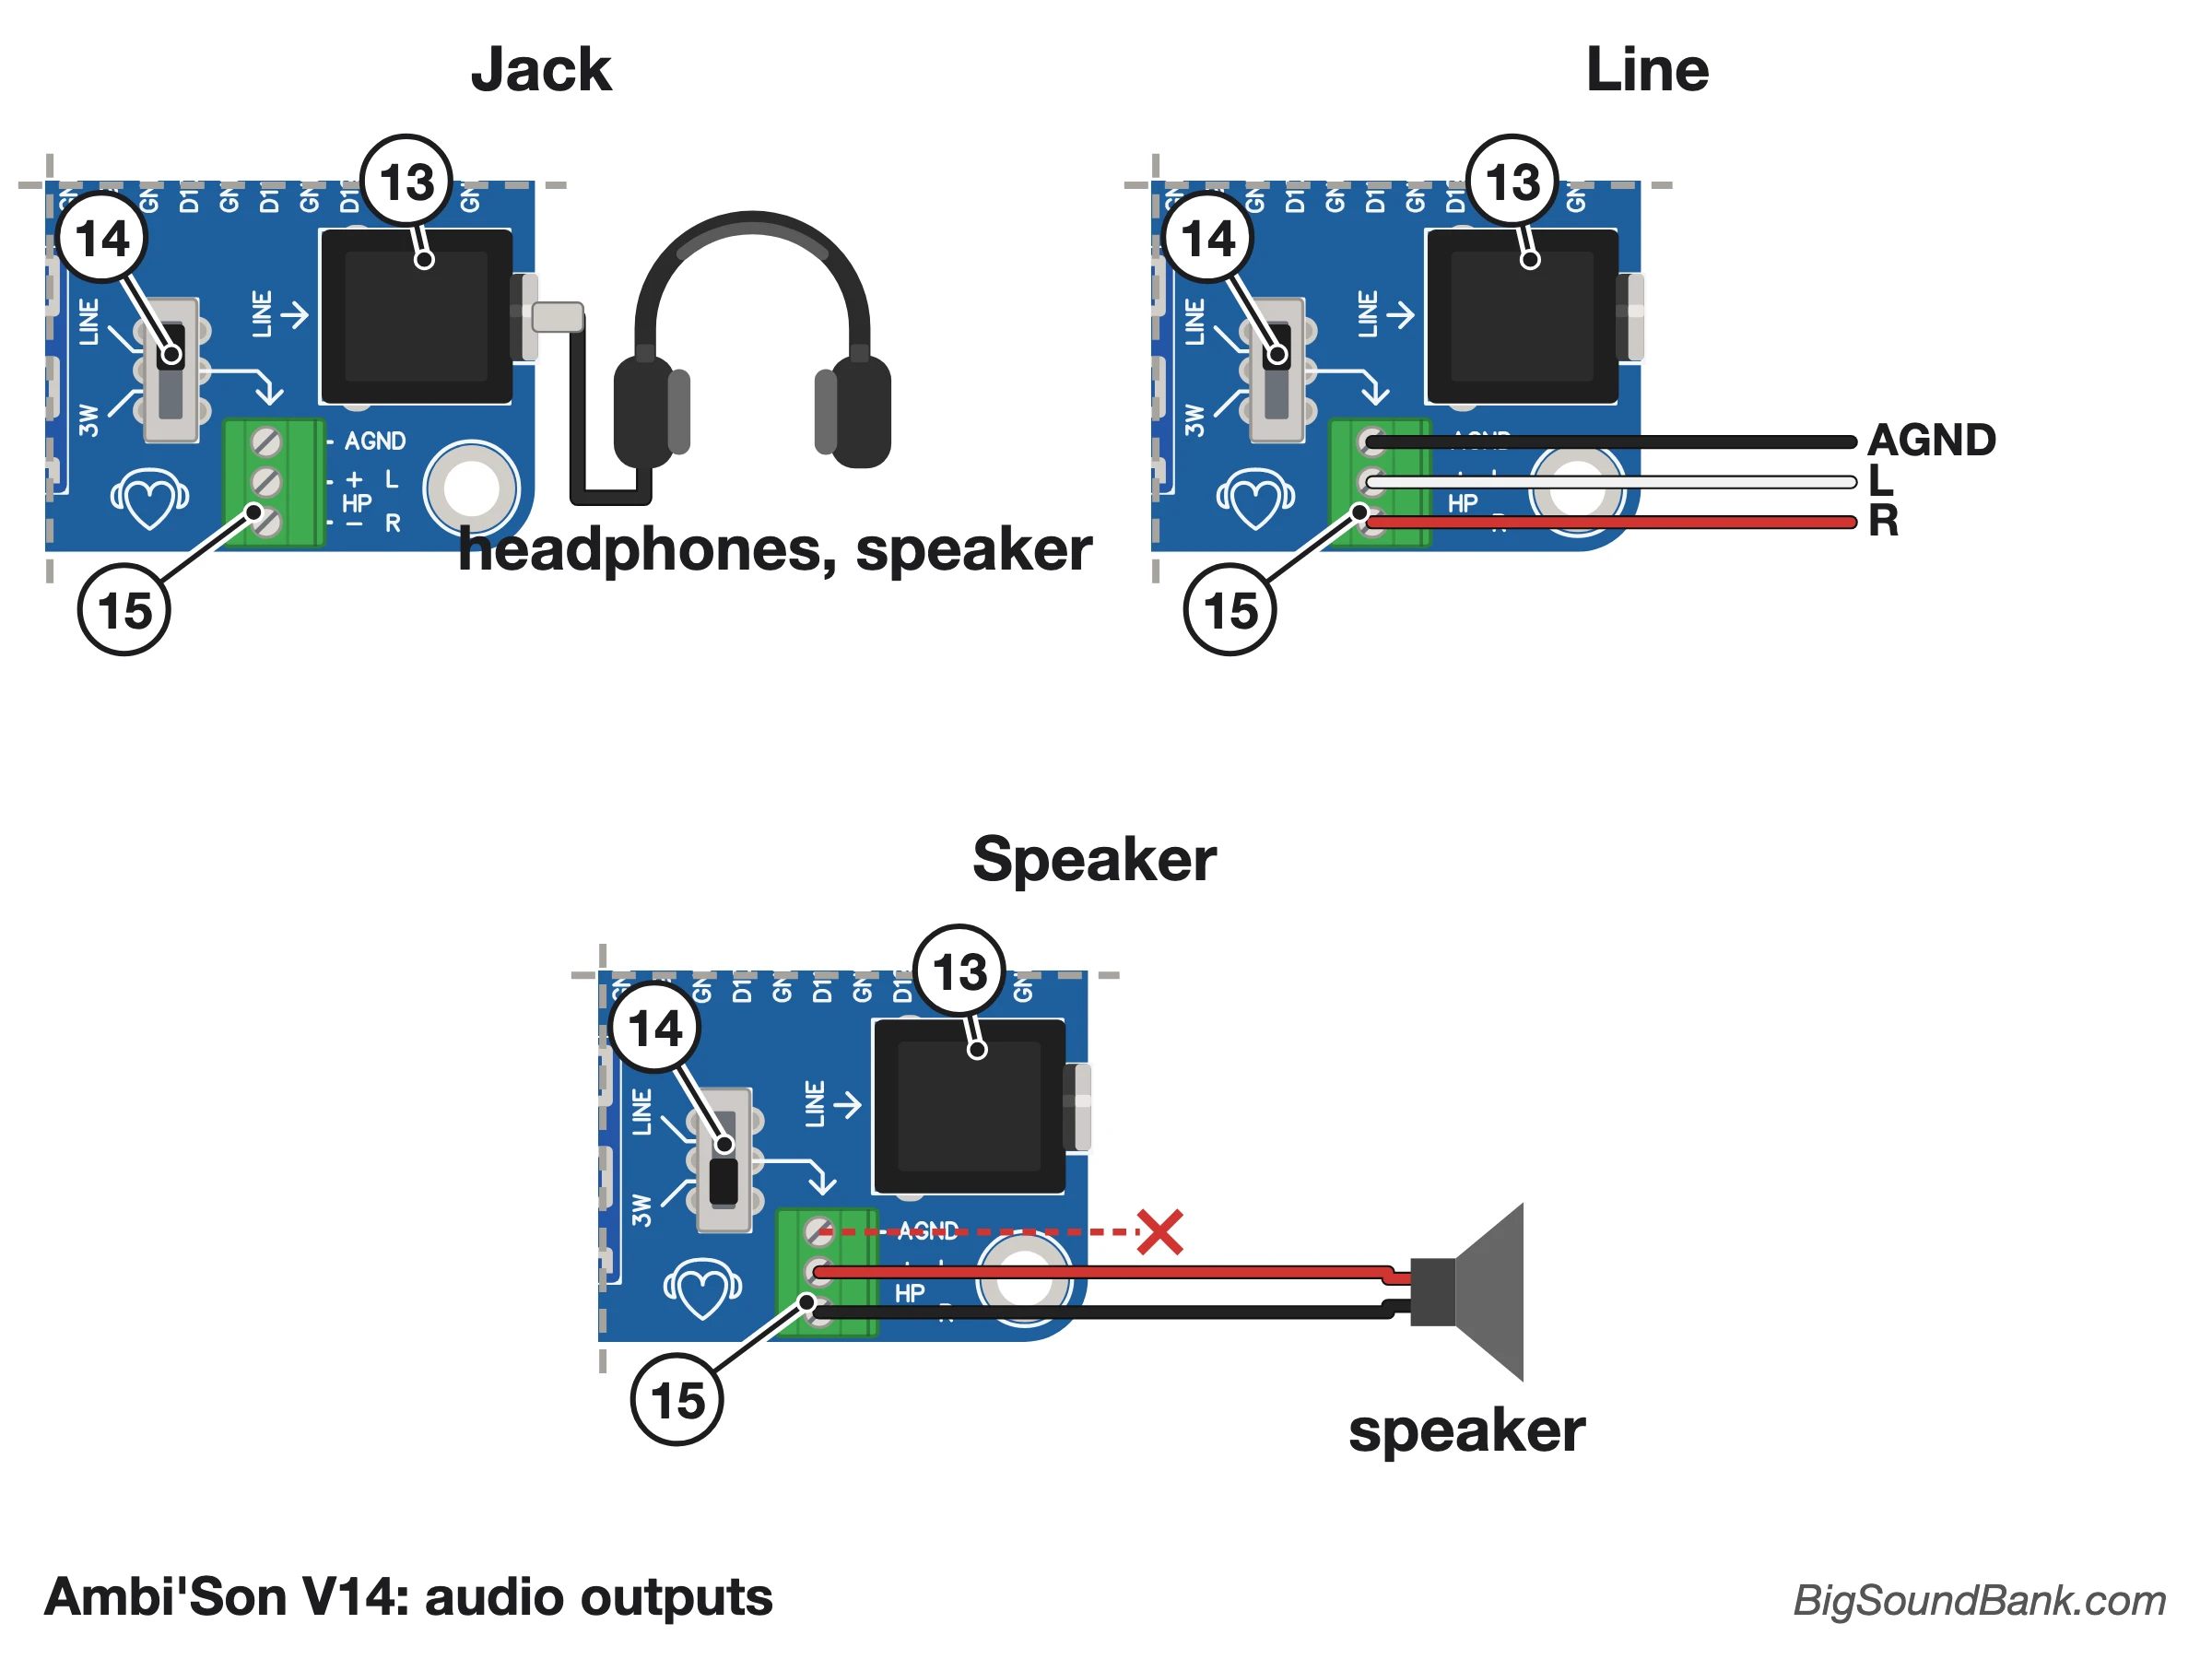
- 13: Stereo Line audio output on a mini-jack (3.5 mm). Plugging in a jack cuts the Bluetooth.
- 14: Selector for the type of output on terminal 15: Line (stereo) or 3W (mono). It does not act on the jack 13, which always stays Line.
- 15: Audio output screw terminal, marked "AGND", "+" and "−" (or "GND", "1" and "2" on older boards), depending on the position of the selector 14:
- In Line (stereo) position: even though the jack output is preferable. On the terminal, connect the audio ground to AGND (important), left to + and right to −.
- In 3W (mono) position: connect a speaker (3 Watts / 4 to 8 Ohms) only between the + and − terminals. Never connect + or − to ground (AGND or GND): the output is BTL type (neither side is ground).
- 16: Bluetooth transmitter module, to send the audio wirelessly to a speaker or headphones (if the option is chosen; PAIR button for pairing).
The diagram shows a V14 board. On older boards, you will find the same parts, sometimes in a different place (see Versions).
In detail
Power supply
The module can be powered with a 7 to 16 volt supply on the 5.5mm x 2.1mm plug (known as "DC5521") 1, with 7-16 volts through the screw terminal 2, or through the Nano's USB interface 3 (not recommended, see below). So you can power the module from a computer, the mains, a car battery, a battery holder, etc.
Polarity: the DC5521 plug 1 must have the + in the centre (the symbol is printed on the board, next to the socket). On the terminal 2, + goes to Vin and − to GND.
Note that a small hole next to the terminal 2 lets you pass your power cable through if you wish. Caution: this terminal 2 can only be reached by removing the Nano; then be sure to put it back the right way round, as in the diagram: its USB-C socket 3 at the edge of the board, above the DC socket 1. The wrong way round is fatal for the module!
The DC inputs (DC5521 plug 1 and VIN terminal 2) are protected against reversed polarity, and by a 1812L110 resettable fuse (PTC): 1.1 A hold current, which automatically cuts the current in case of overcurrent and resets itself once it has cooled down.
The 7 to 16 V applies to V12 boards and later, whose input is protected by a zener diode. On older boards, do not exceed 12 V (9 V remains the safest).
ON/OFF
The volume potentiometer has a built-in switch at its left end stop, placed upstream of the Nano. So it cuts the power when the power is external (DC5521 socket or screw terminal). However, if the module is powered through the Nano's USB, this power arrives downstream of the switch: so the switch cannot cut it.
Files
The DFPlayer Mini accepts microSD cards (and/or USB sticks depending on the version) of 32 GB maximum, formatted as FAT16 or FAT32 (64 GB cards worked in my tests, but with no guarantee). You can put MP3 and WAV files on them (48 kHz / 16 bits max).
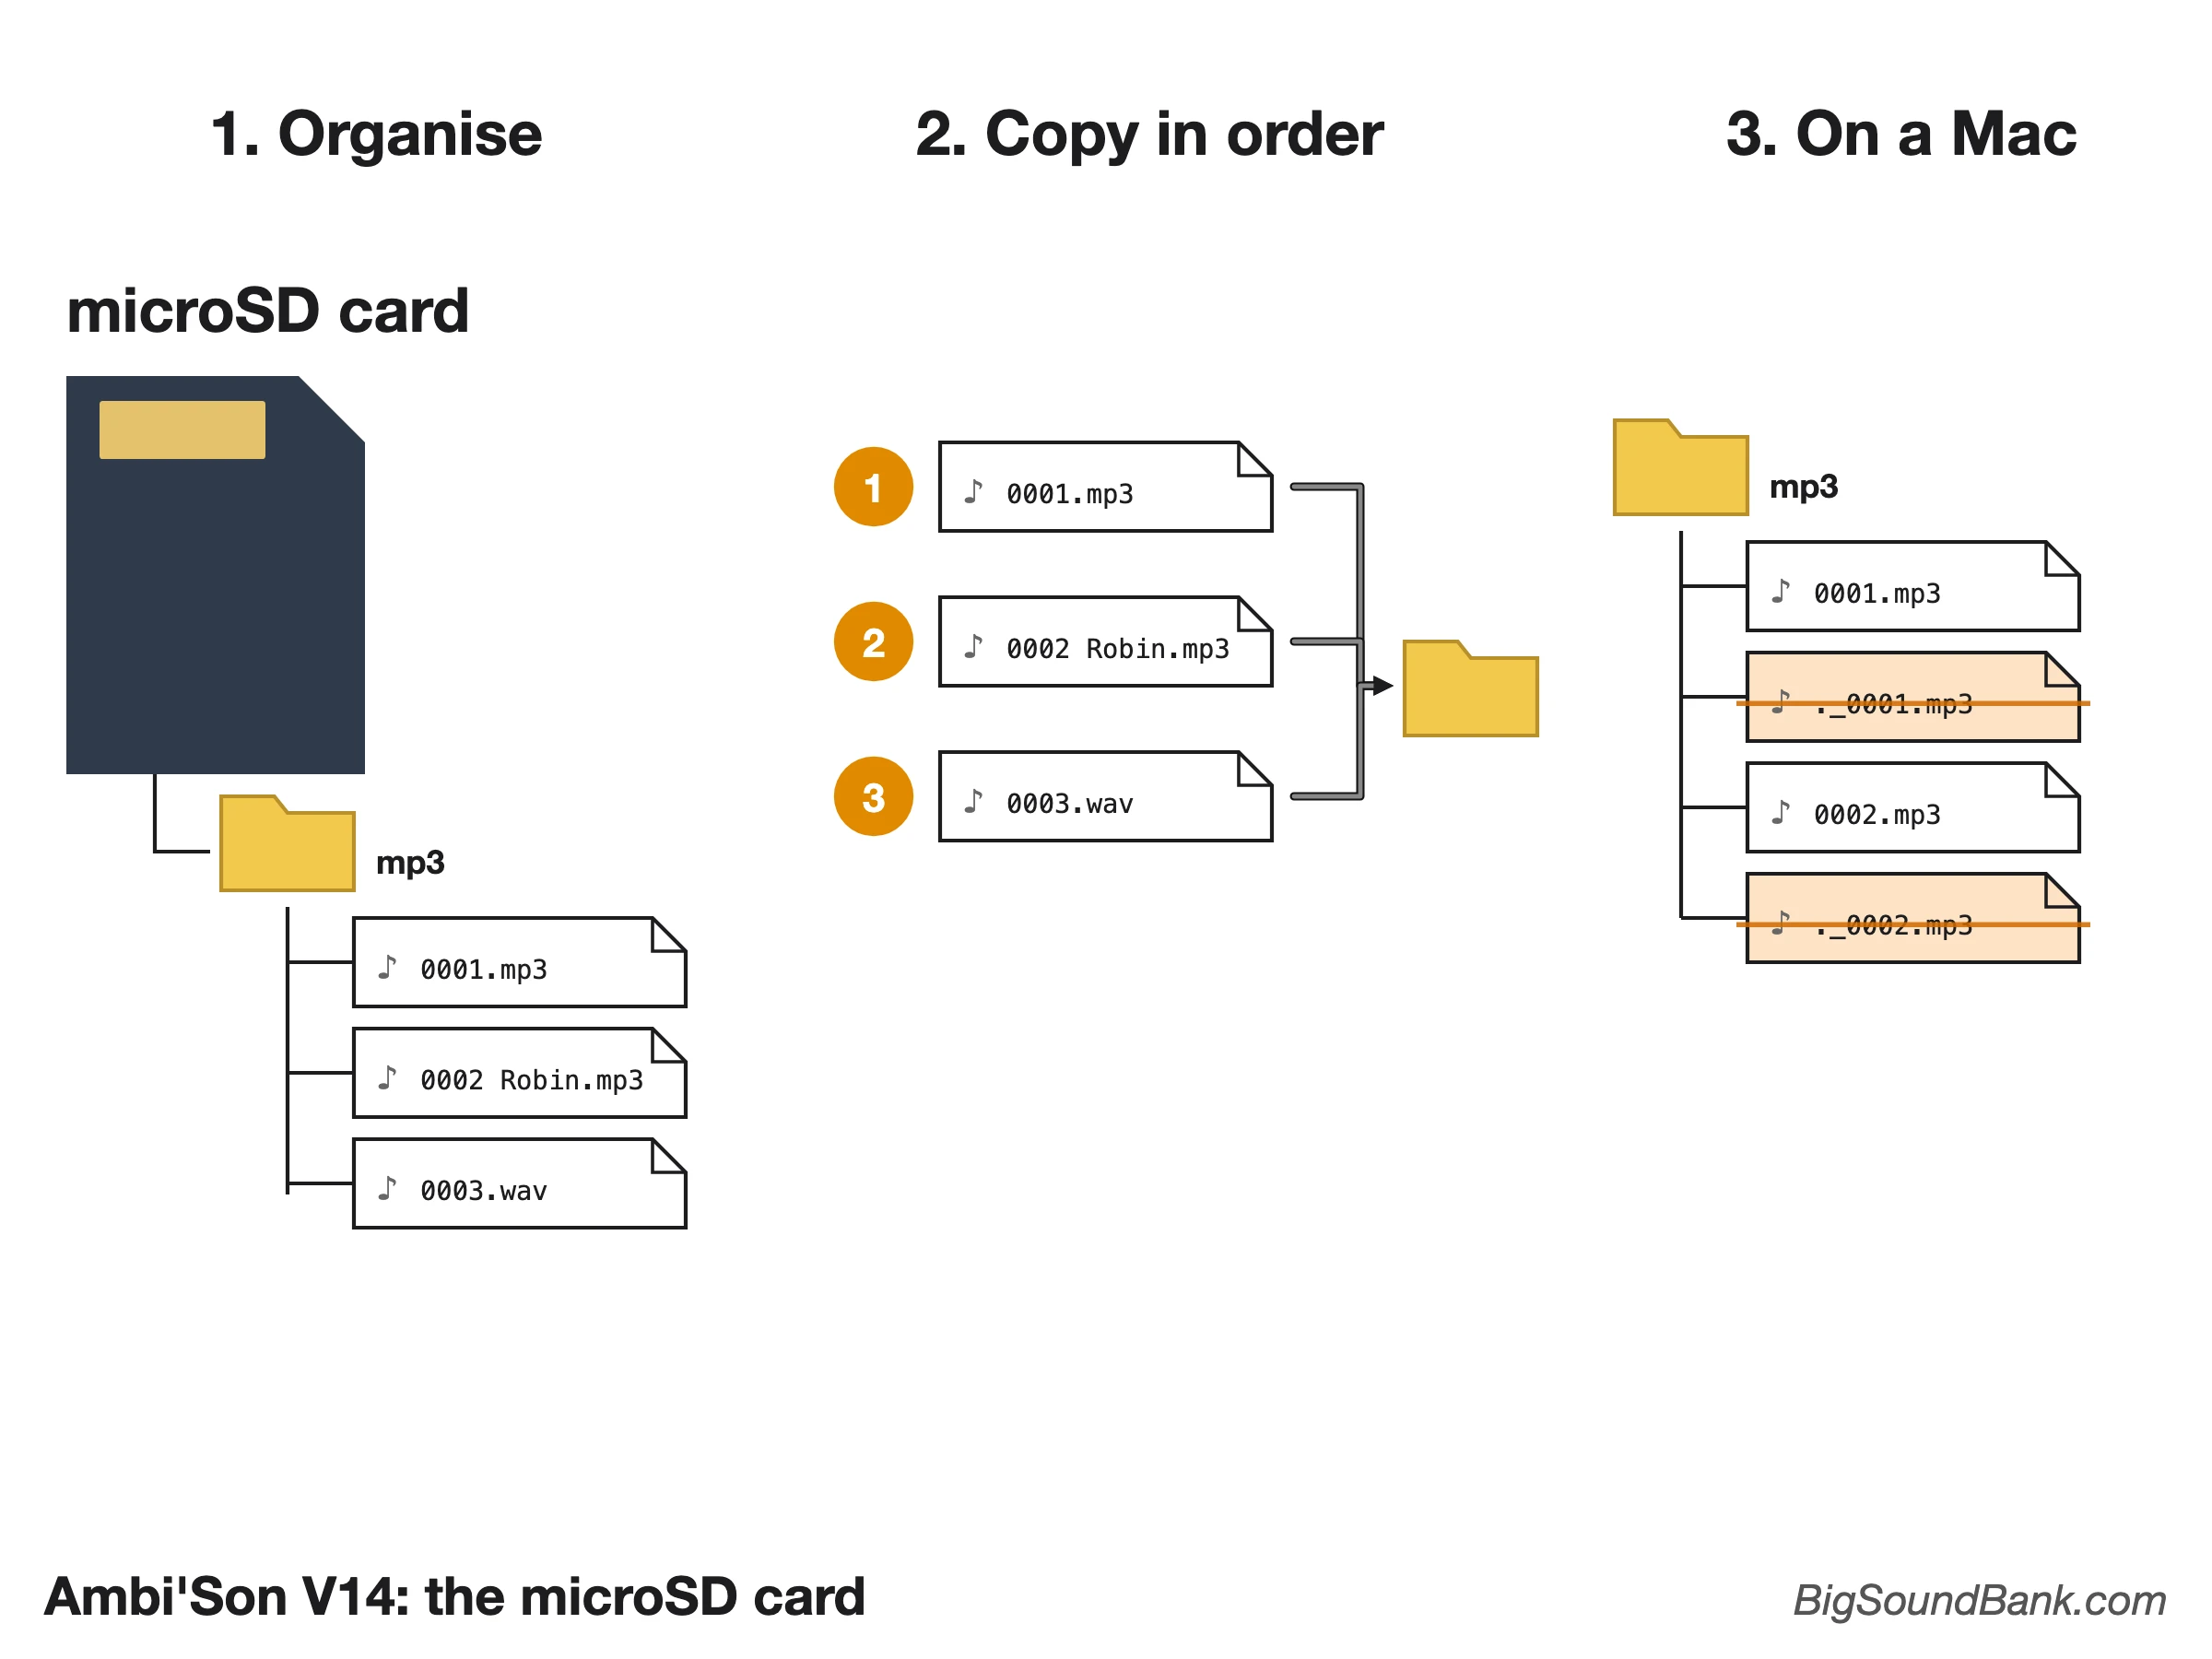
Put your sounds in a folder named mp3, created at the root of the card (even your .wav files), and name them 0001.mp3, 0002.mp3, etc. (always 4 digits at the start; you can add a title after, for example 0001 Robin.mp3):
SD
└── mp3
    ├── 0001.mp3
    ├── 0002.mp3
    └── ...
When a button, a keypad key or an input plays a specific file, the program calls it by its name. So "filler" files are unnecessary: for a button that plays file 5, a 0005.mp3 file is enough, without 0001 to 0004 before it.
On the other hand, playback in order mode, random, and the "next" and "previous" commands follow the order in which the files were copied onto the card. For playback in the order 0001, 0002, 0003…, copy them in that order (one by one, or onto a freshly formatted card).
On a Mac, macOS adds hidden files to the card (starting with "._") that the DF Player counts as sounds. To remove them, type in the Terminal: dot_clean /Volumes/YOUR_CARD_NAME.
Sounds put directly at the root, as with older versions of the program, are still played. They are then called in their copy order, with the precautions described in the DF Player troubleshooting article.
The full steps to prepare your card, on a PC or a Mac, are here: choose and set up your Exposi'Son or Ambi'Son.
Sound output
Before using it, you need to connect something to play the sound: headphones or an external amplifier on the jack, for example. If you connect a speaker, do not use the jack: wire it between "+" (or "1") and "−" (or "2") of the screw terminal 15, with the selector 14 on "3W". Do not use the ground ("AGND" or "GND").
Connecting an amp: beware of hum
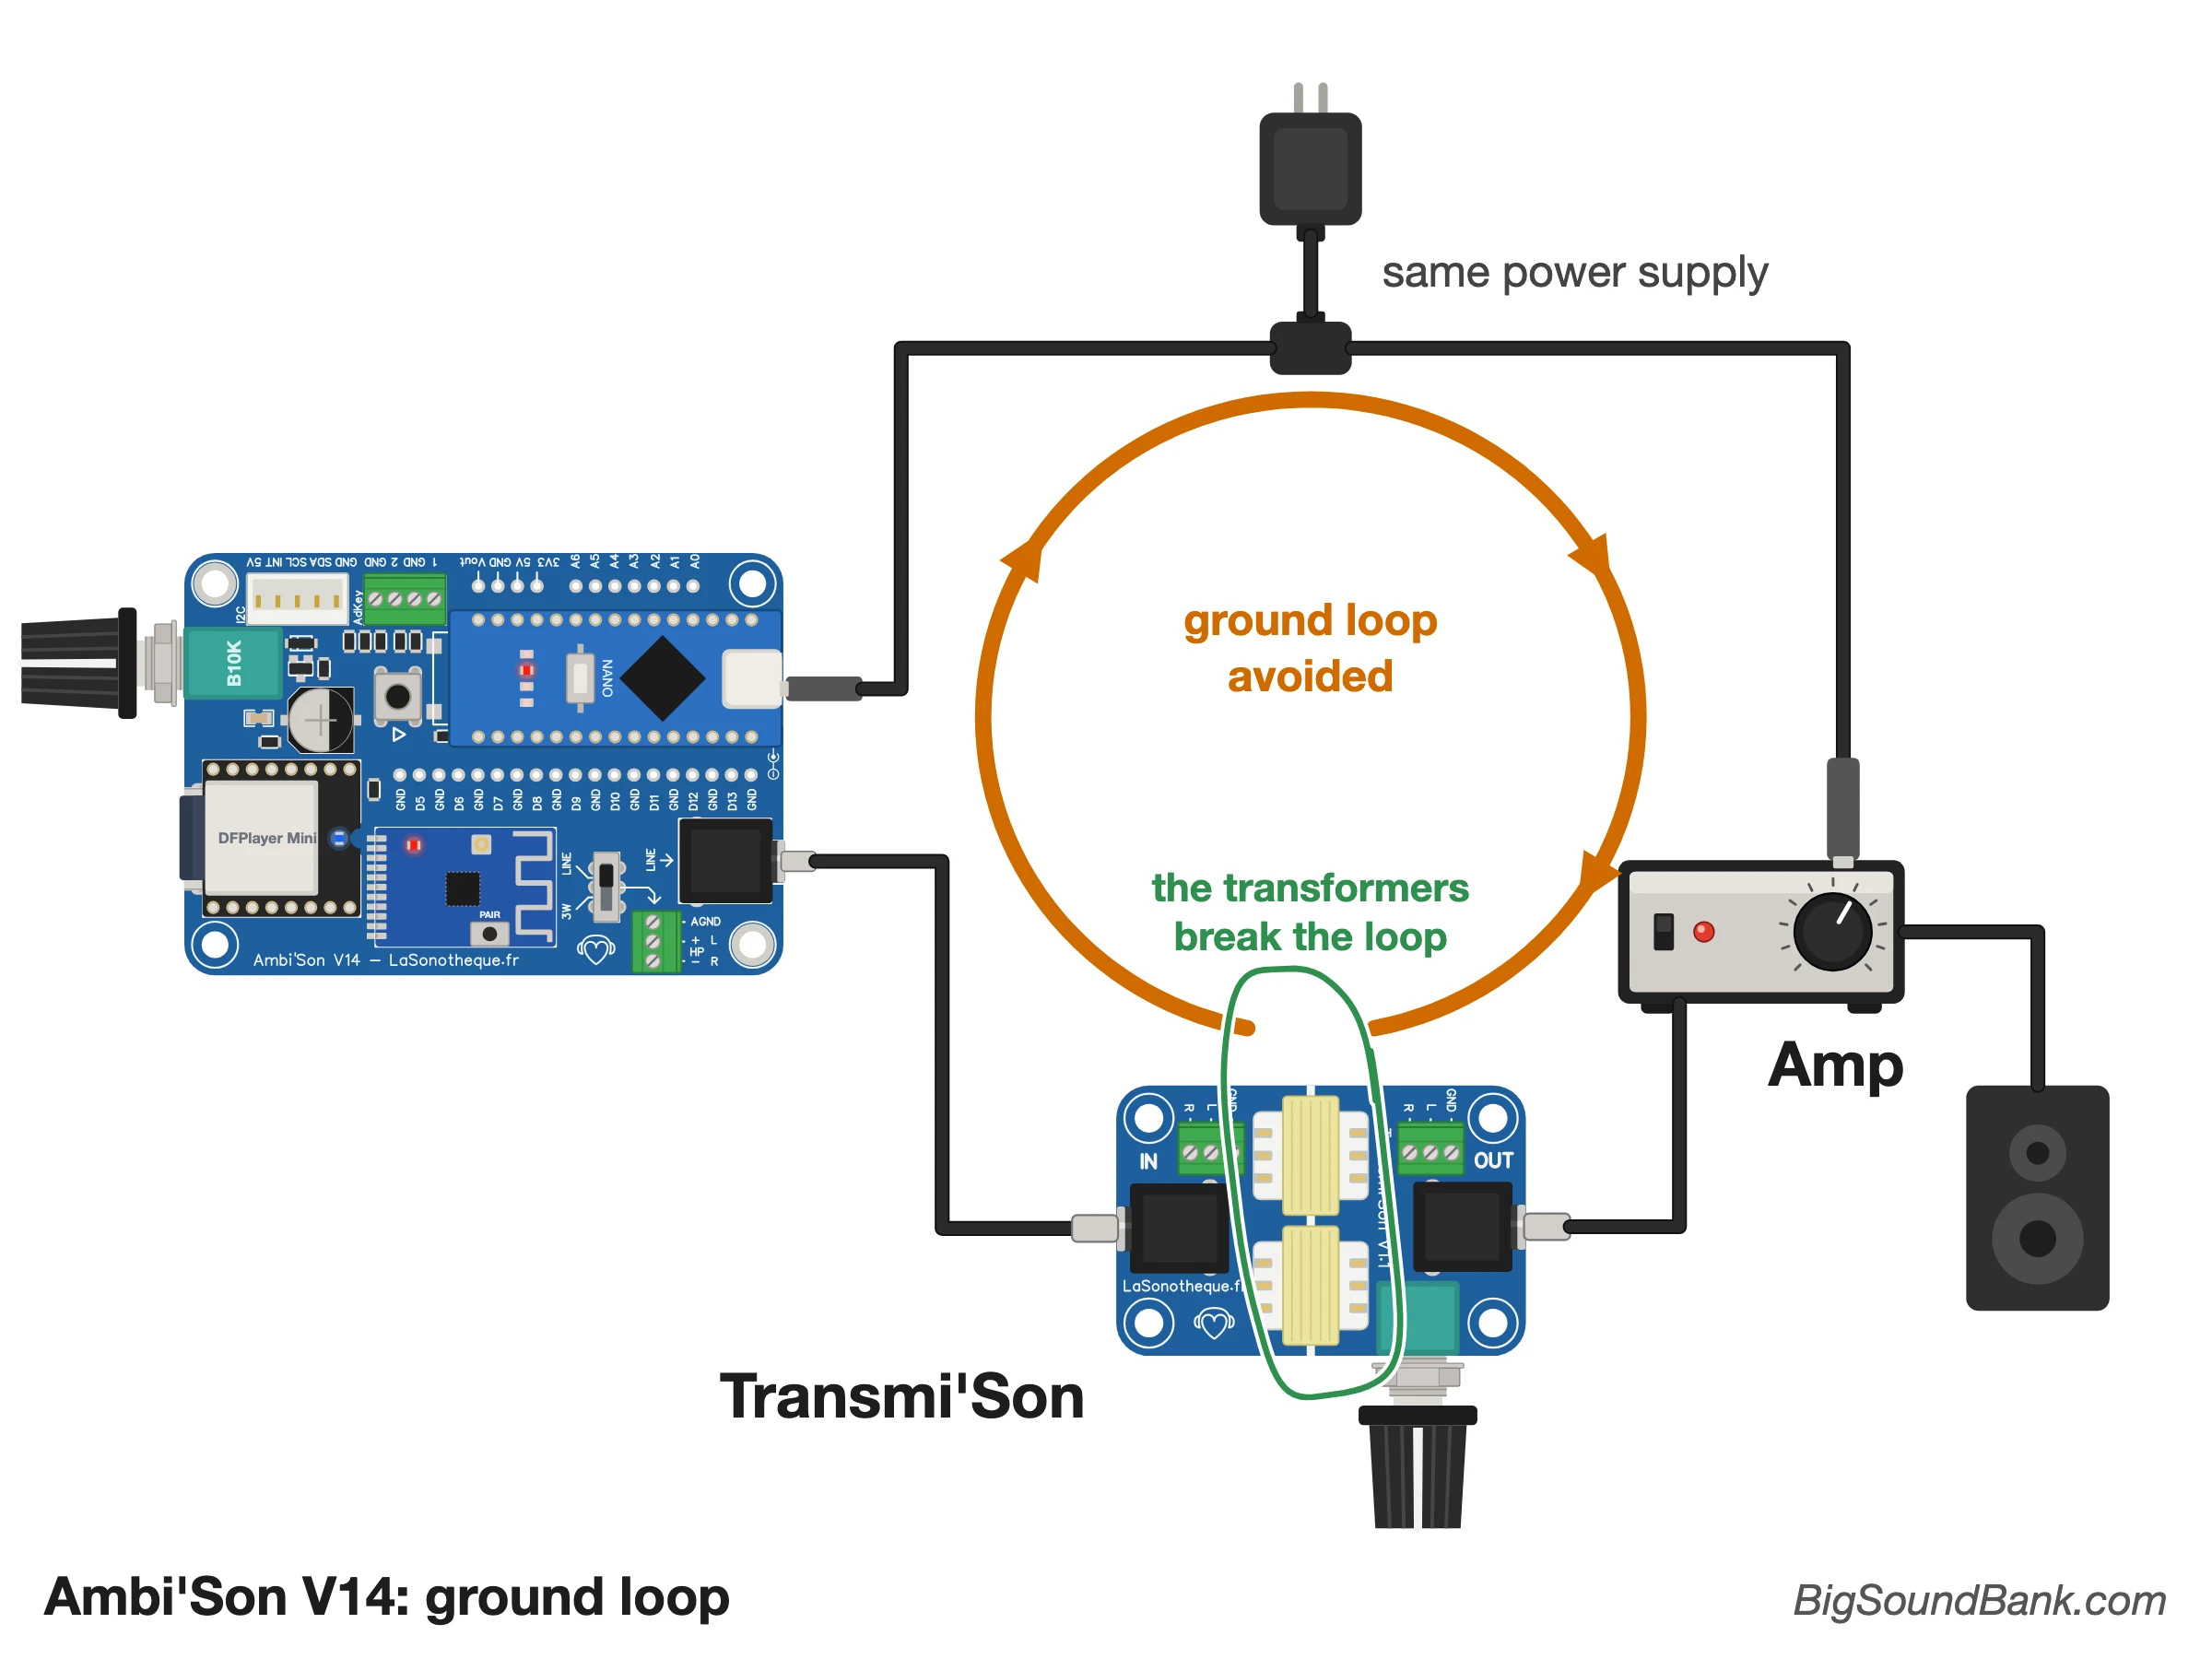
You can connect the Ambi'Son's jack to an amplifier or an active speaker. If each one has its own power supply, the problem usually does not arise. But if a single power supply feeds both (the same adapter, a DC splitter, or the amp connected to the Ambi'Son's Vout output), be careful.
Warning: a player and an amp on the same power supply almost always produce a hum, a low, continuous drone, even between two sounds. It is not a fault: it is a ground loop.
The two devices are then connected twice: through their shared power supply, and through the audio cable. Together, these two connections form a loop (in orange on the diagram), and that loop is what you hear.
To get rid of it, insert a Transmi'Son between the Ambi'Son's jack and the amp: its two transformers let the sound through, but not the ground, and so break the loop. What's more, its knob sets the amp's volume.
Playback
As soon as it is powered, after a few seconds for the Nano to start, playback automatically resumes in the last mode used (random or order), on an endless loop. The very first time, random applies (without repeats until all the files have been played). If there is only one file, it will loop it.
The module also has a push button 7 to switch between the two playback modes and to navigate in them:
- At start-up: resumes the last remembered mode (random or order), on a loop.
- Short press: plays a single file in the current mode, then silence — in random, a file at random; in order, the next file. Each new press does the same again, as many times as you like.
- Long press (≥ 10 s): switches to the other mode (random ↔ order), which starts looping.
- Short press (in this new mode): here too plays a single file in this mode, then silence.
- Mode memory: the random/order choice (made with a long press) is kept and restored at start-up, even after a power cut. Only this choice is remembered: the module always restarts playing (on a loop), never silently waiting.
If you leave the volume 12 at zero for 5 seconds, playback stops; it resumes as soon as you turn the volume back up.
And if the player freezes or the card is removed, the Ambi'Son restarts on its own: handy for an installation that runs unattended.
Power consumption
Consumption (measured peaks: white noise, maximum volume, 9 V supply):
- Module alone: 35 mA
- Headphones or Line output: + 5 mA
- USB stick: + 45 mA
- Bluetooth connected: + 100 mA
- 3 W speaker (4 Ω): + 400 mA
- Recommended supply: 9 V, 1 A (DC power supply)
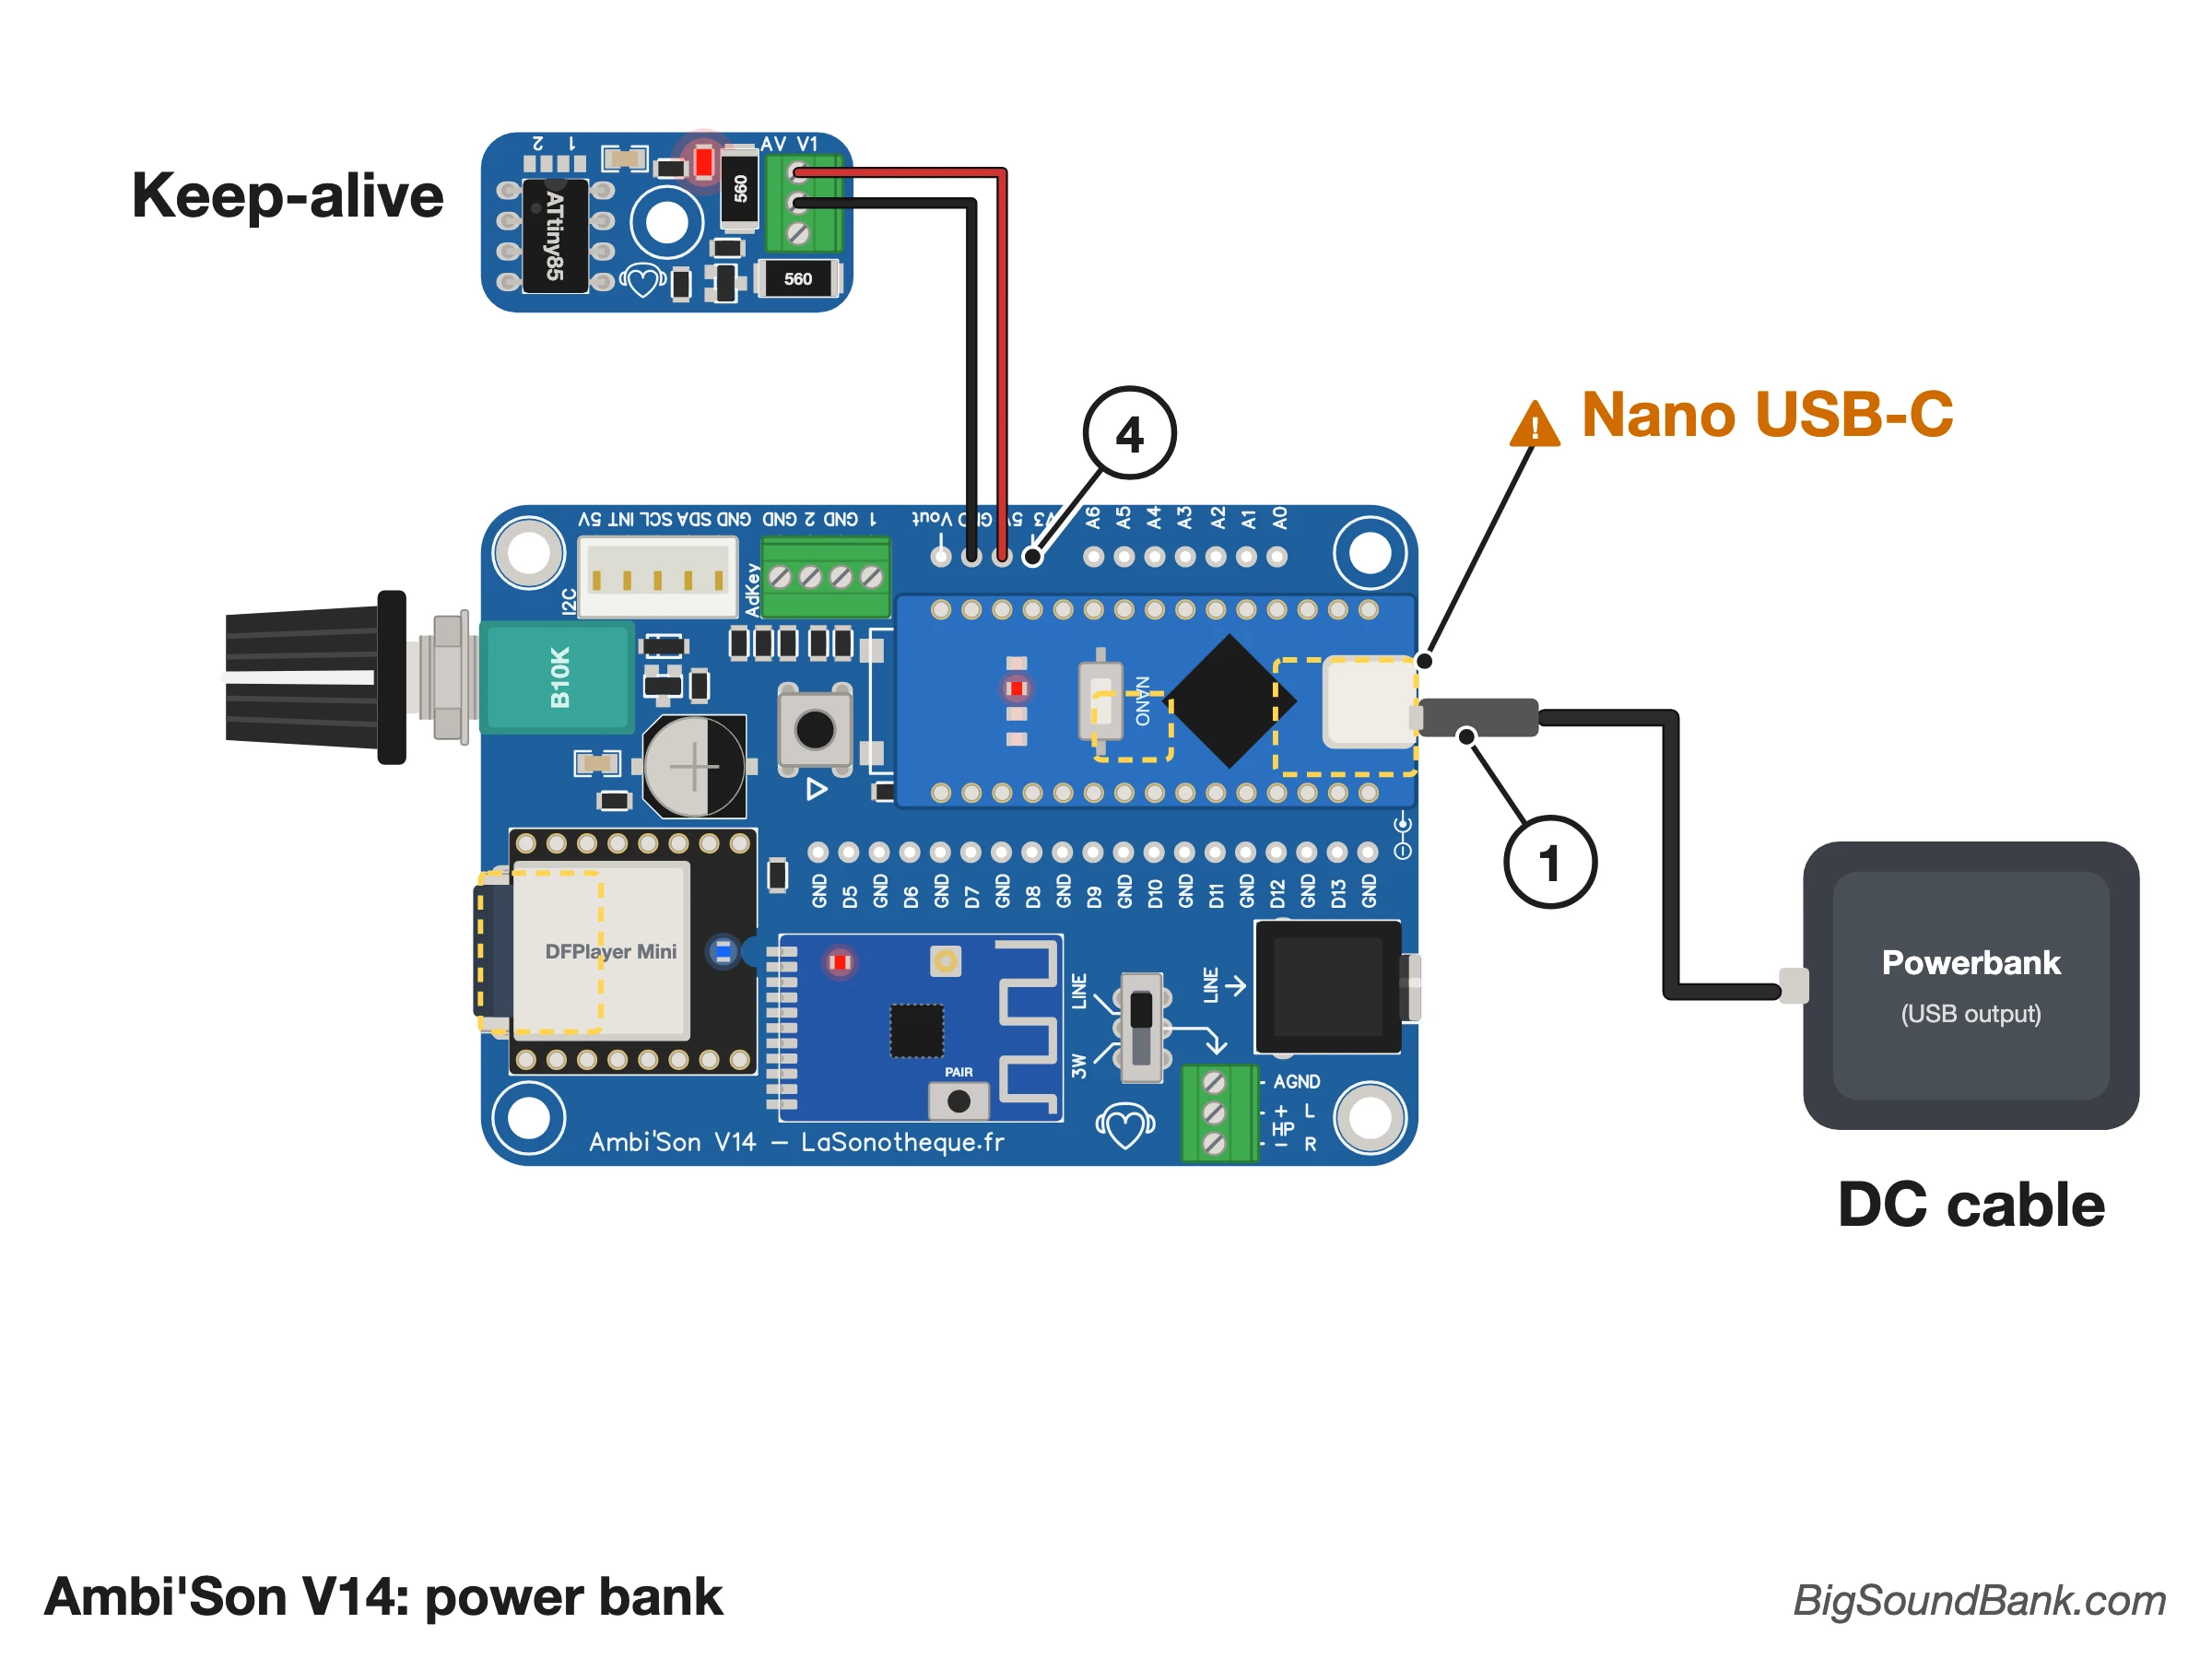
These low currents do not suit every power bank: some cut their output when the current drops (with headphones, at low volume, during the silences between two plays), and the Ambi'Son switches off without warning.
A power bank supplies 5 V: preferably connect it to the DC5521 plug 1, with a DC power supply in the "USB-C > 9 V" version. Avoid the Nano's USB-C 3: the switch does not cut the power, and the Vout output is not available.
- Have time? First test your power bank on its own, in real conditions: same audio output, same volume, and leaving the module at rest for a good while. If it does not switch off, you are all set.
- No time to test, or nothing must ever stop? Add a keep-alive: it keeps the power bank on, with no setting at all. It connects to the 5V and GND points of the Ambi'Son's power network (see below).
Some power banks have an "Always-on" or "low current" mode (meant for connected devices): if yours has one, turn it on, it may be enough.
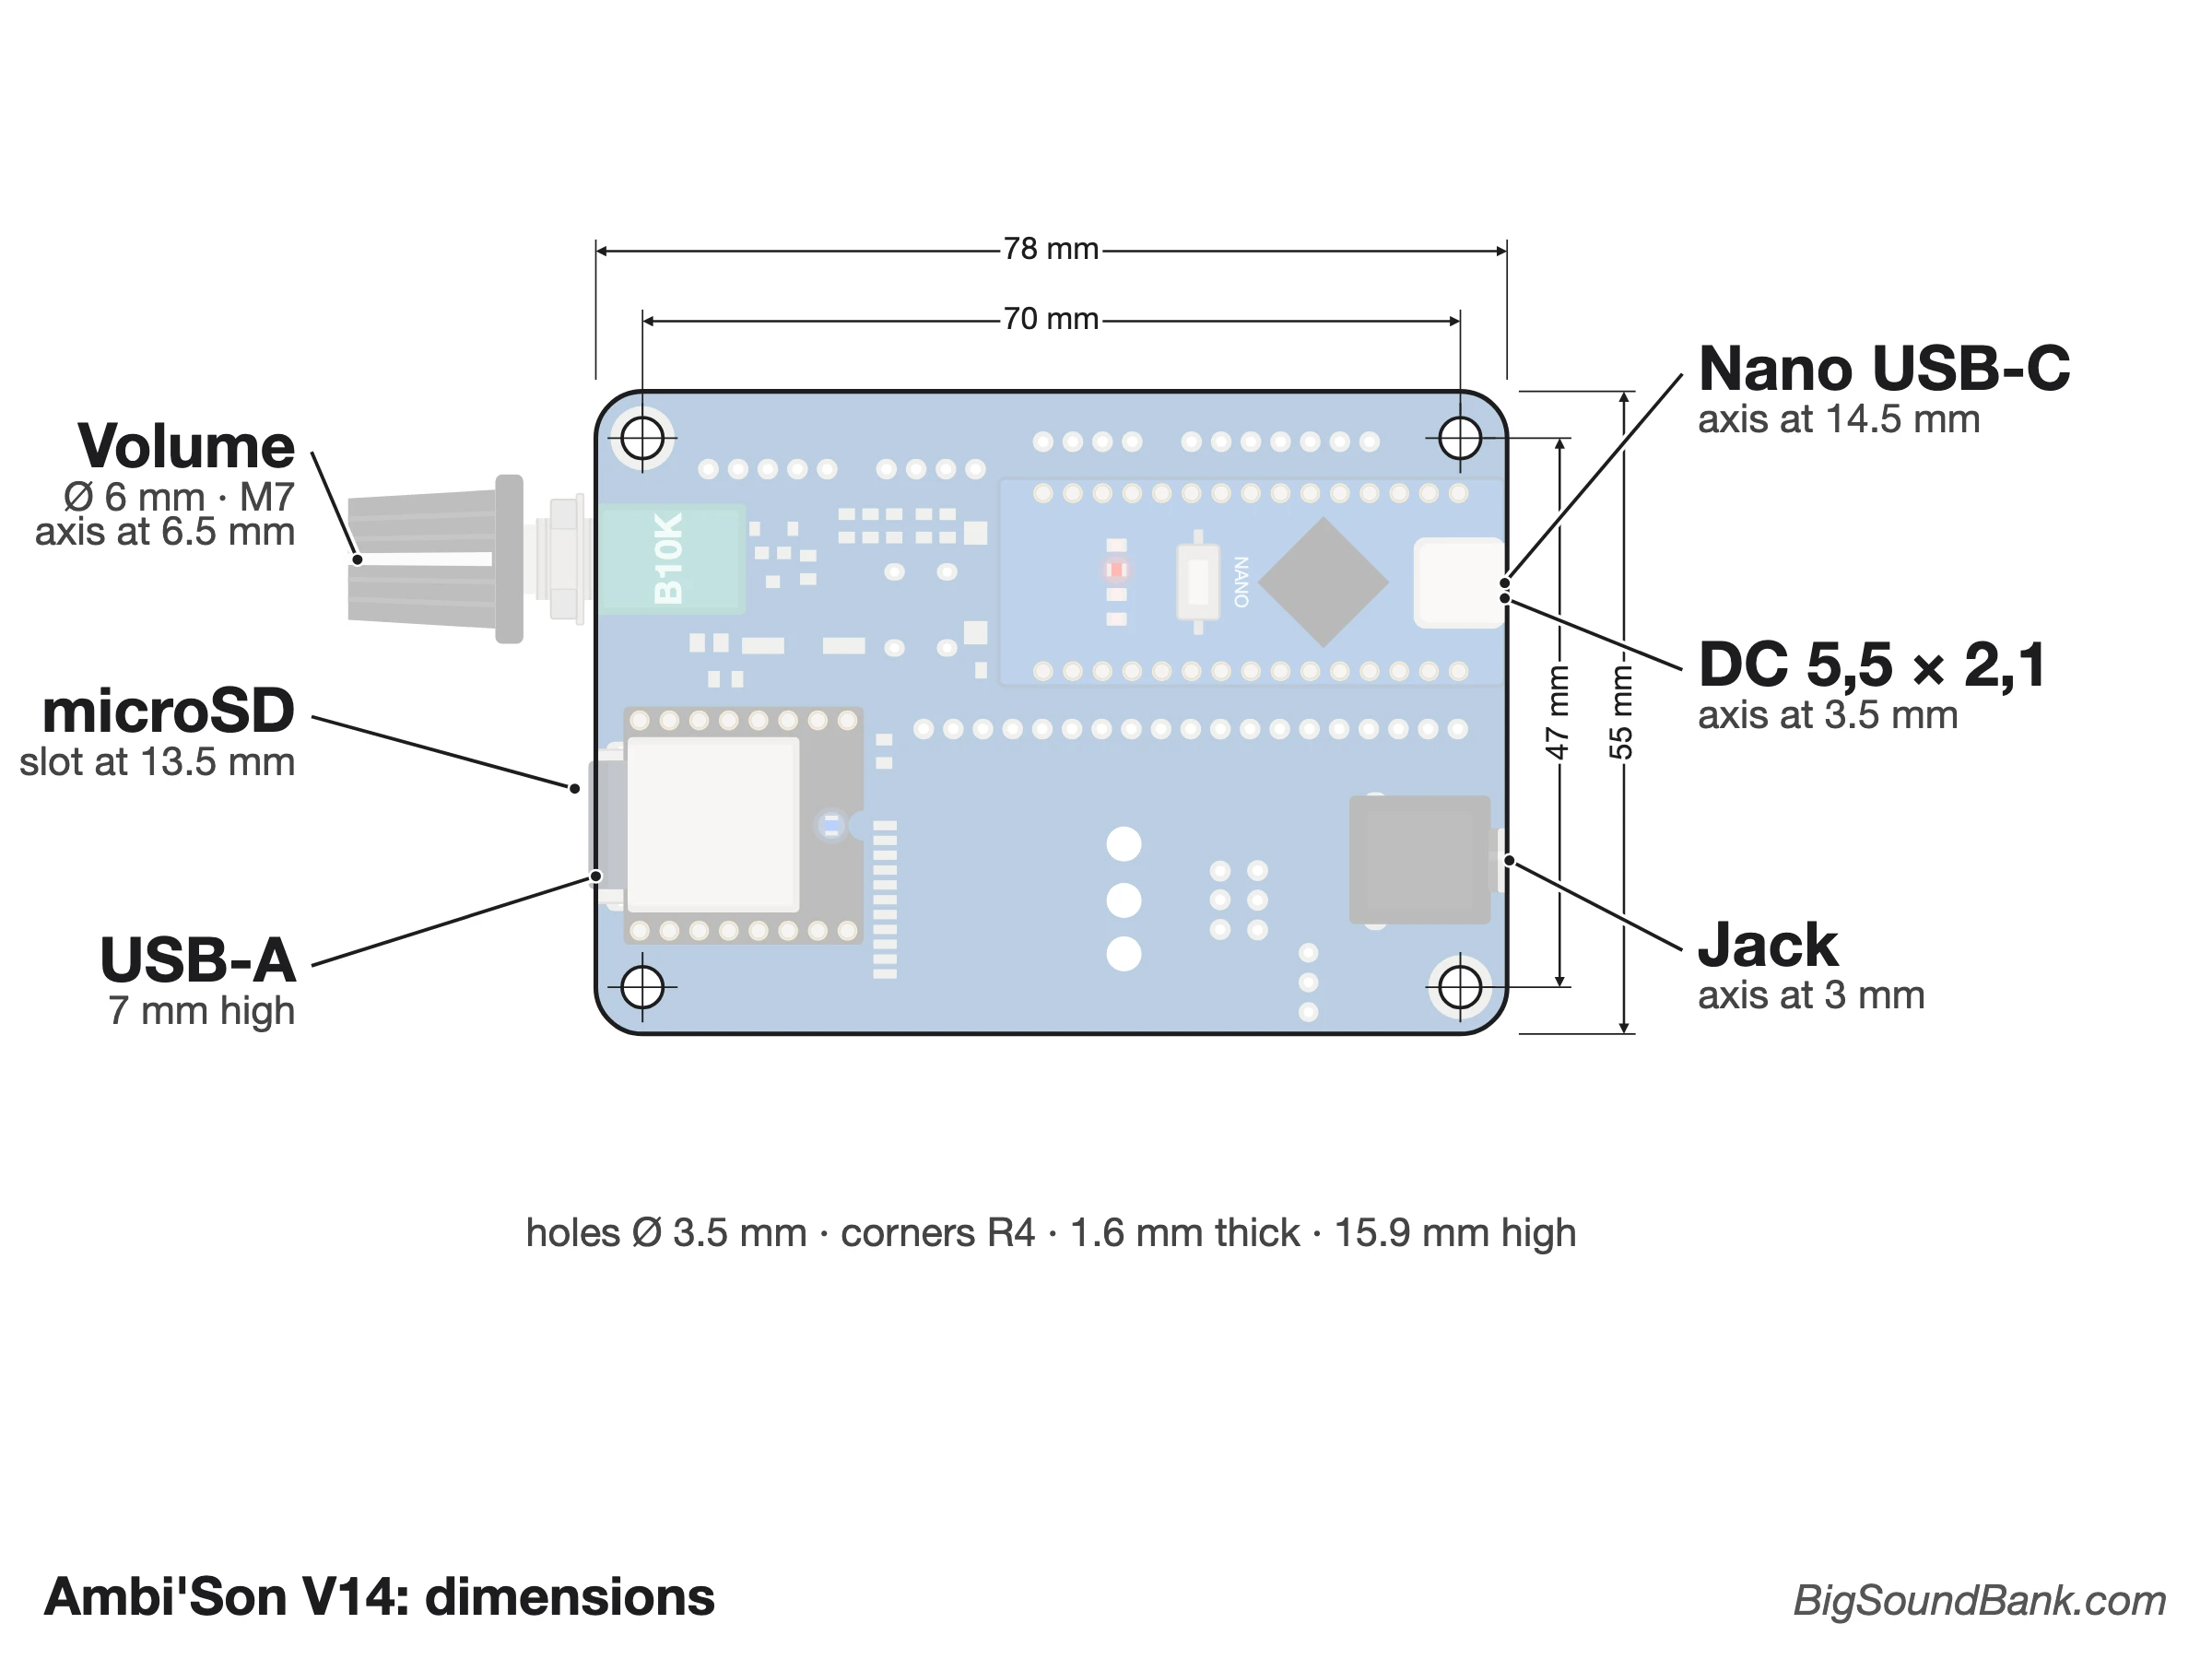
Bare board
As the module is a bare board, it is up to you to fit it out and build it a small case if you wish, but once again: be CAREFUL that nothing conductive touches the circuit board. Risk of a fatal short circuit for the module!
To design your case: the board measures 78 x 55 mm (rounded corners). Since V12bis, it has 4 mounting holes of 3.5 mm (for M3 screws), one in each corner, centred 4 mm from the edges, that is 70 mm and 47 mm from one hole to the next. These 4 holes are also used to mount my wooden protection kit, available as an option on the Ambi'Son page.
The diagram below also gives the position and height of everything that comes out on the sides (volume, microSD card, sockets), so you can drill your case in the right place.
Basic use
- Take a microSD card or a USB stick depending on the version (32 GB maximum) and format it as FAT16 or FAT32 (detailed steps: choose and set up).
- Create a folder named mp3 on it, then copy into it, in order, one or more sound(s) in MP3 (recommended) or WAV format (48 kHz / 16 bits max). Name them 0001.mp3, 0002.mp3, etc. (or .wav), always with 4 digits at the start.
- Insert the microSD card or stick into the reader 5 (or 6).
- Plug in headphones or earphones on the jack 13 (it is always Line, whatever the position of the selector 14).
- Power the Ambi'Son and turn the potentiometer 12 to switch it on (click).
- All the files in the mp3 folder start playing, at random, on an endless loop (or in the last remembered mode, see step 9).
- Set the volume on the potentiometer 12.
- Short presses on the button 7: plays a file at random, then silence. Each new short press plays another random file, as many times as you like.
- Long press (≥ 10 seconds) on the button 7: switches to order mode, all the files are played in order, on an endless loop (0001, 0002, 0003, ..., 0001, 0002, 0003, etc., if they were copied in that order). In order mode, each short press plays the next file then silence; a new long press (≥ 10 seconds) goes back to random mode. The last mode chosen is remembered and restored at the next start-up, even after a power cut.
- Recover from your strong emotions.
Advanced use
Bluetooth
If your module has a Bluetooth output, just press the small pairing button on the module (marked "PAIR") once, then the one on your Bluetooth speaker or headphones, and that's it. Turn the Ambi'Son's volume to maximum and set the volume on the receiver. Only one receiver at a time.
Caution: plugging a jack into 13 cuts the Bluetooth. Leave it free to play wirelessly.
The Bluetooth output adds a slight latency (<0.5 second). The range depends a lot on the case and on obstacles.
On the Bluetooth board, a female U.FL (IPEX1) connector lets you connect an external antenna such as this one (optional, since an antenna is already printed on the board). It is particularly recommended with a metal case, which would otherwise block the radio waves and greatly reduce the range.
Extending the push button
A push button directly on the board is handy, for example, for exhibition designers who want visitors to start a sound on their own. However, this button is deliberately very small and hard to reach, to avoid unwanted presses when it is not used.
If you wish, you can easily extend the button mechanically by making it a kind of stilt, up to above the case you have made for the module.
For more distant use, you can also move this function elsewhere by wiring a push button between D5 and GND, on the input terminal 8 (or D2 on Ambi'Son earlier than V8).
Adding buttons and sensors
The Ambi'Son can do much more than play on a loop. Three ways to connect buttons, contacts or sensors to it:
- Inputs D5 to D13 8, directly on the Nano: up to 9 buttons or contacts (sensor, relay, presence detector...), each wired between its pin and GND. Nothing more to solder. For each input, I set in the program what it does (play a specific file, play, pause, stop, previous, next, a file at random, play on a loop as long as the contact is closed...), whether it acts on press or on release, whether the sound stops when the contact returns to rest (handy with a presence detector), and what a second press during the sound does (restart it, stop it or pause it). Two precautions: D6 is reserved for the Expan'Son if you use them, and D13 carries the Nano's small LED (to use it as an input, you need to solder a 1 kΩ resistor between D13 and 5V).
- The Exten'Son 10 (AdKey option): up to two Exten'Son with 10 buttons each, that is 20 buttons. Your choice: files 1 to 20, or files 1 to 14 plus "previous", "next", "pause" and "all on a loop". The 10 kΩ resistors of the AdKey option are essential: without them, the module plays files on its own.
- The Expan'Son (since V14, on the "I2C Option" connector 11): up to 8 Expan'Son boards with 16 inputs, that is 128 buttons. Each board must have its own address, set with its small switches: the board at the first address (0x20, address switches OFF) plays files 1 to 16, the one at the next address (0x21) files 17 to 32, etc., whatever the order in which they are connected. Connected boards are detected automatically at start-up. The Ambi'Son already has the bus resistors: on an Expan'Son V1, leave its switch 1 OFF. For now, the Expan'Son are only used as inputs (buttons, contacts), not to drive LEDs or relays.
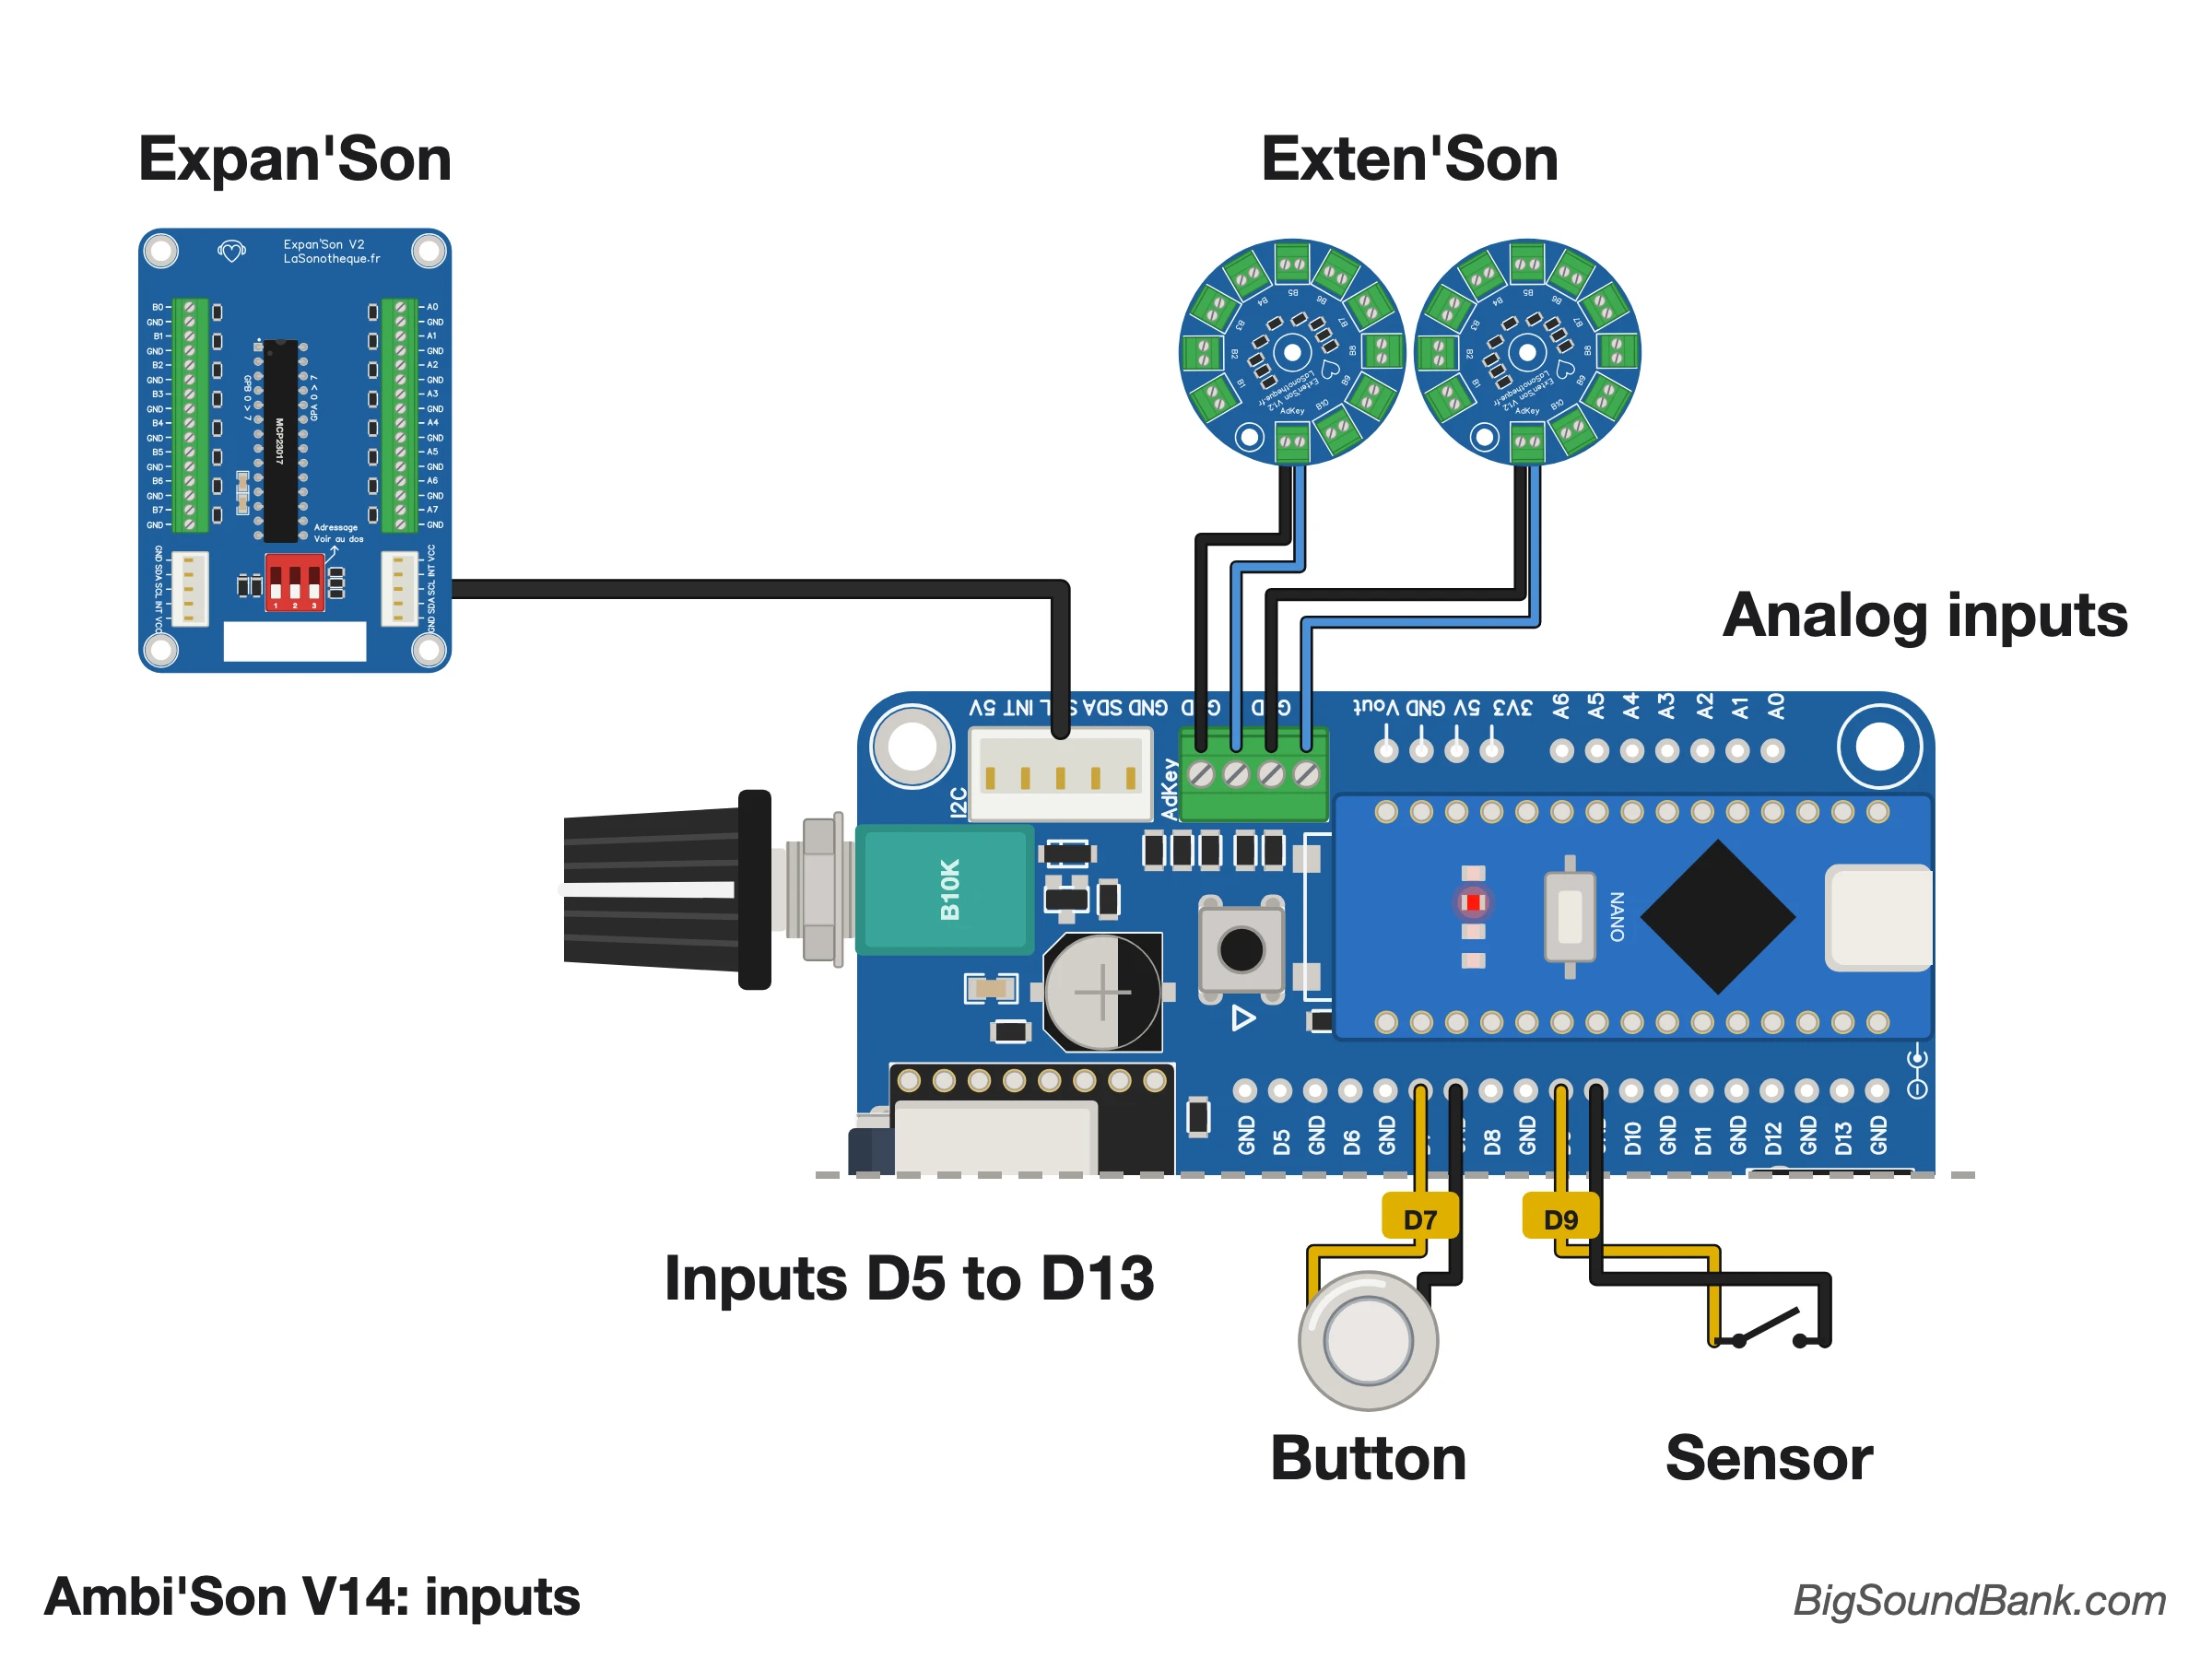
These settings are made in my program: tell me what you want when you order, and I will deliver it ready to use.
A program set up for your project
The behaviour described in Basic use is the standard setting. On request, I can also set for you:
- The playback mode at start-up, imposed at every power-on: random on a loop, in order on a loop, once in order then silence, a single file then silence, or nothing at all, waiting for someone to press a button.
- Locking the button: the long press no longer changes mode, or a long press other than 10 seconds.
- A "museum" minimum volume: even with the potentiometer fully left, the sound does not go below it, so that nobody can turn it off.
- Back to the start for a new visitor: in order mode, after one minute without a press, the next press starts again from file 1.
- The USB stick (USB option): read first, then the microSD card if no stick is plugged in.
- The inputs, the Exten'Son and the Expan'Son described above.
Removable Nano and Player
Two components of my module are removable: the "Nano" and the "DF Player". This design gets around some common constraints, such as being unable to remove the micro SD card or to change the Nano's program directly. That is why I designed these parts to be easily removed "from above".
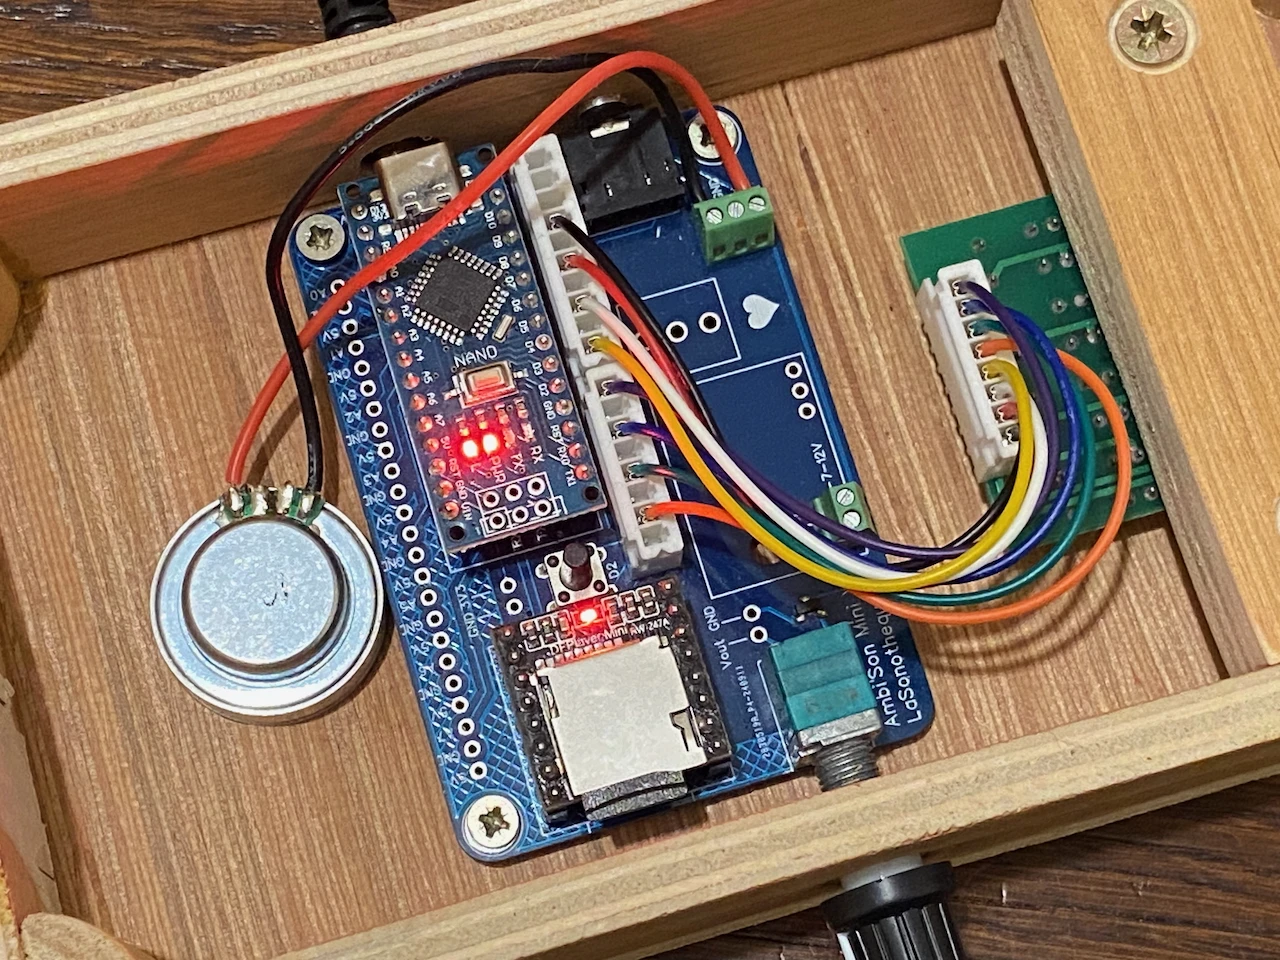
In the photo, you can see that my box prevents plugging in the USB to program the Nano, and also prevents removing the microSD card. Removing the Nano or the DF from above is then an advantage.
Line or Speaker 3W?
The module has a switch 14 to choose, on the screw terminal 15, between "Line" mode (for an active speaker, a mixer or an amp) and "Speaker 3W" mode (for a speaker). This switch only acts on the terminal: the jack 13 is always Line. To change mode:
- Always unplug the power before working on a device.
- Depending on what you connect, set the switch to "3W" (for speakers) or "LINE" (for active speakers, mixers or amps).
Random explained
Although true randomness does not exist in computing, I am rather proud of mine and would like to explain it to you:
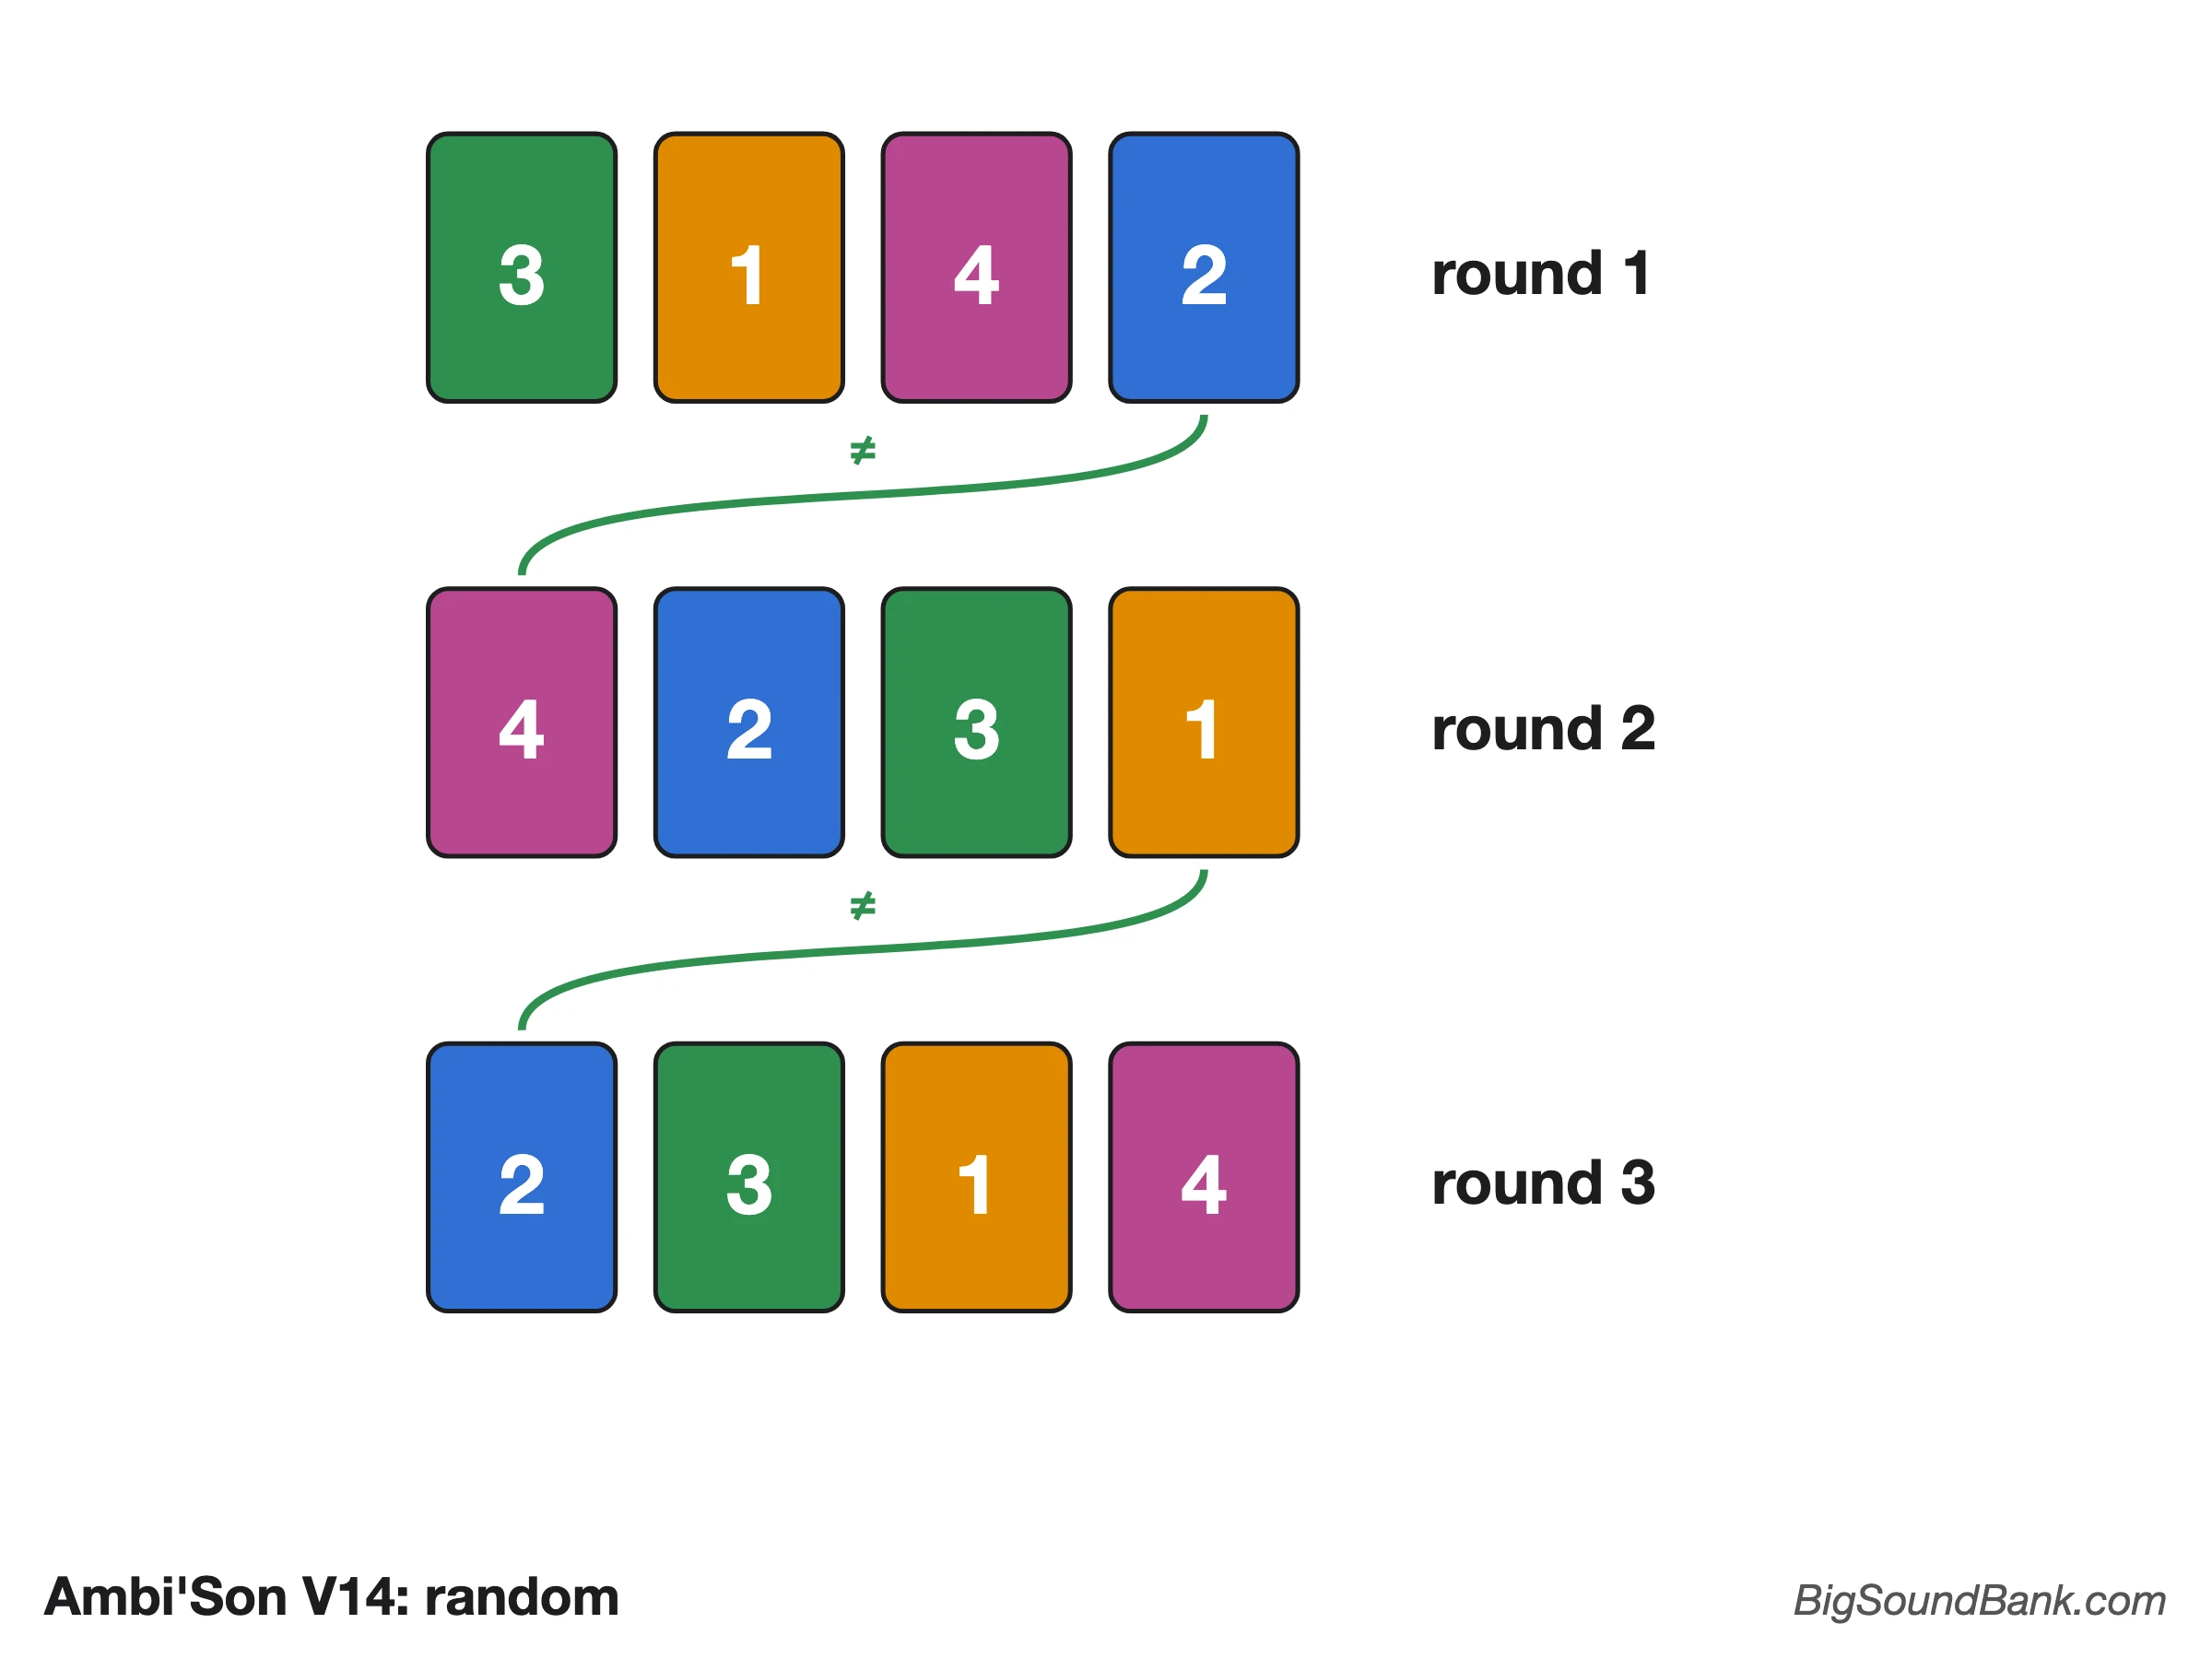
To prevent the (bad) luck of randomness from playing the same sound 3 times in a row (which is statistically possible and frustrating), my program works in rounds, like a deck of cards being shuffled: at each round, it works out a new shuffle of all the files on the card, then plays them one by one. So each file comes up exactly once per round, in an unpredictable order, and the first sound of a round is never the last one of the previous round. Then it shuffles again and starts over.
As the Nano has only 2 KB of memory, this shuffle is worked out as it goes rather than kept as a list: so there is no limit to the number of files.
D2, D5 and push button
Caution: on Ambi'Son versions up to V7, the push button is connected to D2. As D2 is configured as an "INPUT_PULLUP" input on this pin, you must never use it as an output, or feed 5V into it, without risking a fatal short circuit for the module. Since V8, the button is wired to D5 and has a protection.
Nano
The "Ambi'Son" module is controlled by a Nano (an Arduino clone). On delivery, my program is pre-installed, set up for the features described in this manual (or for your project). If you would like me to send you my code, please contact me. My current version of the program (V12) works on all boards since V8 (on V9 to V11 boards, without the Exten'Son).
However, as it is a standard Nano, it is perfectly possible and easy to create your own program with "Arduino IDE". The digital and analog inputs/outputs are accessible and usable. So have fun!
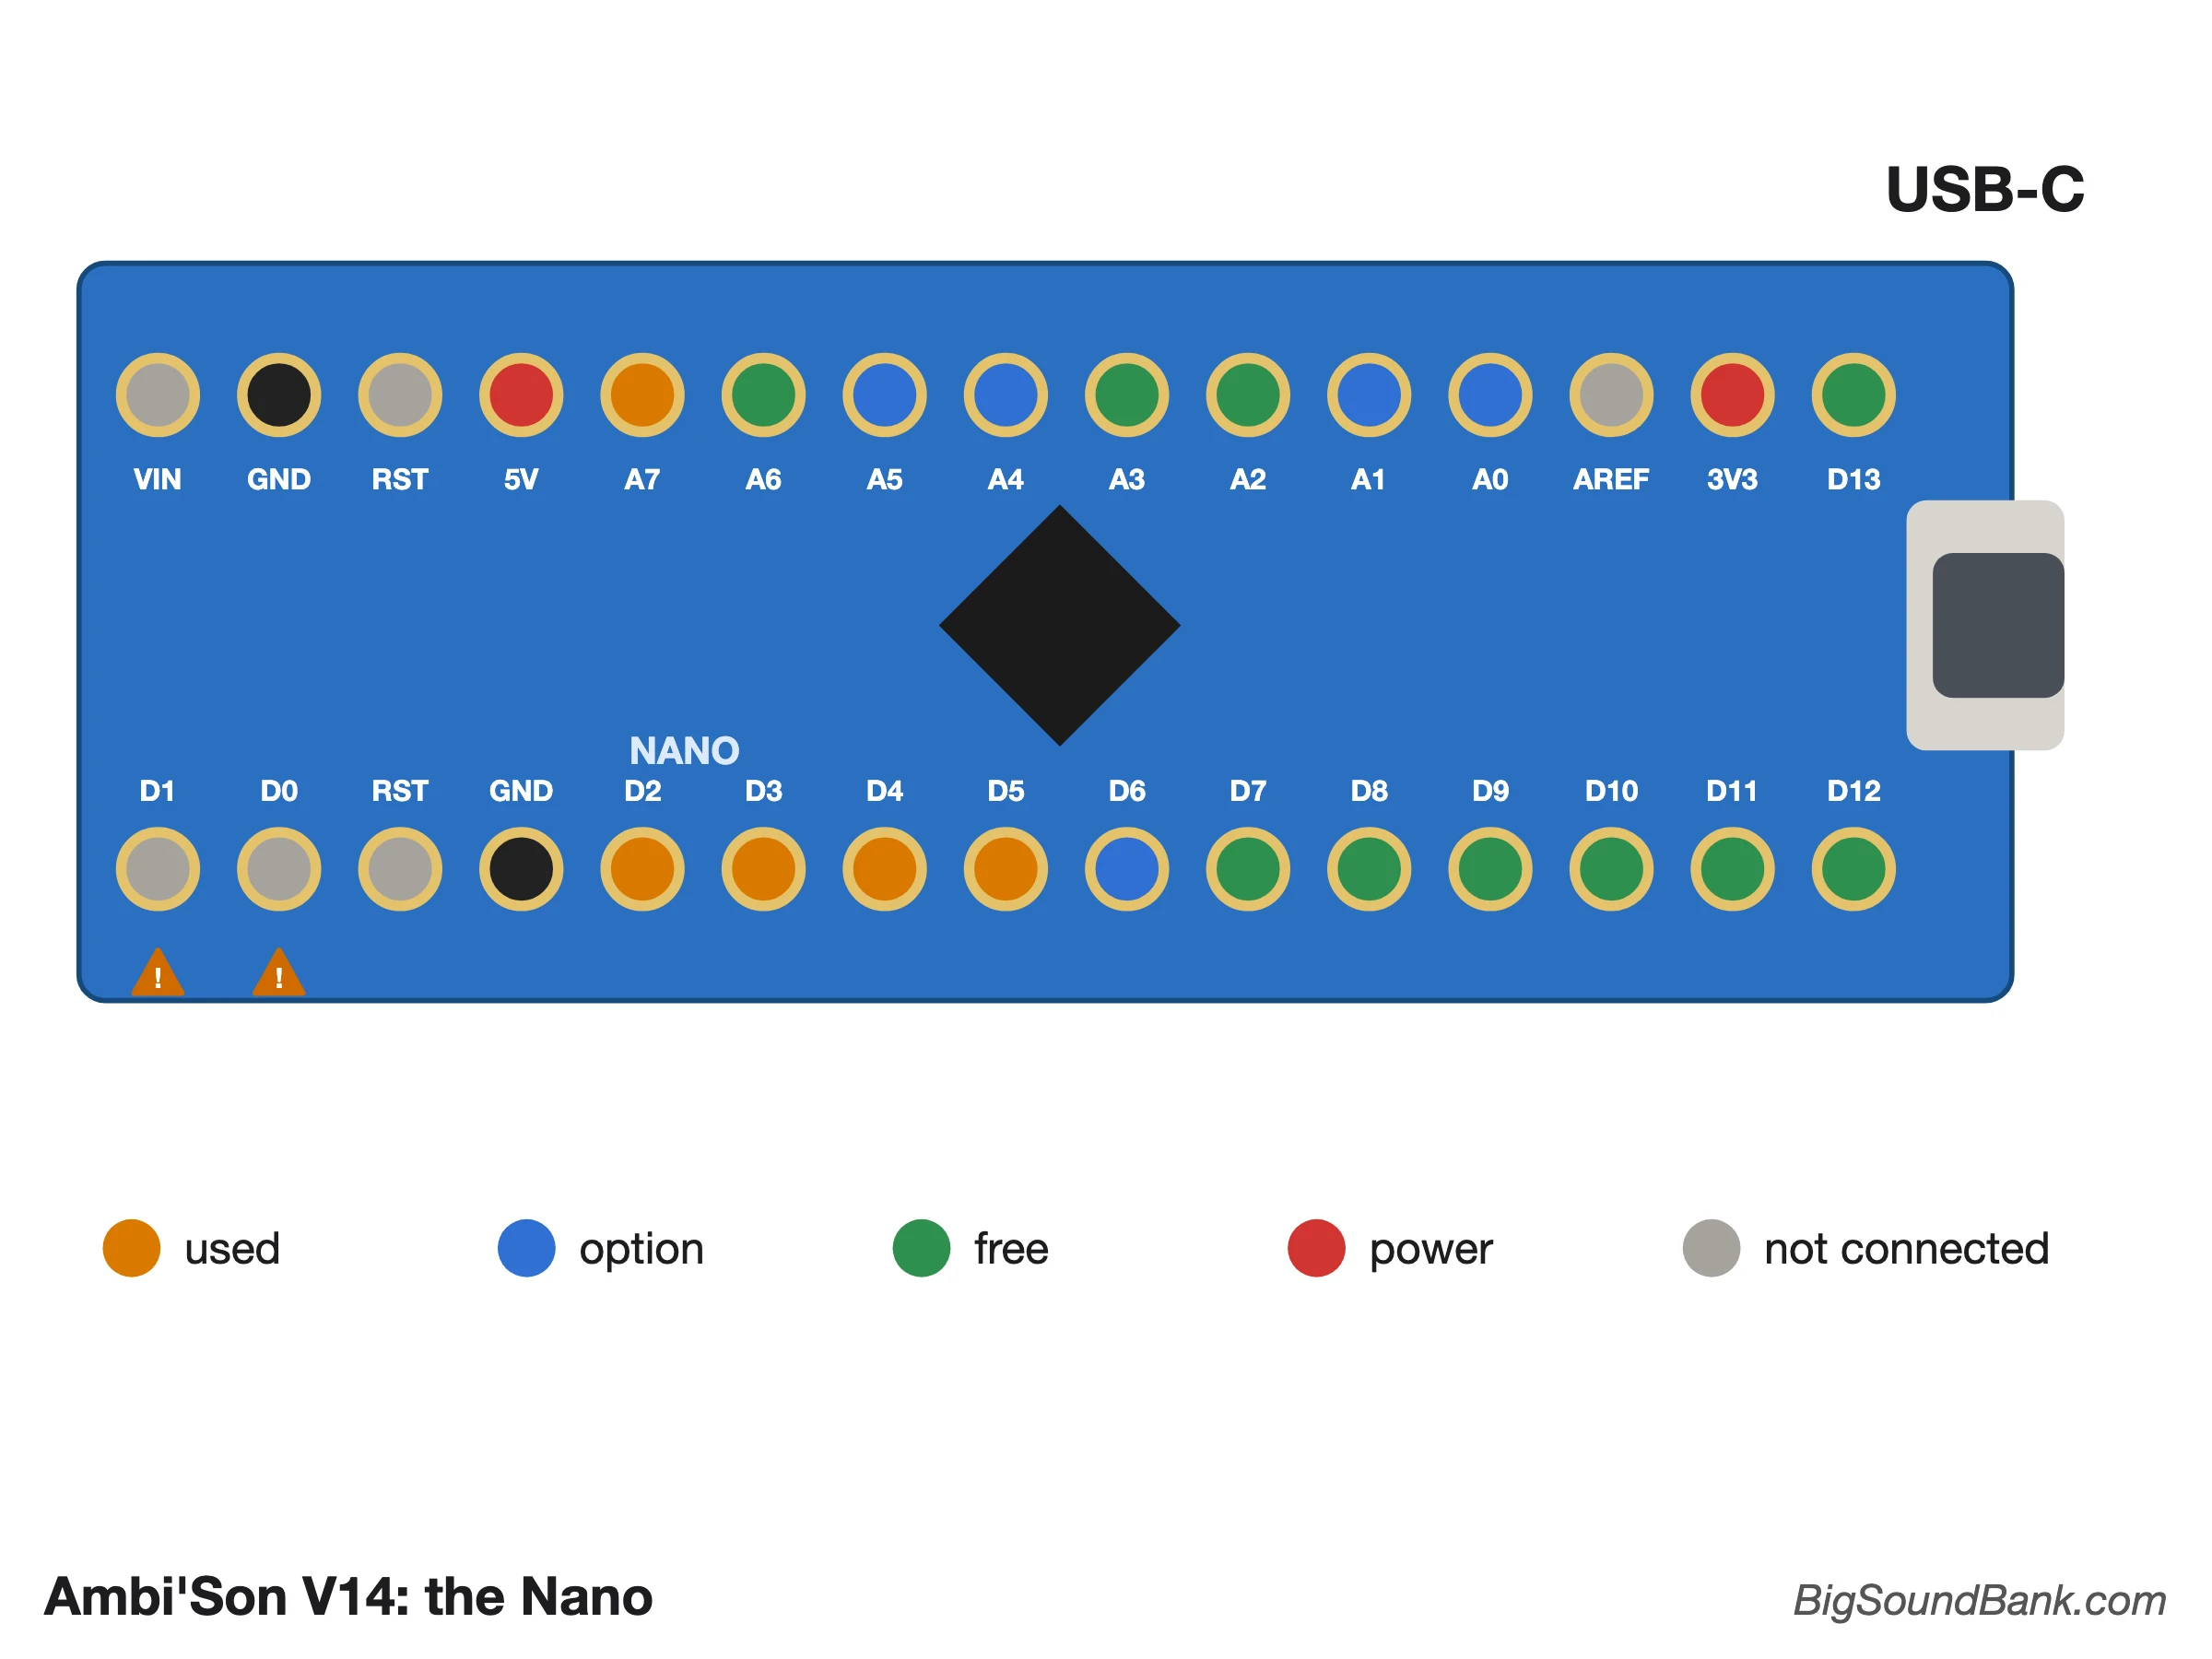
However, my module already uses a few ports:
Ambi'Son V3 to V7
- Volume: A7
- Push button: D2
- Busy: D11
- RX: D12
- TX: D13
Ambi'Son V8
- Volume: A7
- Push button: D5
- Busy: D4
- RX: D2
- TX: D3
Ambi'Son V9 to V11
- AdKey 1: A5 (10k pull-up)
- AdKey 2: A6 (10k pull-up)
- Volume: A7
- RX: D2
- TX: D3
- Busy: D4
- Push button: D5
Ambi'Son V12 and V12bis
- A0: AdKey 1 if option (10k pull-up)
- A1: AdKey 2 if option (10k pull-up)
- A2 & A3: planned for AdKey 3 and 4, since abandoned (not soldered)
- A4 & A5: left free for your "Expan'Son" (I2C: A4 = SDA, A5 = SCL)
- A7: Volume potentiometer
- D2: RX to the DF Player's TX
- D3: TX to the DF Player's RX
- D4: DF Player Busy
- D5: "Play" push button
- D6 to D13: left free
From Ambi'Son V14
- A0: AdKey 1 if option (10k pull-up)
- A1: AdKey 2 if option (10k pull-up)
- A4 & A5: I2C for your "Expan'Son" (A4 = SDA, A5 = SCL, 2.2k pull-up if option), on the 5-pin "I2C Option" connector (5V, INT, SCL, SDA, GND)
- A7: Volume potentiometer
- D2: RX to the DF Player's TX
- D3: TX to the DF Player's RX
- D4: DF Player Busy
- D5: "Play" push button
- D6: Expan'Son INT if option (10k pull-up), otherwise free
- D7 to D13: left free (D13: solder 1 kΩ to 5V to use it as an input)
Indeed, you can add dozens of buttons, a landline telephone keypad, a screen, LEDs, potentiometers, all kinds of sensors (temperature, motion, distance, light...), etc. etc.
And if you are not much good at programming, feel free to ask any generative AI, which is excellent at it.
To learn more about what you can ask the DF Player Mini to do, feel free to visit its wiki.
Have an idea and want to know whether it can be done, and how? Feel free to contact me, free of charge! I will answer personally and quickly!
Fitting out
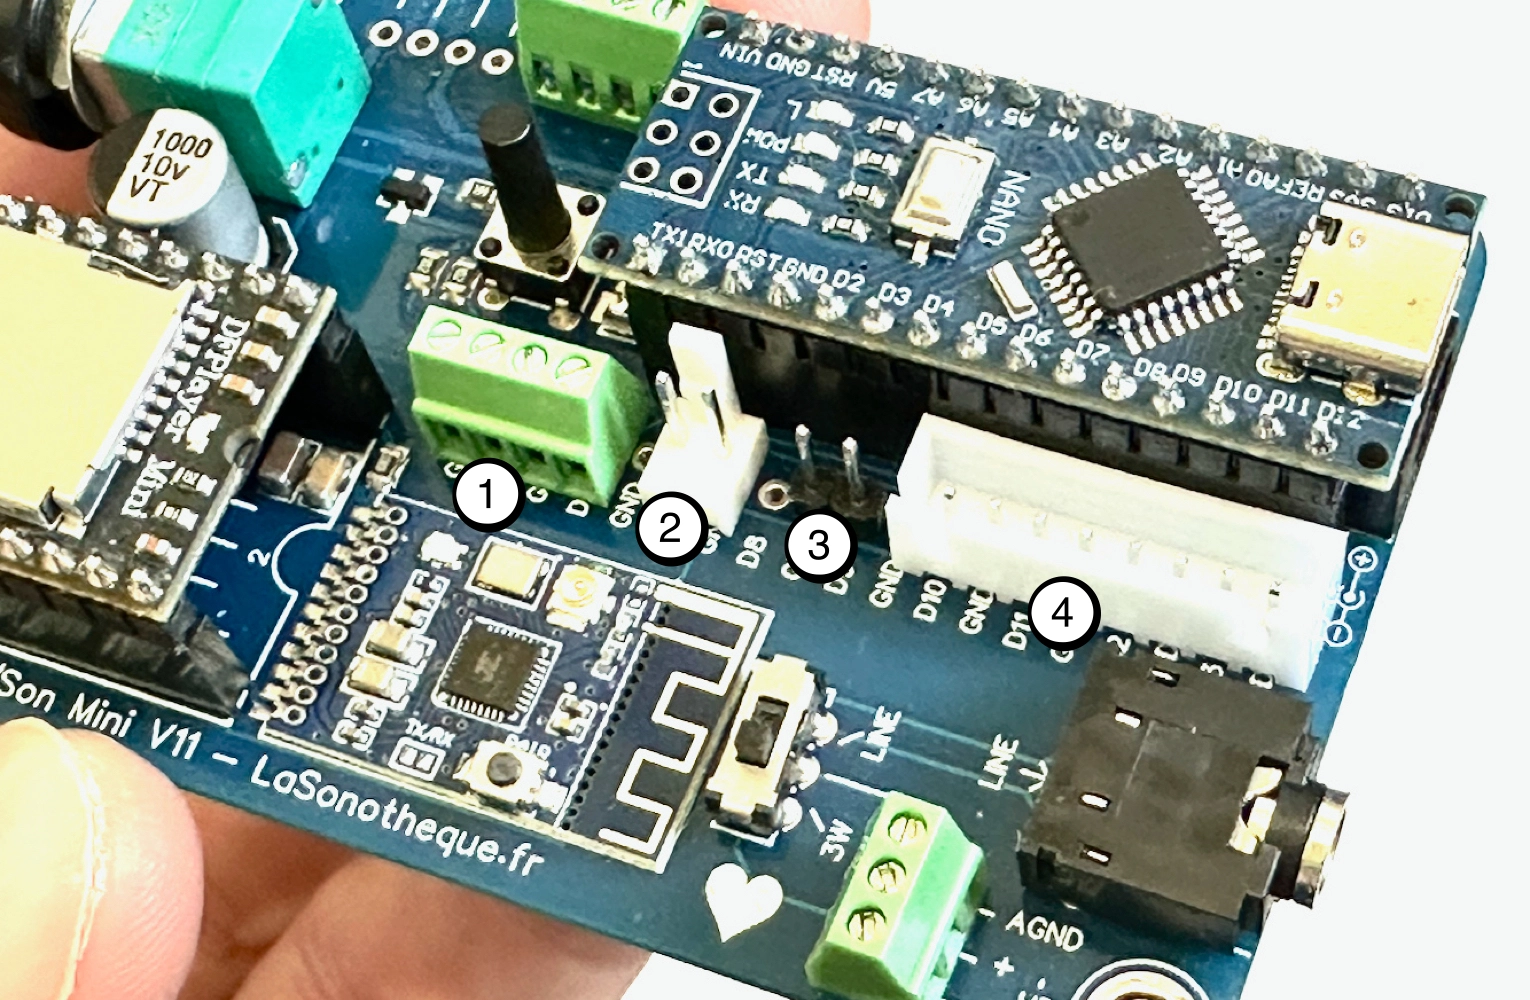
The circuit board is full of holes for fitting things. To make assembly and any later disassembly easier, I recommend using terminals or connectors. Here are the ones I like to use, soldered on top or underneath depending on my project:
- 1: "KF128" screw terminals, for prototyping or simple assembly.
- 2: "KF2510" connectors, self-locking.
- 3: Prototyping pins.
- 4: "XH2.54" connectors, not self-locking.
Once the module is fitted with connectors, here is a list of ideas for equipment to add to your project, so you can bring all your ideas to life:
- Manual triggers: switch, push button, magnetic, touch, matrix keypad, RFID reader, etc.
- Sensors: distance, infrared, presence, light, humidity, temperature, gas, pressure, sound level, colour, CO2, smoke, vibration, tilt, weight, etc.
- Actions: LED, relay, servomotor, buzzer, stepper motor, LCD screen, etc.
Have an idea and want to know whether it can be done, and how? Feel free to contact me, free of charge!
The power network (Vout, 5V, 3.3V, GND)
At the top of the board is a small set of holes 4 dedicated to power, for those who know a bit about electronics. It brings together four points:
- GND: the common ground, to connect to all your accessories.
- Vout: a power output at the voltage of your supply (7-16 V), taken after the fuse, the reverse polarity protection and the switch. With care, you can power other devices with it (a screen, an amp…) from a single supply; but not other Ambi'Son (see just below).
- 5V: a regulated 5 volt output, ideal for cleanly powering 5 V accessories.
- 3.3V: a 3.3 volt output, supplied by the Nano, for small 3.3 V accessories (a few tens of mA only).
If the module is powered through the Nano's USB, the Vout output is not available (nothing arrives before the switch). The 5V and 3.3V outputs remain available.
To power several Ambi'Son from a single supply, use a DC splitter (two to five outputs): each module then gets its power directly on its DC socket 1. Do not connect the Ambi'Son to each other through Vout. Choose a supply powerful enough for all of them: allow 0.5 A per module with a speaker.
Questions, Problems, Solutions & Ideas
The DF Player is a great little player found in many of my creations, including this one, but it has quite a few small flaws, which are easy to work around. So here is an article dedicated to solving all the DF Player Mini's problems.
The most frequent problem is still a badly prepared card (format, folder, names, copy order): if in doubt, go back over the steps to prepare your card.
Versions
Every time I launch a new production run, I make a few changes to the circuit board design. So feel free to contact me with your suggestions for the next versions!
Why do I often talk about "mini"? Because this module also existed in a "maxi" version. That old version had a Raspberry Pi and an XLR output. So its size was... maxi. Since then, I have miniaturised it as much as possible and dropped the "Maxi" size.
- Ambi'Son Maxi, from 2019 to 2022:
- November 2019 - V1: First version of the Maxi module with a Raspberry Pi Zero. Stereo. 1 output on XLR, the other on a terminal.
- December 2019 - V2: A few minor fixes.
- February 2020 - V3: Easy programming added with a row of switches.
- July 2022 - V4: Still Maxi, but with an Arduino Nano. Stereo jack output added.
- Ambi'Son Mini, since 2023:
- October 2023 - V1: First version of the Mini module. Stereo.
- February 2024 - V2: A few minor fixes.
- October 2024 - V3: One of the most stable versions. Stereo "Line" output. 7-12V DC input added. Reverse polarity protection added. Push button added to control 3 playback modes. Analog volume replaced by a more precise digital volume.
- January 2025 - V4: Output resistors added on the jack, to protect against short circuits. A few minor fixes.
- April 2025 - V5: Board redesigned. A few minor fixes. Its V5.2 sub-version adds a 5V buck converter to power accessories and a switch to select "Line" or "Speaker".
- April 2025 - V6: Optional Bluetooth audio output added (could be improved, fixed in V7). A few minor fixes.
- October 2025 - V7: Bluetooth audio output option finalised. USB-A socket added to load sounds from a USB stick. A few minor fixes.
- October 2025 - V8: I/O changes for TX, RX and Busy between the DF Player and the Nano. Push button moved to D5 and protected. A few minor fixes.
- December 2025 - V9: AdKey 1 and 2 connectors added, as on the "Exposi'Son" modules. A few minor fixes.
- January 2026 - V10: Jack in line only. Using the jack cuts the Bluetooth. Jack resistors removed. A few minor fixes.
- March 2026 - V11: Simplifications and minor fixes.
- September 2026 - V12: Third and fourth AdKey added to allow up to 40 buttons on 4 analog inputs (since abandoned in favour of the Expan'Son: 2 Exten'Son at most). Stronger input protection.
- September 2026 - V12bis: Accepts 7 to 16V power. DF Player moved to add a fourth mounting hole, to make it easier to fit the new wooden protection kit. Why "V12bis"? To avoid having a version 13, as a joke and for the superstitious.
- October 2026 - V14: 5-pin connector added to connect Expan'Son over I2C (up to 128 buttons). Back to 2 AdKey inputs. Many components moved.
Conclusion
Using this module is really simple but, at the risk of repeating myself: feel free to contact me if you have any questions or suggestions about it!